RewardsX

Turn Engagement into Rewards


RewardsX
Is a player engagement platform where users earn Bits—a virtual currency—by completing simple, opt-in rewarding tasks. Players can redeem Bits for in-game rewards, making their experience more interactive and engaging.
For server owners, RewardsX generates real revenue when players spend Bits on rewards inside your server, creating a sustainable and scalable monetization system without affecting core gameplay.
## Key Features
– Opt-in rewarding tasks for players
– In-game currency system (*Bits*)
– Customizable reward system for your server
– Real revenue generation for server owners
– Seamless integration with existing gameplay
### **Ask help here:**
👉 **Support Center**
### **Add your server today:**
🚀 **Get Started**


Any data that passes through the RewardsX plugin may be collected on our remote servers.
We do not sell your data.
See more https://rewardsx.net/privacy-policy
ResourcePackNoUpload

# ResourcePackNoUpload Plugin
A Minecraft server tool that allows server administrators to manage and distribute resource packs efficiently without
requiring external hosting.
## Getting Started
The RNU will generate the configuration templates if they do not
exist, but will not work without additional changes.
Two things are important: defining the port for the resource pack provider, and the loader to load the resource pack.
### Defining port
The server config:
– For RNU plugin: `plugins/ResourcePackNoUpload/server.yml`
– For RNU mod: `config/resourcepacknoupload/server.yml`
“`yaml
# This server port needs to be open to the players
port: 25008 # Chose an open server port for the players.
# Provide the root address that will be sent to players, usually
# `http://` + server’s public IP + `:` + port defined above.
# Example:
# publicLinkRoot: “http://192.0.2.1:25008”
#
# For the most common cases, this field does not need to be set, but for Pterodactyl-based
# servers this field is mandatory.
publicLinkRoot:
# The approach of sending the resource pack for the players.
sender:
type: # Here is your sender type.
# Additional sender fields, each type has their own fields.
# See the end of this document for more information.
“`
### Creating resource pack loader
The plugin config (reloadable with `/rnu reload`):
– For RNU plugin: `plugins/ResourcePackNoUpload/config.yml`
– For RNU mod: `config/resourcepacknoupload/config.yml`
“`yaml
# The texture pack loader, called every time that the resource pack is loaded by the RNU.
loader:
type: # Here is your loader type.
# Additional loader fields, each type has their own fields.
“`
**Available types:**
ReadFolder simple loading from folder
Uses an existing folder of any provided path.
“`yaml
type: ReadFolder
# Relative to the server root folder.
# Is inside `Cool Folder` (for this example) the resource pack files should be.
# Cool Folder/pack.mcmeta
# Cool Folder/assets/minecraft…
folder: “rnu resource pack/Cool Folder/”
“`
ReadZip simple loading from zipped resource pack
Uses an existing .zip of any provided path.
“`yaml
type: ReadZip
# Relative to the server root folder.
# Is inside `Cool Resource Pack.zip` (for this example) the resource pack files should be.
# Cool Resource Pack.zip/pack.mcmeta
# Cool Resource Pack.zip/assets/minecraft…
zip: “rnu resource pack/Cool Resource Pack.zip”
“`
Download downloads from web, with http headers
Downloads the resource pack from a link.
At first, it would be somewhat against the RNU purpose, but this loader also
supports http headers for the download request, allowing you to download the
resource, pack with private keys, which is not supported directly by the minecraft client.
“`yaml
type: Download
# Optional field, this will cache the download, making sure the download is not
# done again as long as this cache file can be found in the tempFolder.
cacheName: drive_private_pack # Arbitrary name, will be used to save the file.
# The link for the download.
url: https://www.googleapis.com/drive/v3/files/FILE_ID?alt=media
# Optional field, this is a list of headers, with their keys and values, Here we
# are calling the Google API, and passing a required token to download the file.
headers:
– key: “Authorization”
value: “Bearer drive_api3213xih32i9DASKxE83hd9203f1930c0ll-d1v3-t0k3n2389”
“`
WithMovedFiles modify the files from another loader
Move loader provided resource pack files from a directory, to another.
“`yaml
type: WithMovedFiles
# The folder contents to be moved. Supports unknown paths, for they use `?`.
# For this example, the download (see more loader information below) result for
# the loader link would be something like:
# `Robsutar-super-cool-pack78HN3278gj32d/assets/minecraft…`
# We will use this first folder as origin, ignoring their name.
folder: “?/”
# The folder destination, here we are using the resource pack root.
destination: “”
# This can be any loader, For this loader example we are using a release in GitHub,
# with Fine-grained personal access token, with reading permissions. Depending on
# the release, the content of the resource pack can be inside another download file,
# we use WithMovedFiles to adjust this.
loader:
type: Download
url: https://api.github.com/repos/Robsutar/super-cool-pack/zipball
headers:
– key: “Authorization”
value: “Bearer github_pat_uS78ih32i9DASKxE83hd9203f1930c0ll-g1t-t0k3n2389”
– key: “Accept”
value: “application/vnd.github.v3+json”
“`
WithDeletedFiles modify the files from another loader
Ignore the files of the loader if they match with a provided path.
“`yaml
type: WithDeletedFiles
# The path to ignored, supports glob file matching. In this example, we delete all
# files that ends with `.md`.
toDelete: “**.md”
# To ignore all the files of a directory:
# toDelete: “assets/all_inside_me_will_be_deleted/**/*”
# To ignore a file a file:
# toDelete: “assets/minecraft/i_will_be_deleted.txt”
# This can be any loader, For this loader example we are using simple ReadFolder loader.
loader:
type: ReadFolder
folder: “rnu resource pack/Cool Folder/”
“`
Merged loads and merges resource packs from a list of loaders
Combines multiple loaders, prioritizing the first ones in the list.
“`yaml
type: Merged
# Optional field, this is a list of paths to merge json files list entries, particularly
# useful to merge custom model data automatically.
mergedJsonLists:
– files: “assets/minecraft/models/item/**.json”
# The numeric field used to order the json entries, in the case of custom model data,
# entries must necessarily be ordered.
orderBy: “predicate.custom_model_data”
# This is a list, for each entry you need to specify the values of the desired loader.
# See their how to configure each type in the examples above.
# For overriding cases, loaders on the top of the list have major priority, this is,
# their files will replace the other files.
loaders:
– type: ReadFolder
folder: “rnu resource pack/Cool Folder/”
– type: ReadZip
zip: “plugins/ModelEngine/resource pack.zip”
“`
## Auto reloading
It is possible to make the RNU (**only the plugin**) reload automatically on event call.
How to configure it
The auto reloading config: `plugins/ResourcePackNoUpload/autoReloading.yml`
“`yaml
invokers:
# The event class, this is very specific to each case.
# Here we will use a ModelEngine event.
– eventClass: “com.ticxo.modelengine.api.events.ModelRegistrationEvent”
# The delay in ticks after the event being called.
delay: 10 # Default is 1.
# The cooldown before this event can call the reload again.
# Here we add a cooldown because in the case of ModelEngine, the
# `ModelRegistrationEvent` event is called a few times in `/meg reload`, this
# cooldown will make the reload be executed only once.
repeatCooldown: 10 # Default is 0.
“`
## Different sender
By default, the `Delayed` sender is used, and it works for most cases.
Using the injector on the PaperMC server
NOTE: Experimental feature
The server config: `plugins/ResourcePackNoUpload/server.yml`
“`yaml
sender:
# This sender will override in runtime the server resource pack properties,
# leaving the pack sending handling for the PaperMC.
type: PaperPropertyInjector
“`
No automatic url sending, and fixed link server
The server config: `plugins/ResourcePackNoUpload/server.yml`
“`yaml
sender:
# This sender will not send the resource pack url to the players automatically,
# and will have a fixed link.
# Useful if you want to send the resource pack through the vanilla behavior,
# setting the resource-pack server.properties to this link for example.
type: NoSenderFixedLink
# With the “pack” route, the link would be something like: “http://192.0.2.1:25008/pack.zip”
# But with the ip and port defined in the config `publicLinkRoot`
route: “pack”
“`
## Additional Configurations
There are other settings inside config.yml, such as messages and RNU behavior, refer to the automatically generated
config.yml.
ResourcePack Disabler
# Resource Pack Disabler
Lets you prevent backend resource packs from being sent to players of certain Minecraft versions, globally or per Velocity server. Useful if your resource packs (e.g. from itemsadder, oraxen, or nexo) aren’t compatible with newer Minecraft versions yet.
**Important**: Make sure your Velocity is up to date and supports the new Minecraft version itself.
Supports all Minecraft versions Velocity supports (1.7.2-latest).
“`yaml
# Example values. Allows exact versions, ranges, and comparison operators: > / < / >= / <=
global:
- 26.1
servers:
lobby:
- 1.9-1.12.2
modern:
- '>=1.21′
“`
resource-pack-loader
# Resource Pack Loader
A simple solution to handle resource packs on paper and velocity.
### Source Code
github.com/FlauschigesAlex
### Supported platforms & versions
– Paper Versions: 1.21.10 – 1.21.11
– Velocity Versions: 3.4.0 – 3.5.0
Although resource-pack-loader may work on other platforms or versions, I do not guarantee for their stability or functionality.
## Setup & Configuration
After initially loading the plugin on your server, you’ll need to modify the configuration file in order to enable pack-loading.
Example configuration (with default values):
“`json
{
“useCommand”: true,
“required”: false,
“replace”: false,
“prompt”: null, // “This server recommends a resource pack.”
“packs”: [
{
“_id”: “00000000-0000-0000-0000-000000000000”,
“url”: “https://example.com/resource.zip”
}
]
}
“`
“packs“ The list of resource packs to load.
– “_id“ The unique identifier for the resource pack.
– “url“ The URL that points to the resource pack.
“prompt“ The prompt to display when the player is sent a resource pack. (MiniMessage Formatting)
“replace“ Set whether to replace the player’s server resource packs with the provided ones.
“required“ Sets the resource-packs to be required to play on the server. Disconnects the player if they reject the packs. (see Resource Pack Requirements)
“useCommand“ Enables the “/resource-pack-loader“ command. (see [Commands](#commands))
After initially setting up the configuration, you won’t need to modify it to update your pack(s), just the resource the url(s) point to.
## Commands
### /resource-pack-loader
Requires config entry “useCommand“ to be “true“.
Requires player permission “rpl.admin“.
“/resource-pack-loader reload “ Reloads all resource packs for the provided player.
“/resource-pack-loader reload“ Reloads all resource packs for all online players.
Aliases:
– “/rpl“
– “/resource-pack-loader-paper“, “/rpl-paper“ (Conditional) Provided if the plugin is installed on Paper.
– “/resource-pack-loader-velocity“, “/rpl-velocity“ (Conditional) Provided if the plugin is installed on Velocity.
Report System
# 🛡️ Report System for Velocity
A powerful, high-performance reporting solution for Velocity proxy servers, seamlessly integrated with **Discord** and **MariaDB**. This plugin bridges the gap between your Minecraft server and staff team by creating dedicated Discord channels for every report.
—
## 🚀 Key Features
* **Discord Integration:** Automatically creates a unique text channel for every new report.
* **Web Transcripts:** Generate and host professional chat transcripts (including media/images) when a report is closed.
* **Advanced Rate Limiting:** Prevent spam with a “Greedy Token” system.
* **Fully Customizable:** Every message, sound, and permission node can be edited in the `config.yml`.
* **Staff Protection:** Optional settings to prevent players from reporting administrators.
* **Cross-Server Sync:** As a Velocity plugin, it handles reports across your entire network.
—
## 🛠️ Installation & Requirements
### Pre-requisites
1. **MariaDB Database:** Required for persistent data storage.
2. **Discord Bot:** A registered application on the Discord Developer Portal.
3. **Discord Server**
### Setup Guide
1. **Bot Setup:** Create a bot on the Discord portal, reset the token, and copy both the **Token** and **Application ID**.
2. **Discord Layout:** Create a category where the bot will spawn report channels and a specific channel for the **Audit Log**.
3. **Initial Run:** Place the plugin in your Velocity `plugins` folder and start the server to generate the default configuration.
4. **Configuration:** * Input your MariaDB credentials.
* Fill in the `discord-bot` section (Token, Guild ID, Category ID, etc.).
5. **Restart:** Restart the proxy to initialize the bot and database connection.
—
## 📝 Transcripts Setup
To enable web-based transcripts for closed reports:
1. Generate an API key at space.xap3y.eu.
2. In `config.yml`, set `discord-bot.transcripts.enabled` to `true`.
3. Paste your key into `key` and `media-save-api-key`.
4. *(Optional)* Enable `save-media` to archive images/videos sent in the Discord report channel.
Preview

—
## ⌨️ Commands & Permissions
### Player Commands
| Command | Description | Permission |
| :— | :— | :— |
| `/report ` | Submit a new report | *Default (or reports.report)* |
| `/reports` | Open the report management list | `None` |
| `/reports view-open` | View your own open reports | `None` |
### Staff & Admin Commands
| Command | Description | Permission |
| :— | :— | :— |
| `/reports reload` | Reload config and language files | `reports.reload` |
| `/reports info ` | View detailed report data | `reports.info` |
| `/reports close ` | Close an active report | `reports.close` |
| `/reports delete ` | Remove report from database | `reports.delete` |
| `/reports admin view-open` | View all open reports on the network | `reports.admin.view` |
| `/reports admin view-closed` | View all closed reports on the network | `reports.admin.view` |
| `/reports admin view-player sent
[status]` | View reports a specific player has sent | `reports.admin.view` |
| `/reports admin view-player received
[status]` | View reports filed against a specific player | `reports.admin.view` |
| `/reports admin ban-session
` | Block a player from using `/report` | `reports.admin.ban` |
| `/reports admin unban-session
` | Restore a player’s ability to report | `reports.admin.ban` |
—
### Feature request
Create an issue using the issue tracker link and briefly describe what would you like to add
—
⚙️ Configuration Preview
“`yaml
prefix: “&7[&cReports&7] &r”
require-permission: false # Permission: reports.report
notify-sound: “entity.experience_orb.pickup”
notify-sound-source: “MASTER”
notify-on-join: true
notify-delay-seconds: 5
announce-solved: false # Reply to reporter when their report is closed
max-open-reports: 10 # Max open reports per player, set to 0 for unlimited
reports-per-page: 5 # Number of reports to show per page in the /reports
protect-staff: true # Prevent players from reporting staff members
protect-permission: “reports.protect” # Permission to bypass staff protection
close-comment-required: false # Require a comment when closing a report
min-close-comment-length: 10 # Minimum length for close comment
# Rate limit /report command?
rate-limit: # refillGreedy
enabled: true
time-seconds: 180 # Time to refill in seconds
tokens: 5 # Max reports allowed in the time above
refill-tokens: 5 # Number of tokens to refill after each time
can-bypass: true
bypass-permission: “reports.bypassratelimit”
discord-bot:
log-startup: true # Log startup to discord audit log channel
token: “EXAMPLE_TOKEN”
channel-id: 1111111111111111111 # Audit log channel
app-id: 1111111111111111111 # Discord app ID
guild-id: 1111111111111111111 # Discord server ID
category-id: 1111111111111111111 # Category for report channels
activity: “ReportSystem v{version}” # Discord presence
channel-template: “report-{reporter}” # Channel name template. Vars: {reporter}, {target}, {id}
channel-message: “|| <@&ROLE_ID> ||” # Message to be sent in the report channel
suppress_notifications: false # Send with @silent
transcripts:
enabled: false
url: “https://call.xap3y.eu/v1/discord/transcript/upload”
url-get: “https://space.xap3y.eu/mc/report/”
key: “example_key” # Generate here: https://space.xap3y.eu/mc/report/get-key
media-save-api-key: “example_key” # Same key as above
file-save: false # Save a local copy of the transcript file
save-media: false # Save media files (images,videos,gifs)
media-save-api: “https://call.xap3y.eu/v1/image/upload/url”
user-agent: “ReportSystem/1.0”
media-timeout: 5 # http timeout in seconds for media upload
res-json-template: “/message/urlSet/rawUrl” # Json template to extract url from space api, dont change
“`
Remote velocity whitelist
# Velocity Whitelist Worker
A simple remote whitelist plugin for Velocity proxy servers.
## What it does
This plugin fetches a whitelist from a remote URL and controls which players can join your Velocity proxy. The whitelist is stored in a JSON file that you host somewhere (like a CDN or web server), so you can update it without restarting the server.
## Features
– Fetches whitelist from a remote URL
– Username-based whitelisting
– Multiple list support (admin, vip, members, etc.)
– Special modes: allow everyone or deny everyone
– Auto-reload from URL every few seconds
– Kicks players when removed from whitelist
– Customizable messages
## Installation
1. Download the JAR file
2. Place it in your Velocity `plugins/` folder
3. Start the server (it will create example config files)
4. Stop the server
5. Edit `plugins/velocity-whitelist-worker/config.json` and set your URL
6. Create your whitelist JSON file at that URL
7. Start the server again
## Configuration
### Local config file: `config.json`
“`json
{
“url”: “https://your-domain.com/whitelist.json”,
“reloadIntervalSeconds”: 10
}
“`
– `url` – Where to fetch the whitelist from (required)
– `reloadIntervalSeconds` – How often to check for updates (default: 10)
### Remote whitelist file
This is the JSON file at your configured URL:
“`json
{
“customLists”: [“admin”, “vip”],
“admin”: [
“Player1”,
“Player2”
],
“vip”: [
“Player3”,
“Player4”
]
}
“`
– `customLists` – Which lists to use (if empty or missing, everyone is allowed)
– Add your own list names with player usernames
### Special modes
Set `customLists` to special values:
– `[“all”]` – Allow everyone
– `[“none”]` – Deny everyone (maintenance mode)
– `[]` or missing – Allow everyone (default)
### Messages file: `messages.json`
Customize the messages players see:
“`json
{
“deniedMessage”: “Sorry, You don’t fit the Vibe(SMP)…”,
“kickedMessage”: “You no longer fit the Vibe(SMP)…”,
“maintenanceMessage”: “Don’t worry, we’ll be right back, just some maintenance”
}
“`
## How it works
1. Plugin loads and reads your local config
2. Fetches the whitelist from your URL
3. Checks which mode/lists are active
4. Allows or denies players based on the whitelist
5. Automatically reloads every X seconds
6. Kicks players if they’re removed from the whitelist
## Examples
**Allow only admins:**
“`json
{
“customLists”: [“admin”],
“admin”: [“Admin1”, “Admin2”]
}
“`
**Allow multiple groups:**
“`json
{
“customLists”: [“admin”, “member”],
“admin”: [“Admin1”],
“member”: [“Player1”, “Player2”, “Player3”]
}
“`
**Maintenance mode:**
“`json
{
“customLists”: [“none”]
}
“`
**Allow everyone:**
“`json
{
“customLists”: [“all”]
}
“`
Or just leave it empty:
“`json
{}
“`
## Requirements
– Velocity 3.4.0 or higher
– Java 21 or higher
– A web server to host your whitelist JSON file
RelishAuth
# RelishAuth
**Advanced Authentication System for Velocity Proxy Servers 🔐**

*Secure your Velocity network with advanced authentication, Discord integration, and premium account support*
## 🌟 Features
### 🔐 **Multi-Method Authentication**
– **Password Authentication**: Traditional secure password system with Argon2 hashing
– **Discord Integration**: Link Discord accounts for seamless authentication
– **Premium Auto-Login**: Automatic authentication for premium Minecraft accounts
– **Hybrid Mode**: Combine password + Discord for maximum security
### 🛡️ **Advanced Security**
– **Session Management**: Configurable session durations (0-1 hour)
– **IP Validation**: Optional IP-based session validation
– **Rate Limiting**: Protection against brute force attacks
– **Premium Verification**: Real-time Mojang API validation
– **Bedrock Support**: Compatible with Floodgate for cross-platform play
### 🤖 **Discord Bot Integration**
– **Real-time Verification**: Instant Discord DM verification
– **Join Notifications**: Security alerts when someone joins with your account
– **Account Management**: Change passwords, manage sessions via Discord
– **Admin Commands**: Full server management through Discord slash commands
– **Rich Embeds**: Beautiful, informative Discord messages
### 🌐 **Multi-Language Support**
– **English** and **Arabic** language packs included
– **Customizable Messages**: Full message customization support
### 💾 **Flexible Database Support**
– **SQLite**: Zero-configuration local database (default)
– **MySQL/MariaDB**: Network database support for multi-server setups
– **PostgreSQL**: Enterprise-grade database with advanced features
– **Connection Pooling**: High-performance HikariCP integration
—
## 📸 Screenshots
### Discord Integration

*Seamless Discord verification with interactive buttons*
### Admin Dashboard

*Powerful admin tools accessible through Discord slash commands*
### Security Notifications

*Real-time security notifications keep your account safe*
### Optimized Limbo world

—
## 🚀 Installation
### Prerequisites
– **Velocity Proxy** 3.4.0 or higher
– **Java** 21 or higher
– **LimboAPI** plugin (required dependency)
– **Discord Bot** (optional, for Discord features)
### Step 1: Download and Install
1. Download plugin JAR file
2. Place the JAR file in your Velocity `plugins/` folder
3. Install LimboAPI Place it in the same folder
4. Restart your Velocity proxy
### Step 2: Initial Configuration
1. Navigate to `plugins/relishauth/`
2. Edit `config.yml` to configure your authentication method
3. Set up your database connection
4. Configure Discord bot (optional but recommended)
### Step 3: Discord Bot Setup (Optional)
1. Create a Discord application at Discord Developer Portal
2. Create a bot and copy the token
3. Add the token to your `config.yml`
4. Invite the bot to your Discord server with appropriate permissions
—
## ⚙️ Configuration
### Basic Configuration
“`yaml
# Choose your authentication method
authentication:
method: “password” # Options: password, discord
premium-auto-login: true
allow-bedrock-players: true
# Session management
session:
duration: “5m” # Options: 0, 1m, 5m, 15m, 30m, 1h
allow-different-locations: true
# Database setup
database:
type: “sqlite” # Options: sqlite, mysql, mariadb, postgresql
sqlite:
path: “data.db”
“`
### Authentication Methods
#### 🔑 Password Authentication
Perfect for traditional servers wanting secure password-based auth:
“`yaml
authentication:
method: “password”
password:
min-length: 6
max-length: 32
hashing: “argon2” # Secure password hashing
“`
**How it works:**
1. New players create a password when first joining
2. Returning players enter their password to authenticate
3. Sessions are saved based on configured duration
4. Optional Discord linking for additional features

#### 💬 Discord Authentication
Ideal for Discord-centric communities:
“`yaml
authentication:
method: “discord”
discord:
bot-token: “YOUR_BOT_TOKEN”
server-id: “YOUR_DISCORD_SERVER_ID”
“`
**How it works:**
1. Players enter their Discord username in-game
2. Bot sends verification DM with interactive buttons
3. Players click “Verify” to authenticate
4. Account is permanently linked to Discord


#### 🏆 Premium Auto-Login
Streamlined experience for premium players:
“`yaml
authentication:
premium-auto-login: true
allow-premium-username-impersonation: false # Security: prevent impersonation
“`
**How it works:**
1. Premium accounts are automatically verified via Mojang API
2. No password or Discord verification required
3. Instant server access for legitimate premium players
4. Cracked clients cannot impersonate premium accounts

### Security Configuration
“`yaml
security:
authentication-timeout: 300 # 5 minutes to authenticate
password-attempts:
max-attempts: 3
lock-duration: 15 # Minutes
premium:
verification-timeout: 5
api-url: “https://api.mojang.com/users/profiles/minecraft/”
“`
### Limbo World Customization
“`yaml
customization:
limbo:
dimension: “THE_END” # OVERWORLD, NETHER, THE_END
gamemode: “SPECTATOR”
spawn:
x: 0
y: 64
z: 0
block-movement: true
“`
## 🎮 Commands
### Player Commands
| Command | Description | Usage |
|———|————-|——-|
| `/ra password ` | Set/change password | `/ra password mypass123 mypass123` |
| `/ra discord ` | Link Discord account | `/ra discord john_doe` |
| `/ra logout` | Clear all sessions | `/ra logout` |
| `/ra session [duration]` | Set session duration | `/ra session 30m` |
| `/ra notify ` | Toggle join notifications | `/ra notify on` |
| `/ra unlink` | Unlink Discord account | `/ra unlink` |
| `/ra info` | View account information | `/ra info` |
### Admin Commands
| Command | Description | Usage |
|———|————-|——-|
| `/ra reload` | Reload configuration | `/ra reload` |
| `/ra info ` | View player information | `/ra info PlayerName` |
| `/ra unlink ` | Unlink player’s Discord | `/ra unlink PlayerName` |
| `/ra block ` | Block username from IP | `/ra block Griefer 192.168.1.1` |
| `/ra unblock ` | Unblock username from IP | `/ra unblock Griefer 192.168.1.1` |
| `/ra clearblocks ` | Clear all stored blocks for username | `/ra clearblocks Griefer` |
| `/ra setpassword ` | Admin set a player’s password | `/ra setpassword PlayerName NewPass NewPass` |
| `/ra resetpassword [length]` | Admin reset password (temp password) | `/ra resetpassword PlayerName 16` |
—
## 🤖 Discord Bot Integration
### Setup Process
1. **Create Discord Application**
– Go to Discord Developer Portal
– Click “New Application” and give it a name
– Navigate to “Bot” section and create a bot
2. **Configure Bot Permissions**
Required permissions:
– Send Messages
– Use Slash Commands
– Manage Roles (for linked role)
– Read Message History
3. **Invite Bot to Server**
“`
https://discord.com/api/oauth2/authorize?client_id=YOUR_BOT_ID&permissions=268435456&scope=bot%20applications.commands
“`
4. **Configure in RelishAuth**
“`yaml
discord:
bot-token: “YOUR_BOT_TOKEN”
server-id: “YOUR_DISCORD_SERVER_ID”
linked-role-id: “ROLE_ID_FOR_LINKED_USERS”
“`
### Discord Slash Commands
| Command | Description | Permission |
|———|————-|————|
| `/link` | Instructions for linking account | Everyone |
| `/session [duration]` | Set session duration | Linked users |
| `/notifications [toggle]` | Toggle join notifications | Linked users |
| `/info [player]` | View account information | Admin |
| `/kick ` | Kick player from server | Admin |
| `/unlink ` | Unlink player’s account | Admin |
| `/block ` | Block username from IP | Admin |
| `/unblock ` | Unblock username from IP | Admin |
| `/clearblocks ` | Clear all stored blocks for username | Admin |
| `/setpassword ` | Admin set a player’s password | Admin |
| `/resetpassword [length]` | Admin reset password (temp password) | Admin |
| `/reload` | Reload plugin configuration | Admin |
—
## 📞 **Support & Links**


—
ReLimboQ
# ReLimboQ


## What is this?
The server is full, and players are waiting, but it doesn’t have to be frustrating. With the ReLimboQ plugin, powered by LimboAPI, players can wait seamlessly without ever feeling disconnected.
This plugin does one thing and does it well: it queues players efficiently. When your server reaches its capacity, players are placed in a queue and temporarily moved to a lightweight, minimal environment.
## Features
– [x] Exaroton hosting integration
## Important
ReLimboQ is a fork of discontinued LimboQueue.
Licensed under GNU GPL3 or higher.
## Commands and permissions
### Admin
– ***relimboq.reload* | /rlq reload** – Reload Plugin Command
## Requirements
- Velocity 3.3.0-SNAPSHOT
- LimboAPI 1.1.25
- Java 17+
ReferralX
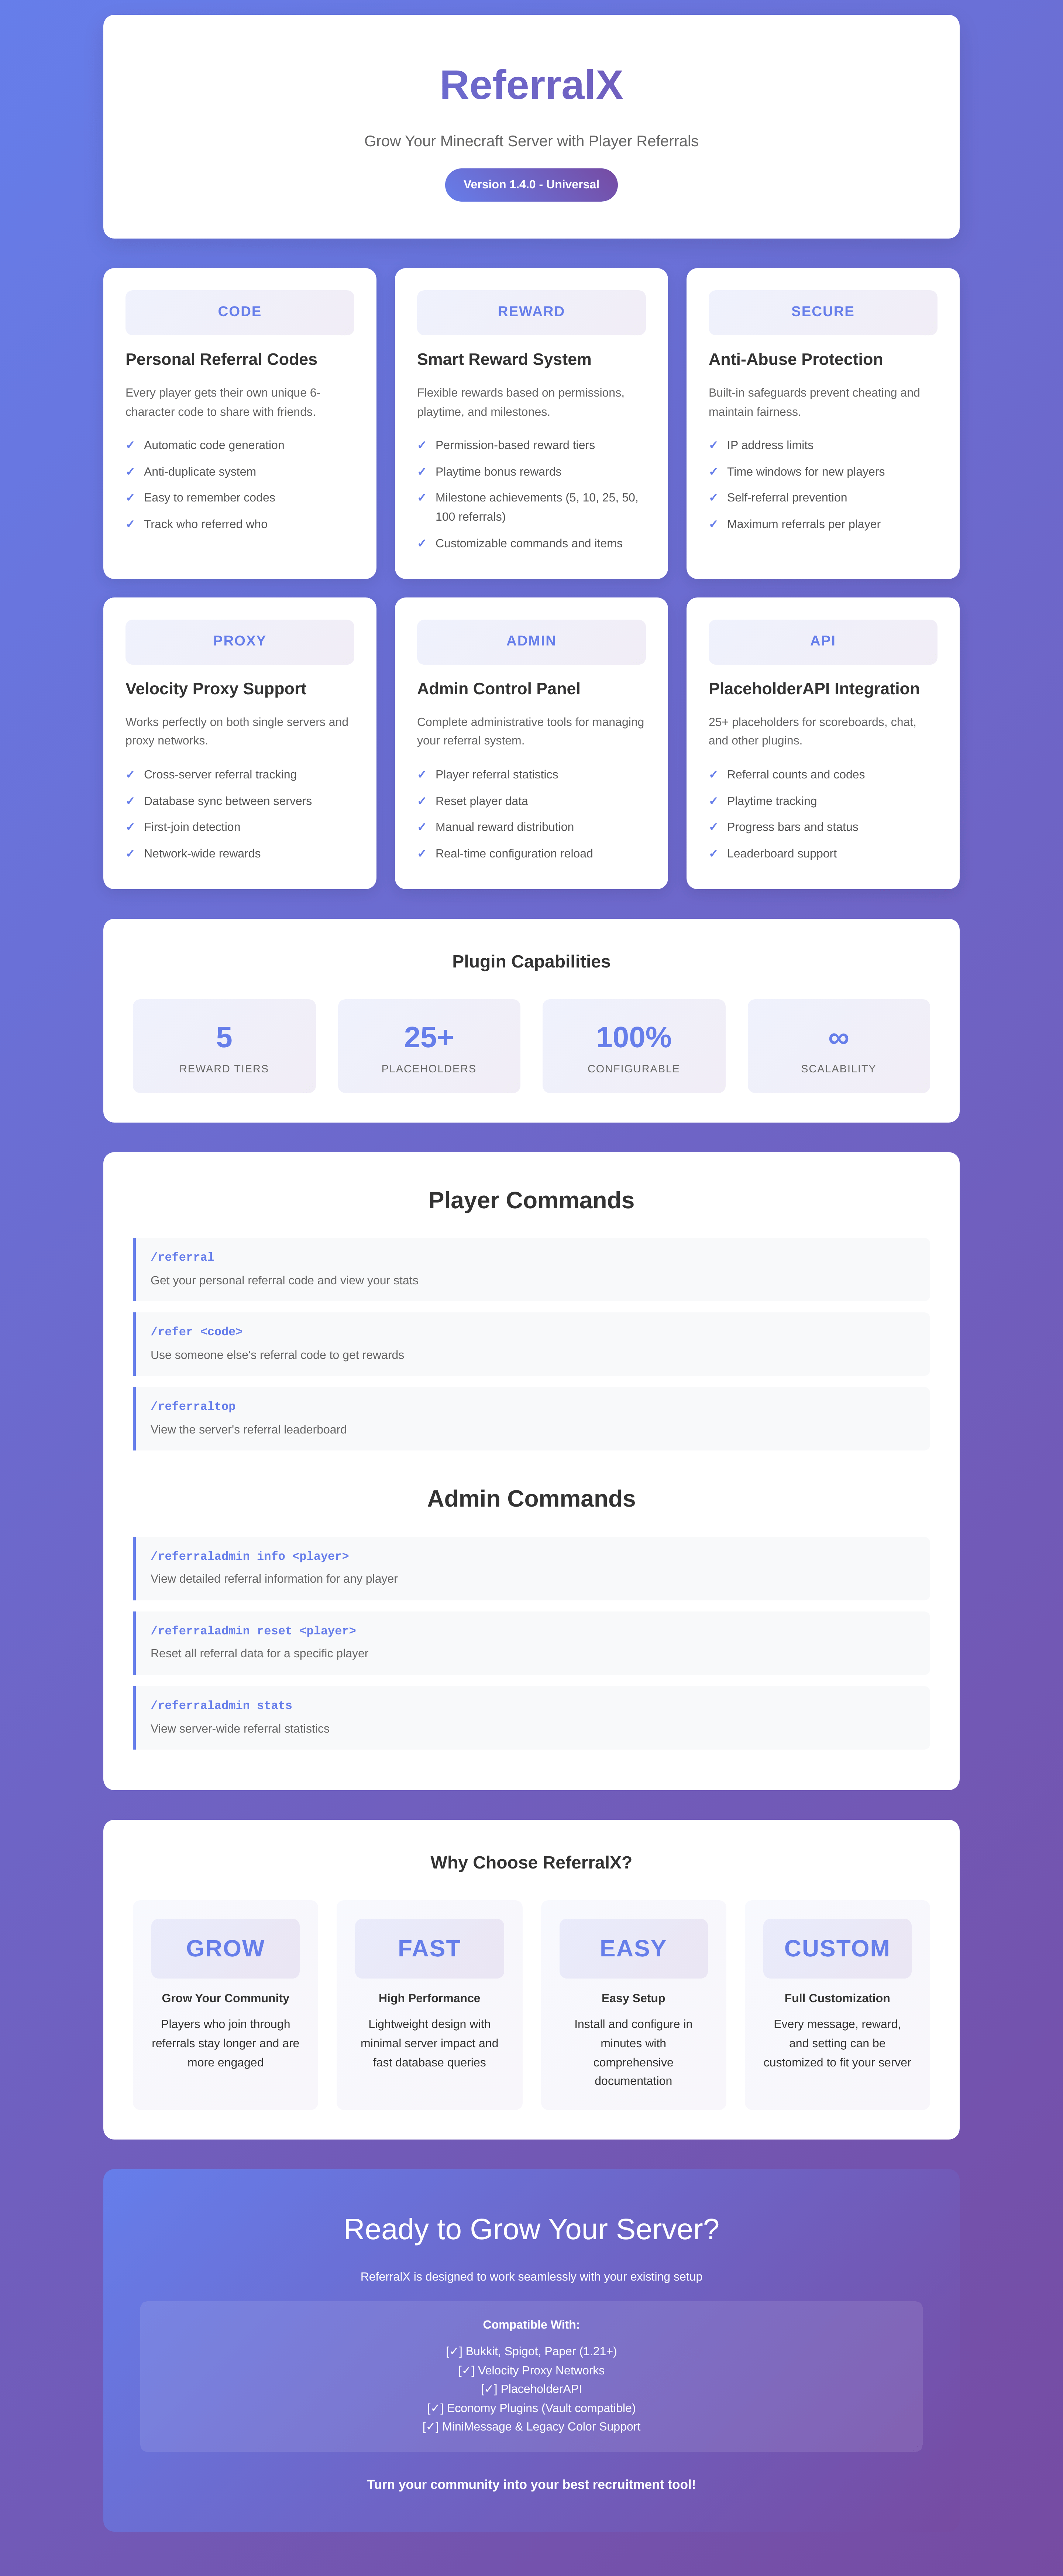
Text version
ReferralX: Enhanced Player Referral System
Boost your Minecraft server’s growth with a reliable and configurable referral program. ReferralX encourages players to invite friends by rewarding both the referrer and the new player, making recruitment fun, fair, and sustainable.
Key Features
🔹 Personal Referral Codes
Each player gets a unique 6-character referral code they can share. Codes are simple, secure, and prevent duplication.
🔹 Fair Tracking
ReferralX ensures each player can only be referred once, preventing abuse and keeping your system fair.
🔹 Configurable Rewards
Server admins can fully control rewards through the config:
Run customizable commands for both referrer and referred player
Support for items, permissions, currency (via your existing economy plugin), and more
Works even if the player is offline when the referral is confirmed
🔹 Built-In Safeguards
Automatic prevention of self-referrals
Optional limits on how many referrals a player can make
Helps deter alt-account abuse
🔹 Admin Tools
Easily manage your referral system with simple commands:
View referral stats per player
Reset or edit referral history
Manually trigger rewards
🔹 Proxy & Playtime Support
ReferralX is fully compatible with Velocity (and Bukkit/Spigot/Paper setups), with optional playtime checks to ensure referrals are legitimate.
🔹 Lightweight & Dependency-Free
ReferralX runs on its own without requiring extra plugins, but integrates smoothly with economy systems if you want to give currency rewards.
Why ReferralX?
✅ Community Growth – Players who join via referrals are more likely to stay because they already know someone.
✅ Organic Recruitment – Bring in genuinely interested players instead of relying only on ads.
✅ Balanced Economy – Reward players fairly without breaking your server balance.
✅ Performance-First – Designed to be efficient and reliable, with minimal performance impact.
ReferralX gives you the tools to turn your community into its own best recruiter, while you stay in control of rewards, rules, and growth.

RediVelocity





RediVelocity 🚀
A modern way to sync data between proxies
>
> # ⛏️ Software Support & Requirements 🎮:
> – RediVelocity is only compatible with the latest version of Velocity, which is **3.4.0-SNAPSHOT** at the time of writing this.
> – I will only support the latest release of Velocity, this mean that **3.4.0-SNAPSHOT is** supported, but **3.3.0 is not!** If you want to get official support, you have to use the latest version of **Redis, RediVelocity and Velocity!**
> – RediVelocity requires **Redis** to be installed and running, you can find the latest version of Redis here.
> – RediVelocity is built with **Java 21** and requires it to run, you can find the latest version of Java here.
> – RediVelocity also adds support for **SimpleCloud**, **VulpesCloud** and **CloudNet v4** to get the accurate proxy name instead of a random generated one.
> # 💻 Development Builds 🌐:
> – **Development Builds:** https://github.com/byPixelTV/RediVelocity/actions
> # 🔥 Build from source 🚀
>
> 1. Clone the repository:
> “`
> git clone https://github.com/byPixelTV/RediVelocity.git
> “`
> 2. Navigate to the project directory:
> “`
> cd RediVelocity
> “`
> 3. Build the project using Gradle:
> “`
> ./gradlew shadowJar
> “`
> 4. The compiled plugin will be located in the `build/libs` directory.


