**Virtual Chests** is a lightweight and powerful Paper plugin that gives server admins full control over who can access private, virtual chests.
Instead of cluttering the world with physical chests, players can securely store their items in **virtual chests** that only they can access. Admins control access through permissions, making this system both flexible and safe.
### ✨ Features
* 🔑 **Permission-based access** – Grant or restrict chest access with ease.
* 📂 **Private virtual storage** – No physical chest needed, items are safe from griefers.
* 🛠️ **Configurable** – Easily manage how many virtual chests players can access.
* 🤝 **Seamless integration** – Works with existing permission plugins (LuckPerms, PermissionsEx, etc.).
* 📜 **History & restore system** – View past chest states, preview snapshots, and restore older versions instantly.
### 🎮 Use Cases
* Reward donators with extra storage.
* Unlock additional chests as achievement rewards.
* Protect inventories without relying on claim plugins.
## ⚙️ Usage
### 🔒 Permissions
Control access to virtual chests using simple permissions:
* **`virtualchests.use`** → Required to use the base command.
* **`virtualchests.open.X`** → Grants access to chest number `X` (e.g., `virtualchests.open.1`).
* **`virtualchests.multiple.3`** → Grants access to chests **1–3**.
* **`virtualchests.multiple.5`** → Grants access to chests **1–5**.
* **`virtualchests.multiple.10`** → Grants access to chests **1–10**.
* **`virtualchests.admin`** → Allows admins to open other player’s virtual chests.
👉 Example: If you want players to have **five private chests**, simply give them `virtualchests.multiple.5`.
—
### 📝 Commands
* **`/chest `** → Opens your own virtual chest with the given number.
* **`/chest `** → *(Admin only)* Opens another player’s virtual chest.
* **`/chest history`** → *(Admin only)* Shows the history for the specified player’s virtual chest.
* **`/chest history -page `** → *(Admin only)* Displays a specific page of the chest’s history log.
* **`/chest history view`** → *(Admin only)* Opens a preview of the historical chest snapshot.
* **`/chest history restore`** → *(Admin only)* Restores the chest to the chosen historical snapshot.
📌 *Note:* The base command `/chest` can be renamed in the `config.yml`.
—
### ⚙️ Configurable Options
**Virtual Chests** comes with a flexible `config.yml` so you can adapt the plugin to your server:
* Choose your **storage type**: SQLite (default) or MySQL.
* Set the **number of rows per chest** (1–6).
* Rename the **base command** to match your server style.
* Customize **messages and chest names** to fit your language or formatting preferences.
* Fully customize all history-related messages, pagination buttons, and date formatting.
* Control how much history is stored using:
* `keep_last`: Number of history entries to keep per chest (`-1` to keep all).
* `history_page_size`: Number of entries shown per page in the history command.
📌 *Tip:* The configuration is easy to edit and helps you tailor the plugin for your community.
VinesCutter
### Harvest entire chains of vines instantly!
Shearing one vine block automatically drops all vines below it while consuming durability. Quick, server-sided, and works with all vine types!
Combatible from fabric 1.21.10 – 26.1.2
Ver. 1.0.1 when sneaking, normal Minecraft behavior and only the vine sheared will drop
Vincent Van Gogh The Starry Night Style Paintings Pixel Art

Bring timeless art into your game with the Vincent Van Gogh The Starry Night Style Paintings Pixel Art Mod. Inspired by Van Gogh’s world-famous masterpiece The Starry Night, this mod transforms classic paintings into beautiful pixel art that perfectly blends with retro-style gameplay.
—
### How many paintings does it have?
**1.0**: 19 paintings

—
With this mod, you can decorate your world with pixel art recreations of Van Gogh’s paintings, giving every space a unique artistic touch. Whether you’re building a cozy house, a creative gallery, or just want to add a bit of culture to your world, these pixel-perfect artworks will make your creations shine.

The Starry Night pixel art paintings are carefully designed to maintain the essence of Van Gogh’s brushstrokes while adapting them to a pixelated aesthetic. This makes the mod not only visually stunning but also lightweight and compatible with many builds.
Perfect for art lovers, pixel art fans, and players who enjoy customization, this mod combines history, creativity, and style. Experience Van Gogh’s art like never before and transform your world into a living gallery of pixel art masterpieces.
Villagers Buy Ender Pearls (Cleric)

3. **Add the Datapack**
Drag the datapack (a `.zip` file or directory) into the Minecraft window.
– A confirmation screen will appear. Click **”Yes”**.
4. **Activate the Datapack**
Move the datapack to the right-hand side of the screen by clicking the triangle on its icon (visible when hovering over it).
5. **Complete World Creation**
– Click **”Done”** at the bottom of the screen.
– Continue creating your world and click **”Create New World”**.
—
### ⚠️ IMPORTANT ⚠️
The datapack only works if cheats are enabled.
You can verify the datapack is active by typing:
`/datapack list enabled`
This command should list an entry named `[file/]`.
In an Existing World
### How to Install a Datapack in an Existing Singleplayer World
1. **Open Minecraft**
Launch the game.
2. **Select Your World**
– Choose the world you want to install the datapack for.
– Click **”Edit”**, then **”Open World Folder”**.
3. **Add the Datapack**
– Open the folder named `datapacks`.
– Place the datapack into this folder. It should be a `.zip` file or a directory.
4. **Reload the World**
– If you are in the world during installation, type `/reload` in the chat or press **F3 + T** to reload resources.
*(Make sure cheats are enabled.)*
—
### ⚠️ IMPORTANT ⚠️
The datapack only works if cheats are enabled.
You can verify the datapack is active by typing:
`/datapack list enabled`
How to Enable Cheats Permanently After World Creation
If you encounter this issue, here is a step by step guide on how to enable Cheats/Admincommands permanently after you have already created a Minecraft world.
⚠️ **Before you begin, you should save and backup your world in case something goes wrong.**
(I will not take any responsibility for any corrupt worlds. Do this at your own risk!)
But don’t worry this works without any problems.
If you don’t want to change this permanently check out [this guide](#).
### 1. You need [NBTExplorer](https://github.com/jaquadro/NBTExplorer/releases/tag/v2.8.0-win)
> NBTExplorer is an open-source NBT editor for all common sources of NBT data. It’s mainly intended for editing Minecraft game data.
### 2. Open NBTExplorer and open your Minecraft world, where you want to enable Cheats/Admincommands.

### 5. Change the Value from `0` to `1` and click **”OK”**

That’s it. You are done. You can now join your world and check if you have permission to change your `gamemode`, for example.
How to Enable Cheats Temporarily After World Creation
### Enabling Cheats Temporarily After World Creation
If you encounter this issue, here is a step-by-step guide on how to enable Cheats/Admin commands temporarily after you have already created a Minecraft world.
1. **Join Your World**
Open your single-player world and press “Escape”.
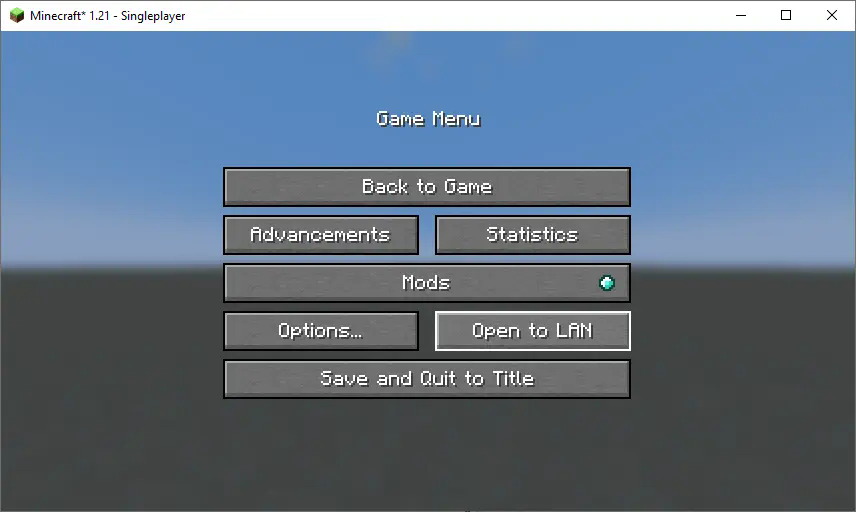
2. **Open to LAN**
Click on **”Open to LAN”**.
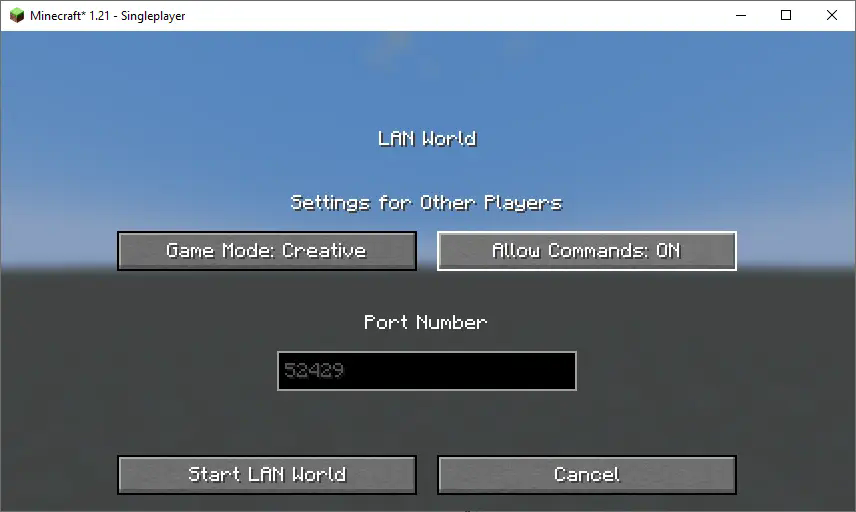
3. **Allow Commands**
Set **”Allow Commands”** to **ON**.
4. **Start LAN World**
Click **”Start LAN World”** to apply the changes.
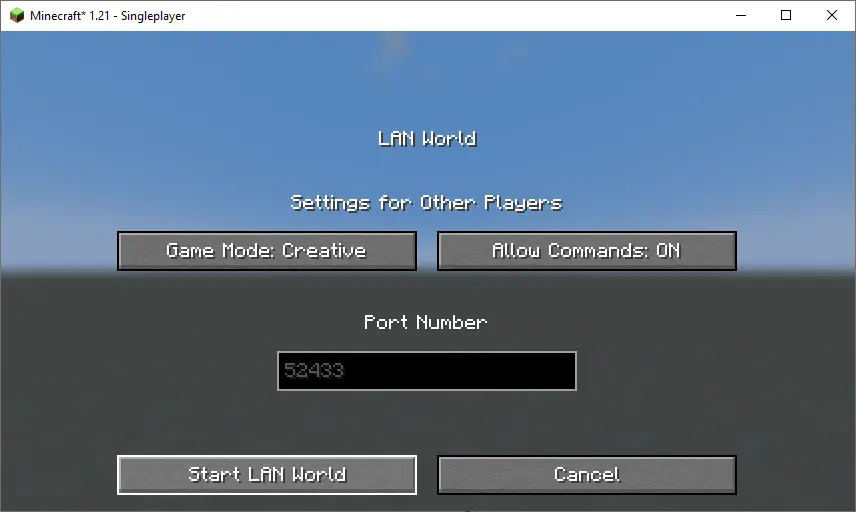
Now, you should be able to use commands like changing your gamemode. Keep in mind that this is only temporary and will need to be done every time you join the world.
How to Install a Datapack in Multiplayer
### How to Install a Datapack in Multiplayer
1. **Open Your Server Folder**
Navigate to your server folder, then open the folder for the world you wish to install the datapack in (default: `world`).
2. **Add the Datapack**
– The datapack should be a `.zip` file.
– Place the datapack into a folder named `datapacks` inside the world folder.
3. **Reload the Server**
– Type `/reload` from the console or as a level 3 operator if the server was running during the installation.
How to Uninstall a Datapack
### How to Uninstall a Datapack from Your Singleplayer World or Server
1. **Run the Uninstall Command**
For my datapacks, run the command:
`/function datapack_name:uninstall`
2. **Delete the Datapack**
– Delete the datapack from the folder you placed it in.
– Alternatively, you can run:
`/datapack disable [file/your data pack file/directory name]`
3. **Reload the World or Server**
After deleting or disabling the datapack, run:
`/reload`
How to Install a Mod on a Minecraft Server
### Step-by-Step Guide to Installing a Mod on a Minecraft Server
1. **Download the Mod**
– Make sure to download the **correct version** of the Mod that matches your server’s Minecraft version.
– **Important:** The mod file should be a `.jar` file.
2. **Ensure No Datapacks or Other Mods Conflict**
– Do not have both a datapack and a mod installed at the same time, as they may conflict.
– Only install one or the other, depending on your server’s setup.
3. **Locate the Mods Folder**
– Open your server’s root directory.
– Inside this directory, find the folder named `mods`.
– If the `mods` folder doesn’t exist, create one.
4. **Install the Mod**
– Paste the downloaded `.jar` file for the Mod into the `mods` folder.
5. **Restart the Server**
– After adding the Mod to the `mods` folder, restart your Minecraft server for the mod to be activated.
6. **Verify Mod Installation**
– Once the server has restarted, join the server and check if the Mod is working.
– You can use `/mods` or a similar command (depending on the mod) to see if the Mod has been successfully loaded.
### Additional Tips
– **Backup Your Server:** Always create a backup before installing the Mod to avoid data loss in case something goes wrong.
– **Ensure Mod Compatibility:** Check that the Mod is compatible with your Minecraft server version and any other mods you have installed.
# Villager Workers
*Hireable workers to automate your village!*
This mod adds **hireable villager workers** for mining, farming, and breeding animals, inventories, the abilitiy to depositing into chests, and many more features.
**Traveling Merchants** can follow waypoints, ride horses or boats, and interact with the Small Ships mod.
Configure everything to fit your gameplay – more features are coming soon!
—
## Play with Friends!
Want to play together with your friends? Check out **DatHost** for the best performance and easy setup!
### How to Get Started
1. Go to [**DatHost using my Link**](https://dathost.net/r/talhanation/minecraft-server-hosting)
2. Register your account.
3. Once registered, choose the plan that fits your needs
4. The **30% discount will be applied automatically** at checkout.
**Important:** The discount only works if you order your server using this [** my Link**](https://dathost.net/r/talhanation/minecraft-server-hosting) !
### General Workers Features
– Hire villager workers with **emeralds**.
– Workers have **inventories** and can deposit items in chests.
– Change to player like models if needed.
– Fully **configurable settings**.
### Traveling Merchants Update
– Merchants travel to predefined waypoints.
– Can ride **horses** or use **boats** for waterway travel.
– Compatible with **Small Ships mod**.
– Configure travel **duration and routes**.
– Fishermen can also use boats to reach optimal fishing spots.
—
## Worker Types
Currently there are **9 worker professions**:
– Miner
– Lumberjack
– Farmer
– Fisherman
– Merchant
– Shepherd
– Chicken Farmer
– Cattle Farmer
– Swineherd
—
## Tutorials
### Hiring & Commanding Workers
1. Buy the **profession blocks** from a Farmer, Fisherman, Mason, Wandering Trader, or Shepherd (villager must be level 2).
2. Place the profession block and wait for an **unemployed villager** to adopt the profession.
3. Hire a worker by **right-clicking with emeralds**.
4. Ensure the worker has enough **food** in their inventory.
5. Assign a **home, bed, and chest** to improve efficiency.
6. Tool upgrades affect **work speed**.
—
### Worker Interaction
– **Right-click**: make the worker follow you.
– **Crouch + Right-click**: open worker inventory.
—
### Miner
– 8 mining modes (Tunnel, 3×3 Tunnel, Flat 8x8x1, Pit 8x8x8, Room 8x8x3, Flat 16x16x1, Pit 16x16x16, Room 16x16x3).
– Can place torches if available in inventory or chest.
– Start-block can be assigned via **Command Screen**.
### Lumberjack
– Assign **work position** via command screen.
– Searches a **10-block radius** for trees to chop.
– Replants saplings if available.
### Farmer
– Assign start block via command screen.
– Hoes **9×9 field**, plants seeds, and harvests mature crops.
– Manages inventory of seeds for replanting.
### Fisherman
– Assign work position.
– Searches **8-block radius** for water sources.
– Can use boats to fish if available.
### Shepherd
– Assign work position.
– Searches **10-block radius** for sheep.
– Breeds or slaughters to maintain target count.
### Chicken Farmer
– Assign work position.
– Searches **10-block radius** for chickens.
– Breeds or slaughters to maintain target count.
### Cattle Farmer
– Assign work position.
– Searches **10-block radius** for cows.
– Breeds or slaughters to maintain target count.
### Swineherd
– Assign work position.
– Searches **10-block radius** for pigs.
– Breeds or slaughters to maintain target count.
### Merchant
– Create up to **4 customizable offers**.
– Travels along predefined **waypoints** with return days setting.
– Two waypoint types: **ground** and **water**.
– Merchant acts as an **active chunk loader**.
#### Owner Screen
– Configure travel routes and timing.
– **Start, Stop, Return, Auto-Restart** buttons for travel control.
#### Customer Screen
– Trade with merchant using **inventory-based goods**.
– Example: 4 cooked mutton for 1 emerald.
#### Creative Mode
– Toggle merchant modes: **Owned** or **Creative**.
– Creative mode removes limits and disables saving income.
—
## Coming Soon
– Beekeeper and Goat Farmer Update
– Smith and Courier Update
– Builder’s Update
– Village Integration Update
– Leveling Update
—
## Installation
1. Install [Minecraft Forge](https://files.minecraftforge.net/net/minecraftforge/forge/)
2. Drop the mod into your `mods/` folder
3. Launch the game and hire your first worker!
—
## Feedback & Issues
Join the community on [**Discord**](https://discord.gg/example) for support, bug reports, and suggestions.
—
## My Other Mods
### [](https://modrinth.com/mod/villager-recruits)
[**Villager Recruits**](https://modrinth.com/mod/villager-recruits):
Command your own **Villager Army** into war! Now with **Diplomacy and Factions**!
—
### [](https://modrinth.com/mod/villager-workers)
[**Villager Workers**](https://modrinth.com/mod/villager-workers):
Hire Villagers and let them **work for you**!
—
### [](https://modrinth.com/mod/small-ships)
[**Small Ships**](https://modrinth.com/mod/small-ships):
Explore the oceans in your **own sailable ships**!
—
### [](https://modrinth.com/mod/siegeweapons)
[**Siege Weapons**](https://modrinth.com/mod/siegeweapons):
Prepare for war. Build your siege weapon. Dominate the battlefield.**!
—
**Hire your villagers. Automate your village. Dominate your economy.**
**Still frustrated by the hidden trades of those shady villager merchants?**
Wish you could preview the treasures they’ll offer before leveling them up? The **Villager Trade Preview** datapack is the pure vanilla solution you’ve been waiting for!
#### **📖 Overview**
Inspired by the popular mod [Visible Traders](https://modrinth.com/mod/visible-traders), this datapack has been redesigned specifically for **pure vanilla environments** (such as Vanilla, Paper, Spigot servers, and single-player worlds). It allows all players (without needing to install any mods) to directly preview **all future trades (levels 2-5)** that a villager will unlock, simply by interacting with them at **level 1**.
#### **✨ Key Features**
* **🔮 Trade Preview**: When interacting with a level 1 villager, their trading interface will directly display all the trades they will unlock upon leveling up (shown in a locked/unavailable state).
* **⚙️ Server-Side Only**: **Requires no mods or resource packs on the player’s side.** Simply install this datapack on your server (or in your single-player world), and all players using the vanilla client can enjoy the preview function. Perfectly compatible with major server software like Vanilla, Paper, Spigot, and single-player worlds.
* **🌿 Fully Compatible**: Works with all vanilla villager professions and biome variants.
* **🔄 Plug and Play**: Both existing villagers and newly generated ones in your server/world will automatically gain the trade preview feature after installation.
#### **💡 Difference from the Mod**
Unlike the `Visible Traders` mod, which requires installation on both client and server, this datapack is designed specifically for **pure vanilla server-side environments** (or single-player) where mods cannot be installed. It achieves the core functionality through the datapack system, allowing vanilla players to enjoy the convenience of previewing future trades. It’s perfect for survival or commercial servers that primarily rely on plugins and datapacks.
#### **📥 Installation Guide**
1. Download the datapack file (`.zip`).
2. Place the file into the `world/datapacks` folder of your server or single-player world save.
3. Restart the server.
4. Done! Your villagers’ trades are now more transparent and engaging!
## ⚠️ Important Note
This datapack is **not directly associated with** the `Visible Traders` mod. It is an independent project inspired by it and developed specifically for vanilla environments.
Villager Shop Edit in SURVIVAL (Villager Trades Edit)
**_Only the server or hoster needs to set up_**
– Addition’s villagers cannot participate in any farm
– Addition’s villagers cannot pick up items on the ground
– Addition’s villagers do not take damage and zombies do not attack
> Set the maximum number of items a villager can sell (set only at the beginning)
– /scoreboard players set maxstok varilshop-genel “#”
– “#”: Maximum number of items a villager can sell (1-27)
Do you find moving villagers annoying? Do they keep running off? Is transporting them by boat getting on your nerves? Do you want to be able to just pick them up? Well this mod helps you with that! You can now click a villager with a bucket and pick them up with ease! No longer will you have to suffer through the annoying boat rides while transporting a single villager at a time, just collect them with buckets!
**WE NOW SUPPORT PAPER/PURPUR SERVERS WITH A PLUGIN WOOOOOO, CHECK OUT THE “VILLAGER IN A BUKKIT” VERSION**
## Features
– Pick up a villager with an empty bucket
– Textures depending on Villager region. Only if they have head decorations (Snow, Desert, Swamp and Savanna) – Both mod and server side only plugin!
– Works with Wandering Traders and Zombie Villagers!
– Information about the specific villager is saved, nametag, job, trades etc
– Item lore with information about the specific villager in the bucket
– Custom advancements! – Mod only
– Support for collecting and dispensing the villager with a dispenser – Mod only
Kidnap villagers

– Attempt to properly support modded Villager types and bucket textures – Mod only
– Make Villager spawned from bucket without NBT data (Creative item) spawn Villager with biome specific clothing like spawn egg does – Mod only
– Dispenser support – Plugin, mod already contains it
## Usage
To use this mod just get an empty bucket and right click a villager! It’s that easy.
### Requirements
~~This mod requires the [Architectury API](https://modrinth.com/mod/architectury-api) to be installed along with the mod~~
As of 1.20.1-1.2.0 and 1.20.2-1.1.0 Architectury API is no longer required. Only earlier versions of the 1.20.1 and 1.20.2 builds require it, any possible 1.19.X or earlier builds do not require it (May be coming in the future).
### Configuration
#### Mod
There are currently two options in the config file which can be found in `/config/villager-in-a-bucket.properties`.
`enable-zombie-villager` sets whether a Zombie Villager can be picked up in a bucket. It does not remove the Zombie Villager In A Bucket item when disabled. Default is `true`
#### Plugin
Old config settings have been deprecated in favour of using permissions. Please read https://github.com/JustDoom/VillagerInABukkit/wiki/Configuring-using-permissions
“`yml
# If enabled, the other options, “villager”, “zombie-villager”, “wandering-trader”, “disable-bucket-use-on-disable” and “harm-reputation”
# (except the resource pack options) will be ignored in favour of using permissions instead. This is the recommended method.
# The other ones will be removed in the future. If you are switching please read https://github.com/JustDoom/VillagerInABukkit/wiki/Configuring-using-permissions
# If you can not see the other settings listed above in this file do not worry, you have just generated it after they were deprecated, and they have not been generated for you.
use-permissions: true
# Should the server ask the client to download a resource pack when they join
resource-pack: true
# The below options are commented out so that it uses the right resourcepack version for the minecraft/plugin version by default
# If you want to override it/manually use an updated resourcepack you can uncomment and override them
# The URL to download the resource pack from
#resource-pack-url: “https://cdn.modrinth.com/data/9tf9GGch/versions/ZBgqIN0Y/VillagerInABukkitPack.zip”
# The SHA-1 hash of the resource pack ZIP
#resource-pack-hash: “f2d4dd5bf8ee221234b738236099b2592c58b8e8”
# The ID for the resource pack. Please do not touch unless you know what you are doing
#resource-pack-id: “68a4b411-e409-4d89-b563-66049ba4914b”
# Should any villager placing and picking up be logged to the console
console-logging: false
# Should any villager placing and picking up be logged to a file
file-logging: false
“`
## Support
Support can be provided on my [discord server](https://discord.gg/ydGK5jYV6t) or you can report any bugs for the mod on the GitHub repository [here](https://github.com/JustDoom/VillagerInABucket/issues). For the plugin please use [this one](https://github.com/JustDoom/VillagerInABukkit/issues)
## If you need a new server check out our partner [lagless.gg](https://lagless.gg/aff/dinonuggies)
[](https://lagless.gg/aff/dinonuggies)
Use code **Dinonuggies** for 20% off!
> A revolutionary villager control plugin that lets you claim, manage, and control villagers using a simple stick!
## 🌟 Features
### Core Features
– 🏘️ **Stick-Based Interaction** – Right-click villagers with a STICK (no more mumbling!)
– 🎯 **Villager Claiming** – Claim villagers with custom names and full control
– 🚶 **Follow System** – Make villagers follow you around the world
– 🧊 **Freeze System** – Freeze villagers in place when needed
– 🔒 **Permission-Based Limits** – Control how many villagers players can claim (8, 16, 32, 64, or unlimited)
– 💾 **Smart Persistence** – All villager states persist across server restarts
– 🎨 **Visual Effects** – Particle effects and smooth animations
– ⚡ **Performance Optimized** – Efficient tracking with smart cleanup systems
### Advanced Features
– **Freeze-on-Look** – Villagers freeze when you look at them (configurable duration)
– **Cross-World Support** – Bring villagers between worlds (configurable)
– **Inventory System** – Access and manage villager inventories with full item storage
– **Auto-Despawn Protection** – Villagers despawn when too far away (performance)
– **Manual Despawn System** – Use `/vc away` to make villagers disappear manually
– **Bring Back System** – Use `/vc bring` to restore despawned villagers
– **Inventory Protection** – Villagers with items become invulnerable and can’t be unclaimed
– **Smart Despawn** – Villagers auto-despawn when you fly too fast with elytra
– **Teleportation Limits** – Prevent abuse with cooldowns and limits
– **World Restrictions** – Control which worlds villagers can be brought to
– **Command Cooldowns** – Prevent spam with configurable cooldowns
– **Debug System** – Comprehensive logging for troubleshooting
—
## 📥 Installation
### Prerequisites
– Paper or Spigot server running Minecraft 1.21+
– Java 17 or higher installed on your server
### Steps
1. **Download** the latest `VillagerClaim-1.0.0.jar` file
2. **Stop** your Minecraft server
3. **Place** the JAR file in your server’s `plugins` folder
4. **Start** your server
5. The plugin will create a `VillagerClaim` folder with default configuration
6. **Configure** the plugin by editing `plugins/VillagerClaim/config.yml`
7. **Reload** the plugin with `/vc reload` or restart the server
### Verification
After installation, verify the plugin is working:
“`
> plugins
[10:00:00 INFO]: Plugins (1): VillagerClaim
“`
—
## ⚙️ Configuration
The plugin generates a `config.yml` file in `plugins/VillagerClaim/` with extensive customization options.
### Basic Configuration
#### General Settings
“`yaml
general:
# Maximum distance to interact with villagers
max-interaction-distance: 5.0
# Time in seconds to freeze villager when looking at it
# Set to -1 for infinite duration (until player looks away)
freeze-on-look-duration: 3
# Interaction tool – players must hold a STICK
interaction-tool: STICK
“`
#### World Restrictions
“`yaml
worlds:
# Allow bringing villagers to specific worlds
allow-worlds:
world: true # Overworld (default world)
world_nether: false # Nether
world_the_end: false # End
#### Message Customization
All messages support Minecraft color codes (`&` format):
“`yaml
messages:
# Claim messages
villager-claimed: “&a&l✓ &aYou have claimed &e{villager_name} &aas your villager!”
villager-already-claimed: “&c&l✗ &cThis villager is already claimed by &e{owner_name}&c!”
# Command messages
villager-following: “&a&l✓ &a{villager_name} &ais now following you!”
villager-frozen: “&b&l✓ &b{villager_name} &bis now frozen in place!”
villager-unclaimed: “&c&l✓ &c{villager_name} &chas been unclaimed!”
“`
#### Feature Toggles
“`yaml
features:
# Enable villager freezing when looking at them
freeze-on-look: true
# Enable villager following mechanics
follow-mechanics: true
#### Getting Started
1. **Hold a STICK** in your hand
2. **Right-click a villager** with the stick
3. **Type a name** when prompted
4. **Use commands** to control your villagers
#### Basic Interactions
– **Claim a villager:** Right-click with stick → Enter name
– **Make follow:** `/vc follow `
– **Freeze in place:** `/vc freeze `
– **Release villager:** `/vc unclaim `
#### Advanced Features
– **Freeze on look:** Look at your villager to freeze them
– **Cross-world travel:** Bring villagers to different worlds
– **Inventory access:** Right-click to open villager inventory or use `/vc inventory `
– **Auto-despawn protection:** Villagers despawn when too far away
– **Manual despawn:** Use `/vc away ` to make villagers disappear
– **Bring back system:** Use `/vc bring ` to restore despawned villagers
– **Inventory protection:** Villagers with items become invulnerable
– **Smart despawn:** Villagers auto-despawn when you fly too fast with elytra
### Files Created
“`
plugins/
└── VillagerClaim/
├── config.yml # Plugin configuration
├── villagerdata.yml # Villager claim data
└── bypass.yml # Bypass player data
“`
### Villager Data Structure
The `villagerdata.yml` file stores:
– Villager UUID and name
– Owner UUID and name
– Current status (following/frozen/idle)
– Location data
– Inventory contents
– World information
### Data Persistence
Villager data is automatically saved:
– When a player disconnects
– Every 5 minutes (configurable)
– When the server stops
– When villager status changes
—
## 🔧 Troubleshooting
### Common Issues
#### Issue: Can’t interact with villagers
**Solutions:**
1. Make sure you’re holding a STICK
2. Check you’re within interaction distance (5 blocks)
3. Verify villager isn’t already claimed by someone else
4. Check permissions: `/vc list`
#### Issue: Villagers not following
**Solutions:**
1. Check villager is claimed by you: `/vc list`
2. Verify follow command: `/vc follow `
3. Check if villager is frozen: `/vc unfreeze `
4. Ensure you’re not too far away (50 block limit)
#### Issue: Commands not working
**Solutions:**
1. Verify permissions are set correctly
2. Check console for errors
3. Ensure you’re using correct command format
4. Try using the full command: `/villagerclaim` instead of `/vc`
#### Issue: Villagers disappearing
**Solutions:**
1. Check despawn distance settings
2. Verify world restrictions
3. Check if villager died (they can take damage)
4. Look for console errors
#### Issue: Cross-world not working
**Solutions:**
1. Check `cross-world-teleport: true` in config
2. Verify world is in `allow-worlds` list
3. Check player permissions
4. Ensure villager is following you
#### Issue: Villager disappeared (despawned)
**Solutions:**
1. Check if villager is despawned: `/vc despawned`
2. Bring back with: `/vc bring `
3. Check if you flew too fast with elytra
4. Verify villager wasn’t killed by mobs
#### Issue: Can’t unclaim villager
**Solutions:**
1. Check if villager has items: `/vc inventory `
2. Empty villager inventory first
3. Villagers with items are protected from unclaiming
4. Use `/vc away ` to despawn if needed
#### Issue: Villager inventory not saving
**Solutions:**
1. Check if villager is claimed by you
2. Ensure you’re the owner of the villager
3. Try closing and reopening inventory
4. Check console for errors
### Getting Help
If you need additional support:
1. Check console logs for error messages
2. Verify your configuration is valid YAML syntax
3. Join our Discord server: [https://discord.gg/cybycQ9wGp](https://discord.gg/cybycQ9wGp)
—
## 📊 Performance
### Resource Usage
– **Memory:** Minimal (<10MB for typical server)
- **CPU:** Very light (efficient tracking system)
- **Disk:** Small data files (YAML format)
- **Network:** No network operations
### Optimization Tips
1. Adjust `auto-save-interval` based on villager count
2. Set appropriate `despawn-distance`
3. Use `max-follow-distance` to reduce unnecessary checks
4. Consider world restrictions for performance
### Tested Performance
- ✅ Works efficiently with 100+ claimed villagers
- ✅ No noticeable TPS impact
- ✅ Fast data saving (<100ms)
- ✅ Minimal memory footprint
---
## 🚀 Roadmap
Potential features for future versions:
- [ ] Villager trading integration
- [ ] Villager profession management
- [ ] Villager breeding system
- [ ] GUI for villager management
- [ ] Villager groups and teams
- [ ] Advanced villager AI
- [ ] Villager marketplace
- [ ] Villager statistics tracking
- [ ] Enhanced inventory management
- [ ] Villager job assignments
- [ ] Automated villager tasks
---
## 🤝 Support
### Bug Reports
If you find a bug, please report it with:
- Plugin version
- Server software and version
- Steps to reproduce
- Console errors (if any)
### Feature Requests
Have an idea? Share it with details about:
- What you want to achieve
- How it would benefit users
- Example use cases
### Discord Community
Join our Discord server for support, updates, and community discussion:
**[https://discord.gg/cybycQ9wGp](https://discord.gg/cybycQ9wGp)**
---
## 📜 License
This plugin is free to use and modify for your server.
### Terms
- ✅ Licensed for use on any server
- ❌ Modification for personal purposes is prohibited
- ❌ Redistribution, even with credit, is prohibited
- ❌ Commercial resale is prohibited
- ❌ No warranty or guarantee is provided
---
## 👨💻 Author
**Yenith**
---
## ⭐ Thank You!
Thank you for using VillagerClaim! If you enjoy this plugin:
- Share it with other server owners
- Leave feedback and suggestions
- Report bugs to help improve it
- Consider supporting future development
- Join our Discord community: [https://discord.gg/cybycQ9wGp](https://discord.gg/cybycQ9wGp)
---
**Made with ❤️ for the Minecraft community**
*Last Updated: 08 October 2025*
AIO – Villager Bucket
# Villager Bucket.
This DataPack is made for capturing villagers in a bucket and store it in your inventory.
You can release the villager out of the bucket when needed.
### *NOTE* : Professions wont be copied.
Advantages:
– Nitwits can be converted to normal villagers this way
– The villager is not “locked” to a profession.
# Usage:
Capturing:
– Stand next to the villager with an empty bucket in your main hand and right-click
Releasing:
– Put the “Villager Bucket” in your main hand and right-click