WLIB

WLIB
Static utility library built for dynamic bukkit plugins
WLIB is a utility library for bukkit servers that simplifies common plugin development tasks and reduces repetitive boilerplate code.
Features include:
* Dynamic command registration
* Static event management
* Plugin management APIs
* Debug and development tools
* Reflection and compatibility helpers
* Cross-platform Bukkit/Paper/Folia support
* General-purpose utility classes for plugin development
WLIB is intended as a lightweight developer library and is primarily used across projects from WebMC Development.
wldc
# WLDC – Discord Whitelist Manager
WLDC is a simple Minecraft-Discord integration plugin that allows you to manage your server’s whitelist directly through Discord commands.
## Commands
### General Commands [DISCORD]
– `/whitelist add ` – Add a player to the whitelist
– `/whitelist remove ` – Remove a player from the whitelist
– `/whitelist list` – View all whitelisted players
– `/whitelist check ` – Check if a player is whitelisted
### Admin Commands [Require ADMINISTATOR on the discord server]
– `/whitelist addadmin ` – Add a Discord user as whitelist admin
– `/whitelist removeadmin ` – Remove a Discord user from admins
– `/whitelist listadmins` – List all admin users
– `/whitelist setgroup ` – Set a Discord role as a whitelisted admin group
### Commands [MINECRAFT]
– `/wldc reload` – Reload the plugin configuration (requires `wldc.reload` permission)
## Configuration
The plugin uses a simple YAML configuration file with the following key settings:
“`yaml
discord:
token: “your-bot-token”
guild-id: “your-guild-id”
status:
type: “PLAYING” # PLAYING, WATCHING, LISTENING, COMPETING
text: “Minecraft” # Custom status text
“`
## Setup
1. Download and install the plugin on your Bukkit/Spigot server
2. Create a Discord bot and get its token
3. Configure the plugin with your Discord bot token and server ID
4. To add users to whitelist / add admins, you need to have Administrator permission on the server.
4. Start the server and use `/whitelist` commands in Discord
## Permissions
– Discord users need the “Send Messages” and “Create Commands” permissions to use whitelist commands.
– In-game reload command requires the `wldc.reload` permission
– Admins can be added via Discord to manage the whitelist
## License
This project is licensed under the MIT License – see the LICENSE file for details.
Made with ❤️ by timuzkas
WLC
A lightweight and customizable plugin configuration for managing player join, first join, and leave messages with full color support and in-game admin controls.
## 🖥️ Compatibility
* Compatible with **Minecraft 1.19 – 1.21+** (both Paper and Spigot)
* Supports **Java 17+ servers**
## 📝 Changelog
**v1.0 – Initial Release**
* First release of the Welcome Message Config plugin
* Basic first join/join/leave message support
* In-game admin commands to manage messages
## 🔮 Planned Features
* Placeholder support (e.g., %online%, %world%)
* GUI configuration menu for easier editing
* Custom animations or sounds on join/leave
* Title, Action bar on join/leave
* Rewards on first join
* Rewards on welcoming
> ⚠️ Note: This is my first plugin and my first upload! If you notice any errors or bugs, please let me know on Discord.
ReadMe
# 📘 Welcome Message Config – README
This configuration file controls join/leave messages and admin commands for your plugin.
## ⚙️ Features
* Custom **first join message**
* Custom **regular join message**
* Custom **leave message**
* Enable/disable each message type
* Admin command to edit settings in-game
## 🧩 Configuration Overview
### 🔹 First Join Message / Join Message / Leave Message
“`yaml
firstjoin_message/join_message/leave_message:
enabled: true
text: “&7[&5+&7] %player%”
“`
* `enabled`: Enable/disable the first-time join/join/leave message
* `text`: Message shown when a player joins for the first time/join/leave
## 🎨 Formatting
* `&` is used for color codes (Minecraft formatting)
* `%player%` will be replaced with the player’s name
## 🛠️ Admin Command
### Base Command
“`
/wlcadmin
“`
### Permission
“`
wlcadmin.use
&cYou do not have permission to perform this command. (%permission%)
“`
## 📌 Available Subcommands
“`
/wlcadmin reload
/wlcadmin setfirstjoinmessage
/wlcadmin setfirstjoinenabled
/wlcadmin setjoinmessage
/wlcadmin setjoinenabled
/wlcadmin setleavemessage
/wlcadmin setleaveenabled
“`
## ⚠️ Usage Notes
* Boolean values must be `true` or `false`
* Invalid usage will return an error message with correct syntax
Deafult Config
“`
firstjoin_message:
enabled: true
text: “&7[&5+&7] %player%”
join_message:
enabled: true
text: “&7[&a+&7] %player%”
leave_message:
enabled: true
text: “&7[&c+&7] %player%”
wlcadmin_command:
permission: wlcadmin.use
nopermissionmessage: “&cYou do not have permission to perform this command. (%permission%)”
correctusage: “Correct usage /wlcadmin ”
reload:
successfully: “&aThe configuration has been successfully reloaded.”
warning: “&eThe configuration was reloaded, but some values may not be valid.”
error: “&cAn error occurred while reloading the configuration.”
setfirstjoinmessage:
successfully: “&aThe join message has been updated successfully.”
error: “&cUsage: /wlcadmin setfirstjoinmessage ”
setfirstjoinenabled:
successfully: “&aThe join message state has been updated to %newstate%.”
samestate: “&eThe join message state is already set to this value.”
error: “&cUsage: /wlcadmin setfirstjoinenabled ”
setjoinmessage:
successfully: “&aThe join message has been updated successfully.”
error: “&cUsage: /wlcadmin setjoinmessage ”
setjoinenabled:
successfully: “&aThe join message state has been updated to %newstate%.”
samestate: “&eThe join message state is already set to this value.”
error: “&cUsage: /wlcadmin setjoinenabled ”
setleavemessage:
successfully: “&aThe leave message has been updated successfully.”
error: “&cUsage: /wlcadmin setleavemessage ”
setleaveenabled:
successfully: “&aThe leave message state has been updated to %newstate%.”
samestate: “&eThe leave message state is already set to this value.”
error: “&cUsage: /wlcadmin setleaveenabled ”
“`
Witness
# 🕵️ Witness
### *No crime goes unseen. No truth stays hidden.*




**The walls have eyes.**

—
## 👁️ The Concept
In standard Minecraft, a murder in a dark alley is just a respawn screen. **Witness** changes the stakes. If a crime is committed within the line of sight of another player, it is no longer just your word against theirs—it is an **Official Testimony.**
This plugin creates a tangible “paper trail” for every illegal act, forcing criminals to be calculated and victims to find protection.
—
## ✨ Key Features
### 📜 Official Testimony Records
When a crime (murder, theft, or griefing) is detected, the plugin automatically generates a **Testimony Book** for nearby witnesses.
– **NBT-Secured Data:** Includes the timestamp, coordinates, suspect’s name, and victim’s name.
– **Evidence Level:** Categorizes crimes from “Misdemeanor” to “High Felony.”
– **Non-Forgeable:** Records are signed by the server, making them valid evidence for trials.
### 🕵️ Dynamic Detection Logic
Witness doesn’t just check radius; it checks **Line of Sight**.
– **Stealth Mechanics:** Sneaking or wearing certain gear can reduce your detection profile.
– **Environmental Factors:** Foliage and darkness can affect whether a witness “clearly identifies” the suspect.
– **Anonymous Tips:** Servers can be configured to allow witnesses to remain anonymous to avoid retaliation.
### 📋 The Criminal Record
Every player has a permanent file accessible via the suite.
– **Active Charges:** Lists all witnessed crimes that haven’t been resolved.
– **Prescription System:** Minor crimes eventually fade, but major felonies stay on your record forever.
—
## 🔗 CivCraft Suite Integration
**Witness** is the primary “data feeder” for the rest of the **CivCraft Ecosystem**:
| Integration | Synergy Effect |
|————-|—————-|
| 🏹 **BountyBoard** | Automatically puts a price on a suspect’s head once a report is filed. |
| ⚖️ **Tribunal** | Reports are used as the primary evidence in court cases. |
| 🪪 **Reputation** | Being witnessed committing a crime causes an instant, massive drop in social score. |
| ⚔️ **ReanimateMC** | Failing to help a “Downed” player can be flagged as “Negligence” or “Abandoned.” |
| 🪦 **Epitaph** | Linking a Testimony Record to a Gravestone displays the “Cause of Death” in detail. |
—
## 🛠️ Commands & Permissions
| Command | Description | Permission |
|———|————-|————|
| `/witness report` | Manually file a report for a crime you just saw | `witness.report` |
| `/witness record ` | View the criminal history of a player | `witness.check` |
| `/witness evidence` | View the data of a Testimony Book in your hand | `witness.use` |
| `/witness purge` | (Admin) Clear a player’s criminal record | `witness.admin` |
—
## 📦 Installation
1. Download **Witness.jar**.
2. Install **CivCraft Core** to enable cross-plugin crime reporting.
3. Drop into your `/plugins` folder and restart.
4. Define your “Crime Zones” in the config to toggle detection in specific areas.
—
## ⚙️ Configuration Snippet
“`yaml
# Witness – Configuration
crimes:
detect-murder: true
detect-theft: true # Requires chest-lock or similar plugin
detect-grief: false # Recommended for creative/unprotected zones
detection:
max-distance: 32
require-line-of-sight: true
blindness-blocks-detection: true
reporting:
auto-generate-book: true
alert-guards-on-crime: true
WitherSpawn
# Features
* Completely disable or enable Wither spawning with ‘/ws toggle’ command
* Keep track of all Withers in your server with uuid, location, and time info stored using SQLite database
* Disable Wither damage, explosions, or status effect
* Armor, armor toughness, attack damage, follow range, knock back resistance, movement speed, & max health of Wither now configurable!
* Optimized and lightweight
* Disable Wither spawning in worlds by listing them in configuration file
* Wither will spawn if a server operator or player with bypass permission is within bypassRadius range in configuration file
* Config option to prevent anvil damage to Wither
* Config options to cancel dropping of Nether Star item or XP if Wither died from listed death reasons – https://hub.spigotmc.org/javadocs/bukkit/org/bukkit/event/entity/EntityDamageEvent.DamageCause.html
* Config option to set minimum/maximum y-coordinates Wither can spawn within
* New scan feature that will add or update database with currently loaded Wither information
* Command ‘/ws list’ will now list all Withers with uuid, last location, and time found in database
* Set maximum amount of Withers allowed to be alive and loaded in the server when spawning new Withers
* Setting maxWithers to 0 will disable Wither spawns unless player has op or witherspawn.bypass permission
* Kill all Withers loaded in the server with command ‘/ws killall’
* Kill all Withers within default or specified radius of player who issued command
* Withers that are killed with commands do not drop anything
* Notification option with location for when players try to spawn Wither but is disabled or prevented
* Notification option with location for when players successfully spawn Wither
* Config option to disable Wither spawning above sea level in Overworld
* Config option to send messages to server console, admins, or players
* Customizable messages in config!
# Commands
**/ws toggle** — Completely disable or enable Wither spawning
**/ws killall** — Kill all Withers loaded in the server
**/ws list** — List uuid, location, and time of all Withers found in database
**/ws radiuskill** — Kill all Withers within killRadius set in configuration file
**/ws radiuskill #** — Replace # with an integer above 0 to kill Withers within specified radius
**/ws reload** — Reload configuration file
# Permissions
**witherspawn.admin** — Allows use of commands
**witherspawn.bypass** — Completely bypass restrictions and allow Wither spawning
**witherspawn.deny** — Completely deny Wither spawning unless player has witherspawn.bypass permission or op
**witherspawn.notify** — Receive message when players attempt to spawn Wither but is disabled/prevented or when successfully spawned
# Config File
* Config file automatically updates to latest version when updating plugin jar file!
* Config regeneration still recommended for updated comments!
WitherOfDead
Tired of player deaths feeling quiet and boring? WitherOfDead makes every death count by playing the Wither spawn sound effect right where a player dies.
Most plugins make this sound global, but that gets annoying fast. This plugin limits the sound to a 20-chunk radius (320 blocks). If you are nearby, you’ll hear the blast; if you’re far away, your ears are safe!(Gemini)
Range: 20 Chunks (320 blocks)
Performance: Super lightweight, no lag.
Compatibility: Works on Paper/Spigot 1.13 to 1.21+.
1.1.0 config file added
Created by Pc-g & Gemini
Wither Survival
# Wither Survival
Every mob turns into Withers. Except for Endermen, Blazes, and the Dragon. The goal is to beat the game.
Inspired by Azp3ct’s video, “Can You Beat Minecraft if Every Mob is the Wither?”
## Youtube Overview
## Installation
1. Make a Bukkit, Spigot, or PaperMC minecraft server, following this guide.
2. Download the latest release from the releases tab.
3. Unzip it if it is zipped, then drag and drop the jar into the `plugins` folder.
4. Start the server
## Warning
This plugin applies to all worlds, and will cause destruction to your worlds.
## Gameplay
The End has the Endermen replaced with Withers instead. Blazes and endermen still spawn naturally.
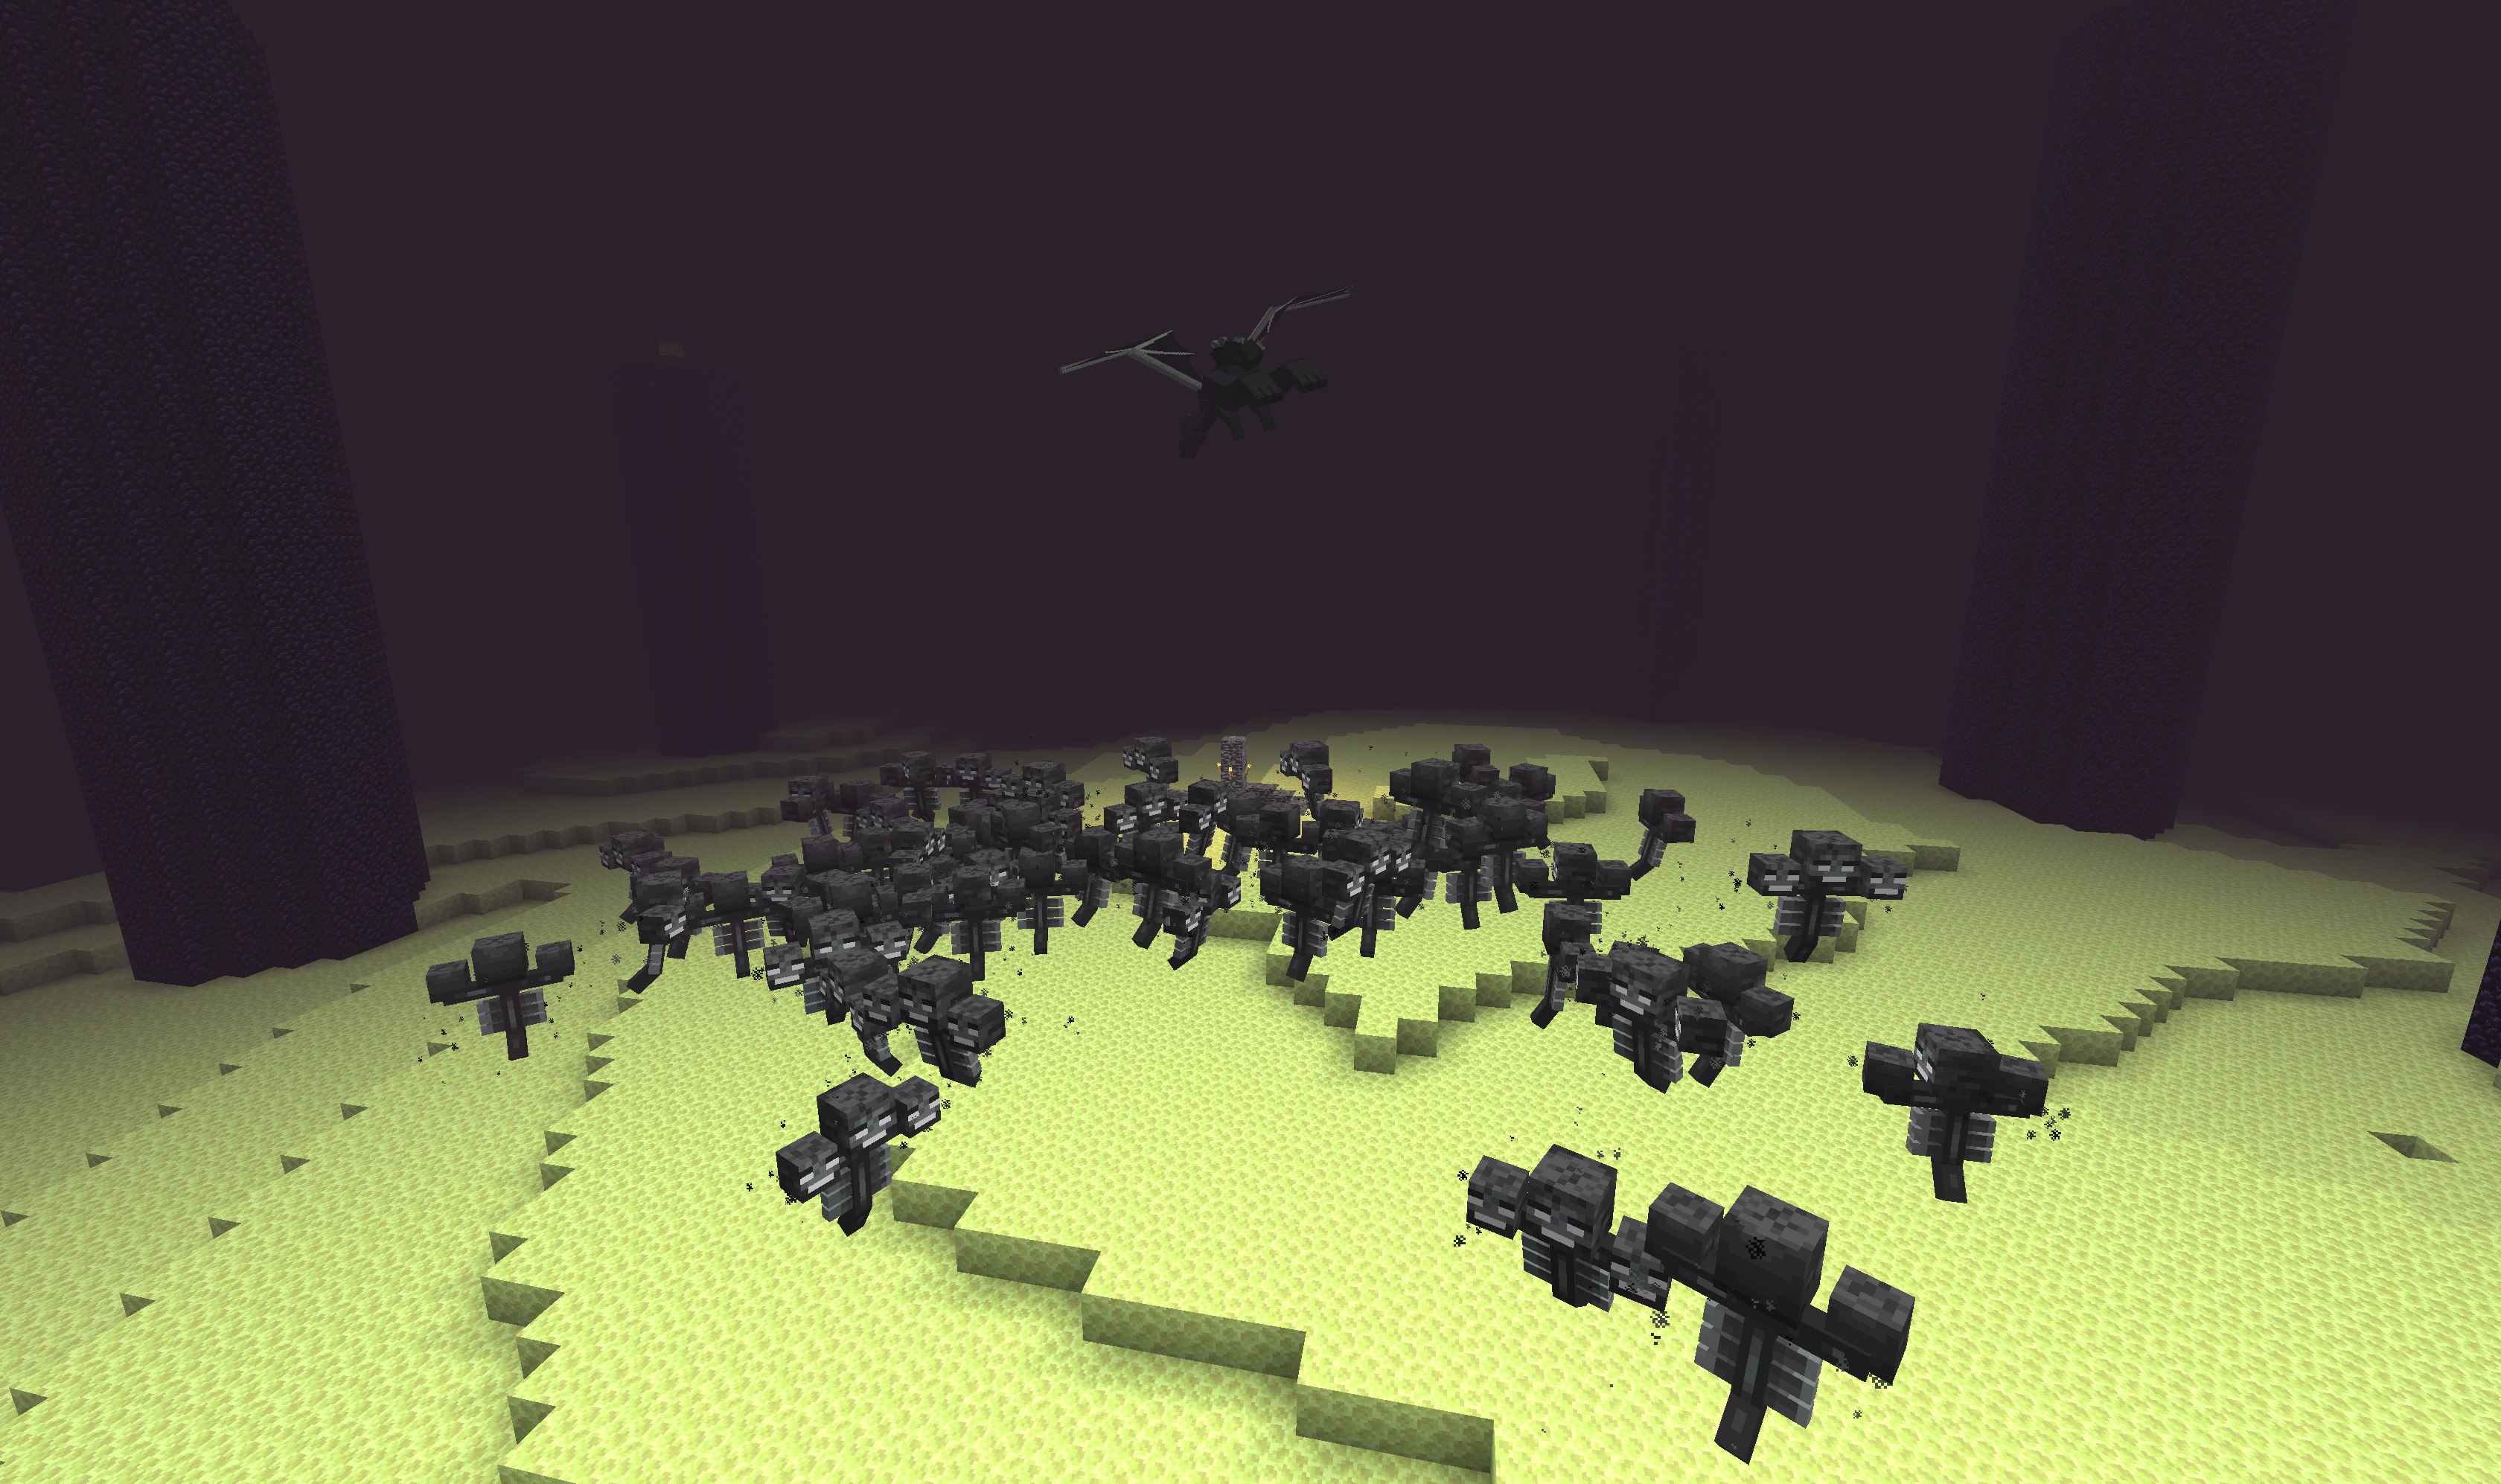
The time is always set to night, although it appears to look like day, add torches everywhere!

## Any other gameplay ideas?
I’d love to hear them, create an issue, and let’s see if it can be implemented.
## License
This plugin is licensed under MIT.
Withdrawer
Withdrawer is a way for players to withdraw their money, exp, hp or others onto physical items, so they can redeem them, trade them, sell them or store them as they wish.
## Features
* Withdraw your money, exp or hp onto items!
* Use the API to implement a new item that fits your needs!
* Bulk-Redeeming while pressing down the Shift Key.
* Messages and Sounds are all configurable, such as plugin prefix.
* The items are all configurable.

WispSMP
> **Disclaimer:** This is an unofficial remake of the WispSMP plugin concept. I am not affiliated with the original WispSMP server or team. This plugin is a fan-made recreation and I do not claim any credit for the original gameplay concept.
# ❤️ WispSMP
Players start with a set number of lives. Each death removes one life. If you hit zero lives, you switch to spectator mode unless revived with the Eye of Revival.

# 🔹Features
– **Visual Lives System**
Custom heart indicators appear in player nametags. They show how many lives a player has left. Hearts update in real time.
– **Spectator on Death**
A player with zero lives switches to spectator mode. No respawn. They watch the world without interaction.
– **Eye of Revival**
Players revive eliminated players with the Eye of Revival. The Eye comes from a pedestal ritual. A revived player returns with full lives.
—
## Commands & Permissions
| Command | Permission | Description |
| ——————– | —————- | ———————————— |
| /revive | wispsmp.revive | Revive a dead player with full lives |
| /pedestal | wispsmp.pedestal | Spawn the pedestal |
| /pedestal deactivate | wispsmp.pedestal | Remove the pedestal |
Aliases: /res, /restore
—
## How It Works
1. **New players join** → Get configured lives (default 3)
2. **Player dies** → Loses one life, hearts update
3. **Out of lives** → Becomes permanent spectator
4. **Revival** → Use the Eye of Revival at the pedestal to restore a player’s full lives
—

# Get the Texture-Pack from my Discord Server
—
Need help or have suggestions? Feel free to reach out via my Discord Server.
**Remade by Lusik21556** (@lusik_2155)
Wireless Redstone Plugin
_Releasing general improvement update soon. Found some weird bugs and missing features_
### ⚡ Wireless Redstone: Lightning Rods
Tired of messy redstone trails across your base? This plugin lets you use Lightning Rods as long-range, wireless transmitters and receivers. It’s lightweight, survival-friendly, and integrates perfectly with the vanilla look of Minecraft.
### 🕹️ How to Use
Releasing video tutorial soon
**_1._ The Setup**
> Place a Lightning Rod.
>
> Place a Redstone Torch directly on top of it.
**_2._ Tuning the Frequency**
> Take a Book and Quill and rename it to either Sender or Receiver using an Anvil.
>
> Open the book and type your desired Frequency (e.g., 100, Base_Alpha, or Gate) on the first page.
>
> Right-click the Lightning Rod with the book to register the device.
**_3._ Transmitting Power**
> When a Sender receives power, the torch on top will light up.
>
> All Receivers on the same frequency will instantly activate, triggering a visual “strike” > effect on the rod.
### 🌟 Key Features
– Full Variant Support: Works with all Lightning Rod stages (Normal, Exposed, Weathered, Oxidized) and even Waxed versions.
– Survival Integrated: No commands needed. Everything is done through blocks and items.
– Auto-Cleanup: If you break a rod or the torch above it, the location is automatically removed from the config—no “ghost” data left behind.
### 🛠️ Installation
– Drop the .jar into your plugins folder.
– Restart your server.
– Start linking your machines!
_Note: The Redstone Torch acts as the antenna tip and signal indicator. Use observers or adjacent redstone dust to pull the signal from your receivers._