WarpUtils
# Introduction
**WarpUtils** is a lightweight, fully configurable server-side utility mod that provides essential teleportation features: Homes, Warps, and TPA requests.
Inspired by the VanillaTweaks Datapacks.
Because it is server-side only, you can install this on your server and **pure vanilla clients can join without any drawbacks** or additional downloads.
## Core Functionality
* **Homes:** Players can set personal waypoints and teleport back to them.
* **Warps:** Operators can set global waypoints (like shops or hubs) accessible to everyone.
* **TPAs:** Players can send requests to teleport to one another securely.
* **Back:** A convenient command to return to your previous location after a teleport.
# Features
Every teleportation feature comes with
– **Cooldowns:** Configure how long a player must wait after teleporting before they can use the command again.
– **Warm-up Delays:** Configure a “stand-still” timer before a teleport executes. This delay will be cancelled if the player moves, runs another command, or is attacked (if the fight cooldown is active).
– **Configurable:** Every feature can be individually disabled and configured (see configuration details below).
Homes
Allows players to set personal homes and teleport back to them at will. Server owners can configure the maximum number of homes a player is allowed to keep.
| Command | Description |
| :— | :— |
| `/home ` | Teleports you to the specific home |
| `/home` | Teleports you to your default home (auto-selects one if no default is set) |
| `/setdefaulthome ` | Sets an existing home as your default |
| `/sethome ` | Creates or overwrites a home at your current location |
| `/delhome ` | Deletes the specified home |
| `/renamehome ` | Renames an existing home (can also override if the `newName` already exists) |
| `/homes` | Lists all your saved homes and their coordinates |
TPAs (Teleport Requests)
Allows players to request teleportation to other players. The requesting player is teleported to the receiving player once they accept the request.
**Note:** A player can only have one *outgoing* request active at a time, but can receive multiple *incoming* requests. Cooldowns apply after the teleport happens; delays apply after the request is accepted.
| Command | Description |
| :— | :— |
| `/tpa ` | Sends a teleport request to the specified player |
| `/tpaaccept ` | Accepts a request from a specific player |
| `/tpaaccept` | Accepts the most recent teleport request. |
| `/tpadeny ` | Denies a request from a specific player |
| `/tpadeny` | Denies all active incoming requests |
| `/tpacancel` | Cancels the outgoing request you sent |
| `/tpas` | Displays all active sent and received requests |
Warps
Allows operators to manage global points of interest that all players can teleport to.
**The Spawn Warp:**
By default, a `Spawn` warp is enabled and linked to the world spawn point (can be set using `/setworldspawn …`)
– It can be detached from the world spawn by overwriting it: `/setwarp Spawn`
– It can be reattached to the world spawn by deleting the custom warp: `/delwarp Spawn`
| Command | Description |
| :— | :— |
| `/warp ` | Teleports you to the specified global warp |
| `/warps` | Lists all available warps and their locations |
| `/setwarp ` | **(OP)** Creates or overwrites a warp at your location |
| `/delwarp ` | **(OP)** Deletes the specified warp |
| `/renamewarp ` | **(OP)** Renames an existing warp |
Commands marked with **(OP)** can only be executed by the
Back Command
Allows players to return to the location they were at *before* their last teleport or to their death location. The behavior is highly customizable via the config (including `mode` and `duration` settings).
| Command | Description |
| :— | :— |
| `/back` | Teleports you back to your last location before a teleport |
Tpr Command
Allows players to teleport to a random location. The maximum and minimum range of the teleport is configurable.
| Command | Description |
| :— | :— |
| `/tpr` | Teleports you to a random location |
Player Preferences & Effects
Personalize your experience using: `/warputils personal …`
## Customizable Options:
* **Delay Display:** When teleporting how should the delay progress be displayed: `none`, `percentage` or `seconds`.
* **Language:** Set your display language (currently only supports English).
* **Message Target:** Choose where mod messages appear: `chat` or `actionbar` (Some messages may be forced to be displayed in one or the other, e.g. homes list).
* **Particles:** Adjust the visual effects of the teleportation.
## Visual Effects
Particles are displayed at three stages:
1. **Charge Effect:** During the warm-up delay.
2. **Departure:** At the location you leave.
3. **Arrival:** At your destination.
*Note: Operators can force effects to be enabled globally, overriding player preferences.*
# Configuration
*Note: The config file is not for direct configuration. It only sets the default values used when creating a world or resetting the world specific config using `/warputils config reset`, `/warputils config reset` or `/warputils config default`*.
The command `/warputils config ` allows you to easily configure the functionality of each feature **as an operator**. Non-operators may read the values of the config but not edit them.
General
This config category allows you to set more general configurations, like the default `messageTarget` or the `cooldown` and `delay` used for teleporation. Each teleportation features inherits the `cooldown` and `delay` values by default (the respective setting’s value is set to -1) but they can be set individually using `/warputils config cooldown ` for example.
Accessed using `/warputils config general `.
| Setting | Default | Description |
| :— | :— | :— |
| `cooldown` | 1200 (1 minutes) | The waiting period (in ticks) between teleportations |
| `delay` | 60 (3 seconds) | The time (in ticks) between executing the command and being teleported |
| `messageTarget` | actionbar | The primary location to display messages to |
The exception to the cooldown default is the /tpr command for which it is set to 24000 (20 minutes).
*ticks: 1 tick = 1/20th of a second*
Homes
Accessed using `/warputils config homes `.
| Setting | Default | Description |
| :— | :— | :— |
| `maxHomeCount` | 3 | The maximum number of homes a player can have (0 = Infinity) |
| `disableHomes` | false | Disables homes (homes won’t be deleted) |
Tpas (Teleport Requests)
Accessed using `/warputils config tpas `.
| Setting | Default | Description |
| :— | :— | :— |
| `duration` | 6000 | The time (in ticks) a tpa request is active (0 = Infinity) |
| `disableTpas` | false | Disables tpas |
*ticks: 1 tick = 1/20th of a second*
Warps
Accessed using `/warputils config warps `.
| Setting | Default | Description |
| :— | :— | :— |
| `disableSpawnWarp` | false | Is the spawn warp disabled |
| `disableWarps` | false | Disables warps (warps won’t be deleted) |
Back Command
Accessed using `/warputils config back `.
| Setting | Default | Description |
| :— | :— | :— |
| `duration` | 0 | The time (in ticks) a tpa request is active (0 = Infinity) |
| `mode` | backBack | The operation mode of the `/back` command |
| `backOnDeath` | false | Does your death set a back location |
| `disableBack` | false | Disables the `/back` command |
The operation modes the `/back` command:
– **backBack**: You can teleport back to the location you used `/back`, `/home`, `/tpa` or `/warp` from
– **singleUse**: You can teleport back once after every teleportation using `/home`, `/tpa` or `/warp`
– **persistent**: The back location only changes when using `/home`, `/tpa` or `/warp`
Tpr Command
Accessed using `/warputils config tpr `.
| Setting | Default | Description |
| :— | :— | :— |
| `minRange` | 500 | The minimum distance (in blocks) tpa can teleport you away from your position |
| `maxRange` | 2000 | The maximum distance (in blocks) tpa can teleport you away from your position |
| `disableTpr` | false | Disables the `/tpr` command |
The operation modes the `/back` command:
– **backBack**: You can teleport back to the location you used `/back`, `/home`, `/tpa` or `/warp` from
– **singleUse**: You can teleport back once after every teleportation using `/home`, `/tpa` or `/warp`
– **persistent**: The back location only changes when using `/home`, `/tpa` or `/warp`
Effects
Accessed using `/warputils config effects `.
| Setting | Default | Description |
| :— | :— | :— |
| `chargeEffect` | RisingRings | The default effect to display during the delay period |
| `enforceChargeEffect` | false | Enforces the default charge effect; always plays this effect instead of the effect the player selected |
| `teleporationEffect` | Smoke | The default effect to display at the location of departure |
| `enforceTeleportEffect` | false | Enforces the default teleportation effect; always plays this effect instead of the effect the player selected |
| `arrivalEffect` | Smoke | The default effect to display at the location of arrival |
| `enforceArrivalEffect` | false | Enforces the default arrival effect; always plays this effect instead of the effect the player selected |
| `disableEffects` | false | Disables all particle effects in this mod |
*Note: To disable one specific effect, select the “None” effect and enforce it.*
Fight Cooldown
Accessed using `/warputils config fightCooldown `.
| Setting | Default | Description |
| :— | :— | :— |
| `cooldown` | 60 | The duration during which you cannot teleport after being attacked |
| `onlyPvP` | false | Whether only players can trigger this cooldown |
*Note: To disable this feature set the cooldown to 0.*
## Note:
Feel free to share any ideas regarding additions or changes on my github issues page.
Also minecraft version 26.1 and higher will no longer support forge.
Warping Carrots (Teleport to Friends)
# Warping Carrots



Teleport to your Friends with ease! Intended for small servers (up to 10 Friends) where you play Together! It tries to offer a more Survival-Friendly and Balanced approach compared to having access to an `/tpa` command.
## How does it work?
### Ender Warp
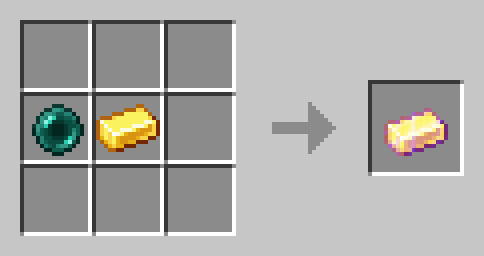
Every Player can open an Ender Warp by right clicking with the Ender Warp Item. It can be crafted with a Gold Ingot and an Ender Pearl (Shape does not matter):
There can only be one Ender Warp open at all times. Ender warps automatically close after 60 seconds. When someone opens an Ender Warp the previously open one gets closed.
### Warping Carrot
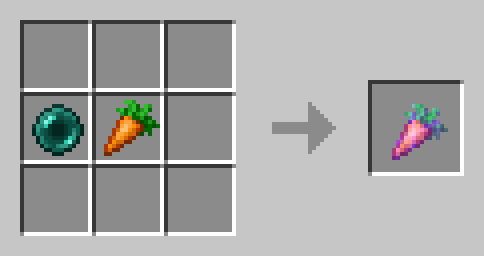
Eat Warping Carrots to teleport to the player who is currently opening an Ender Warp. It will damage you as much as an Ender Pearl. Warping Carrots are crafted with an Ender Pearl and a Carrot (Shape does not matter):
### Golden Warping Carrot
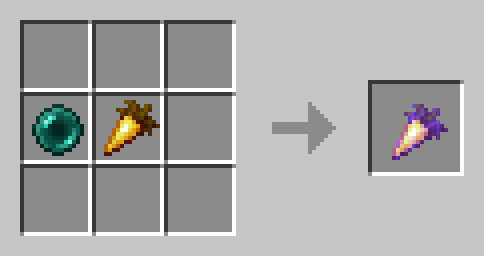
The Golden Warping Carrot has the same functionality as the Warping Carrot, but will not deal Damage when Teleporting.
## ⚙️ Compatibility
Do not use an “Unlock all achievements” datapack after having installed this datapack!
## ❗Issues and Suggestions
Report issues immediately on my Discord.
Warp Portals ─ Portal teleportation
# Warp Portals
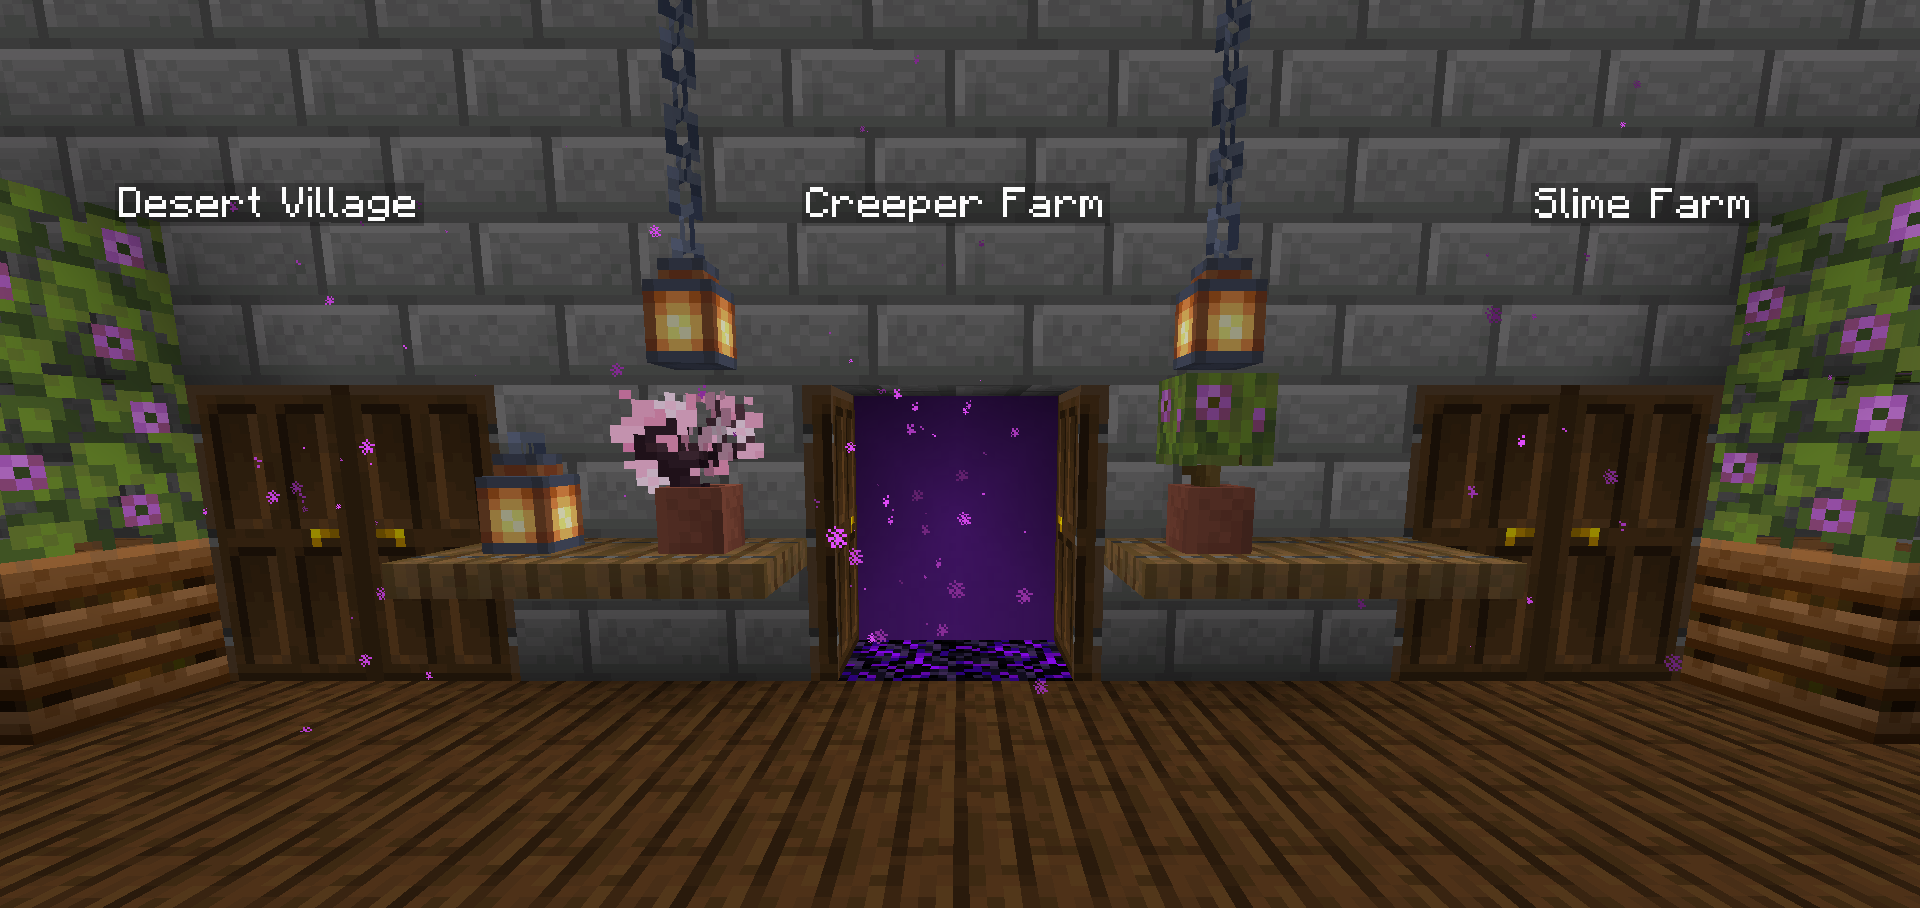
Create Warp Portals between your favorite locations. This datapack is made to be balanced, simple to use and lightweight.
Warp Portals supports Multiplayer and uses the best practices for datapacks to insure compatibility with other datapacks.
This datapack doesn’t use chunk loading, unlike most teleportation datapacks, which makes it lightweight no matter how many portals you have.
## Usage
### Forging the Portal Wand
To create a Warp Portal, you need to forge a Portal Wand. To do so, you need to drop an **Ender Pearl** in a **Crying Obsidian** block. They will turn into a portal and **and the Crying Obsidian will be the destination of the portal** created by the wand.

### Creating the Portal
To create a portal, you need to right-click above a **Crying Obsidian** block with the Portal Wand. The portal will be created and stepping into it will teleport you to the place where that Wand was forged. You can add more Crying Obsidian or Obsidian blocks around the portal to make it bigger, they will also teleport you when you step on them, you can use any shape, pads, rectangles, etc.

### Destroying the Portal
To destroy the portal, simply break the **Crying Obsidian** block in the entrance (where you see the particles) and the portal will be destroyed. **The Ender Pearl used to create the wand will drop above**.
## Installation
After downloading the `Warp Portals vX.Y.Z.zip` file (vX.Y.Z is the version number), you can install it by one of the following methods:
– **New SinglePlayer World**: When creating a new world, in the `More` tab, click on `Data Packs`, and drop the `Warp Portals vX.Y.Z.zip` file. The datapack will appear in the `Available` list, click in the arrow to add it to the `Selected` list and click `Done`.
– **Existing SinglePlayer World**: Click `Edit` in the world selection screen, click `Open World Folder`, go to the `datapacks` folder and drop the `Warp Portals vX.Y.Z.zip` file.
– **Multiplayer Server**: Drop the `Warp Portals vX.Y.Z.zip` file in the `datapacks` folder inside the world folder.
## Uninstalling
To uninstall Warp Portals, execute the command `/function warp_portals:uninstall` in the world where you installed the datapack, then remove the `Warp Portals vX.Y.Z.zip` file from the `datapacks` folder.
Note that Minecraft doesn’t provide the necessary tools to actually remove the entirety of a datapack. This function will break (and drop the Ender Pearls) of all portals in currently loaded chunks.
Wards

# MachinaWards
**Protect your builds with configurable land claim wards — no grief, no drama.**
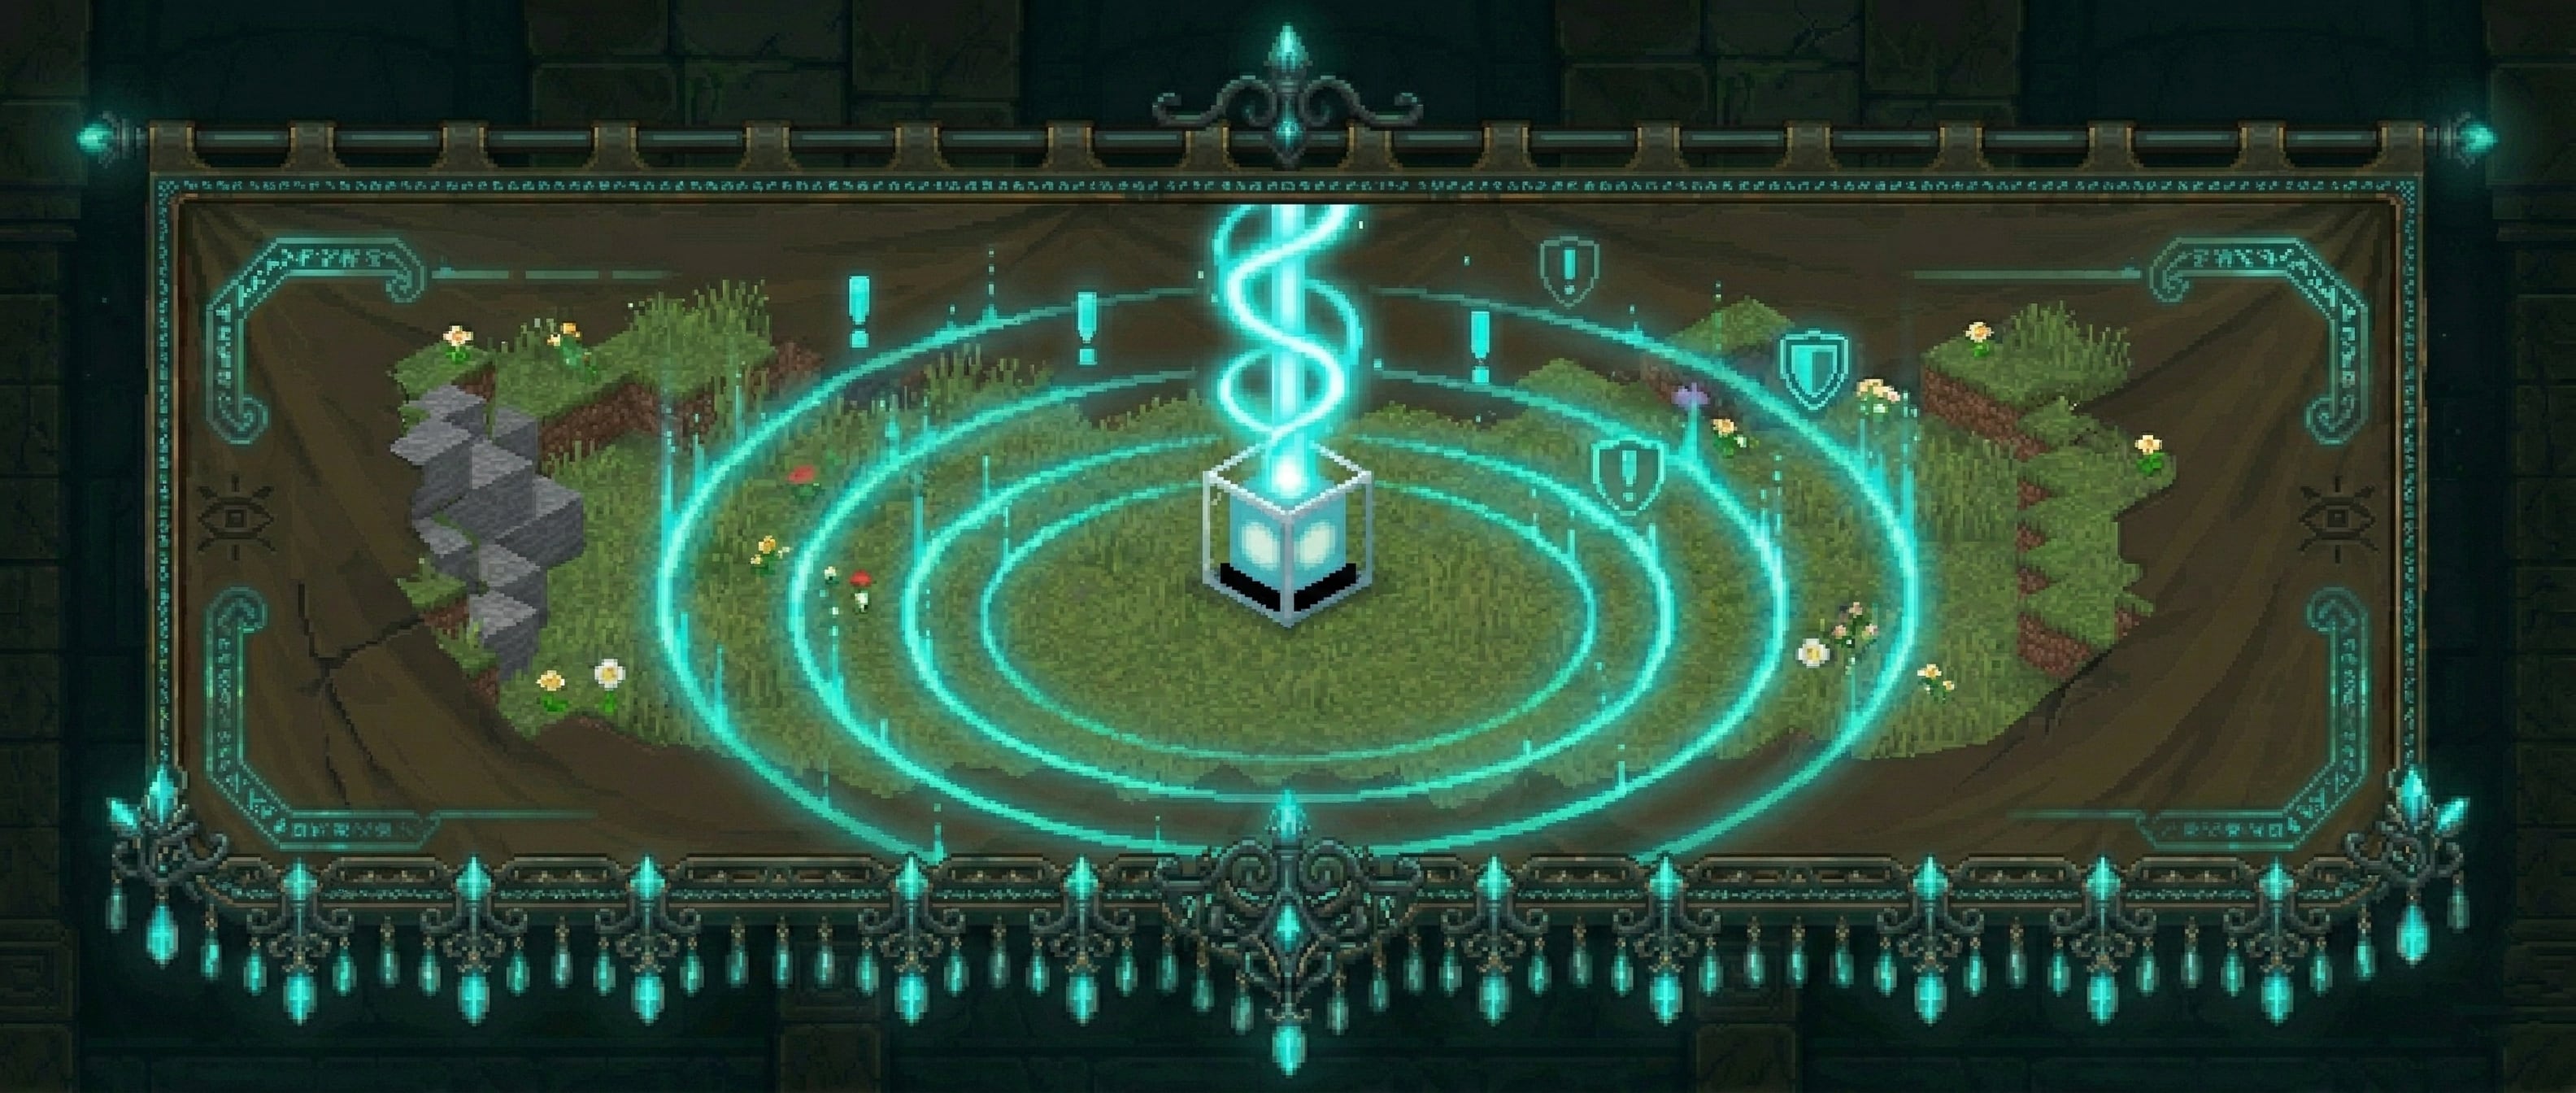
MachinaWards lets players place physical ward blocks to claim and protect an area. Members can be added by the owner, events are logged, and outsiders are stopped cold. Three tiers of wards scale from starter bases to high-value infrastructure.
—
## How It Works
Craft a ward item and place it like any block. The block marks the center of your protected zone. Break or sneak+right-click to pick it back up — the ward stays in your inventory so you can relocate it any time.
Right-click the ward block to open the management menu.
—
## Ward Tiers
| Tier | Block | Default Radius | Member Limit | Ward Intelligence |
| ———— | ————— | ————– | ———— | —————– |
| **Basic** | Lantern | 12 blocks | 5 | — |
| **Advanced** | Beacon | 20 blocks | 10 | — |
| **Super** | Crying Obsidian | 30 blocks | Unlimited | Yes |
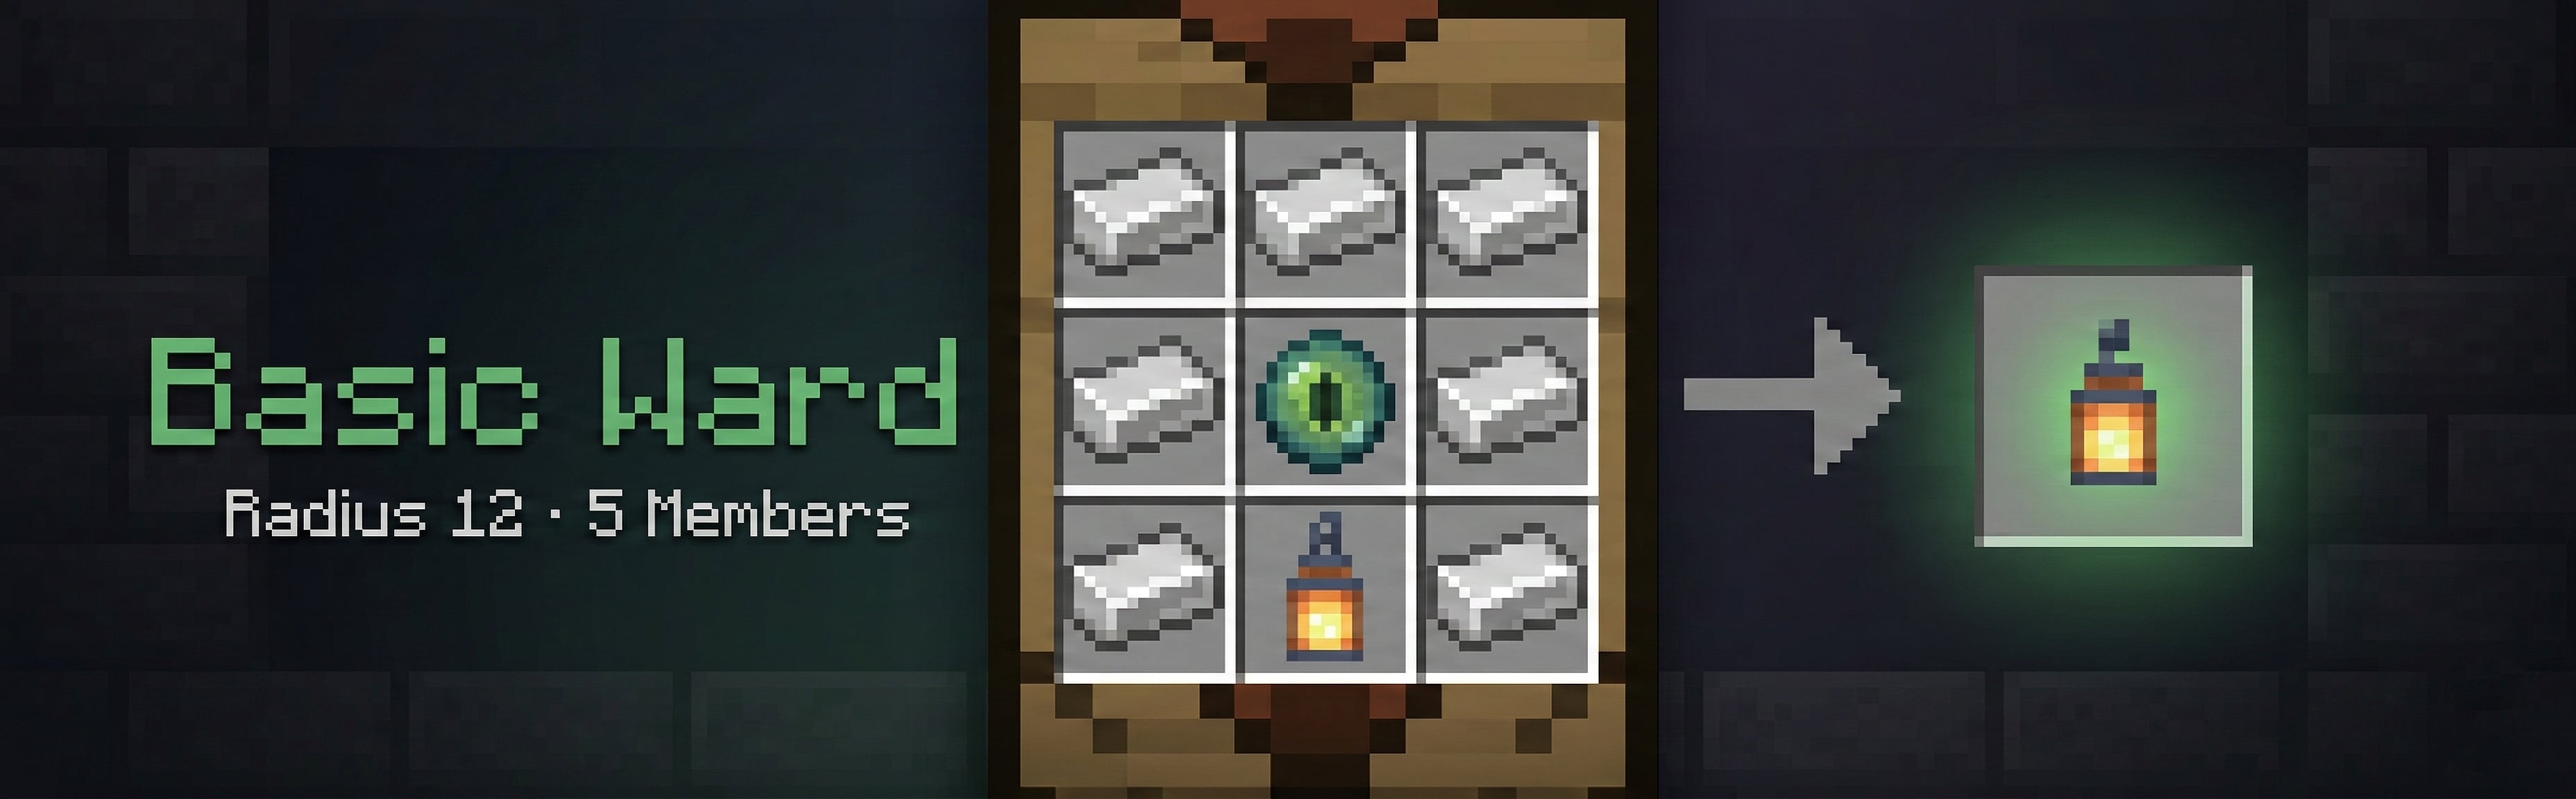
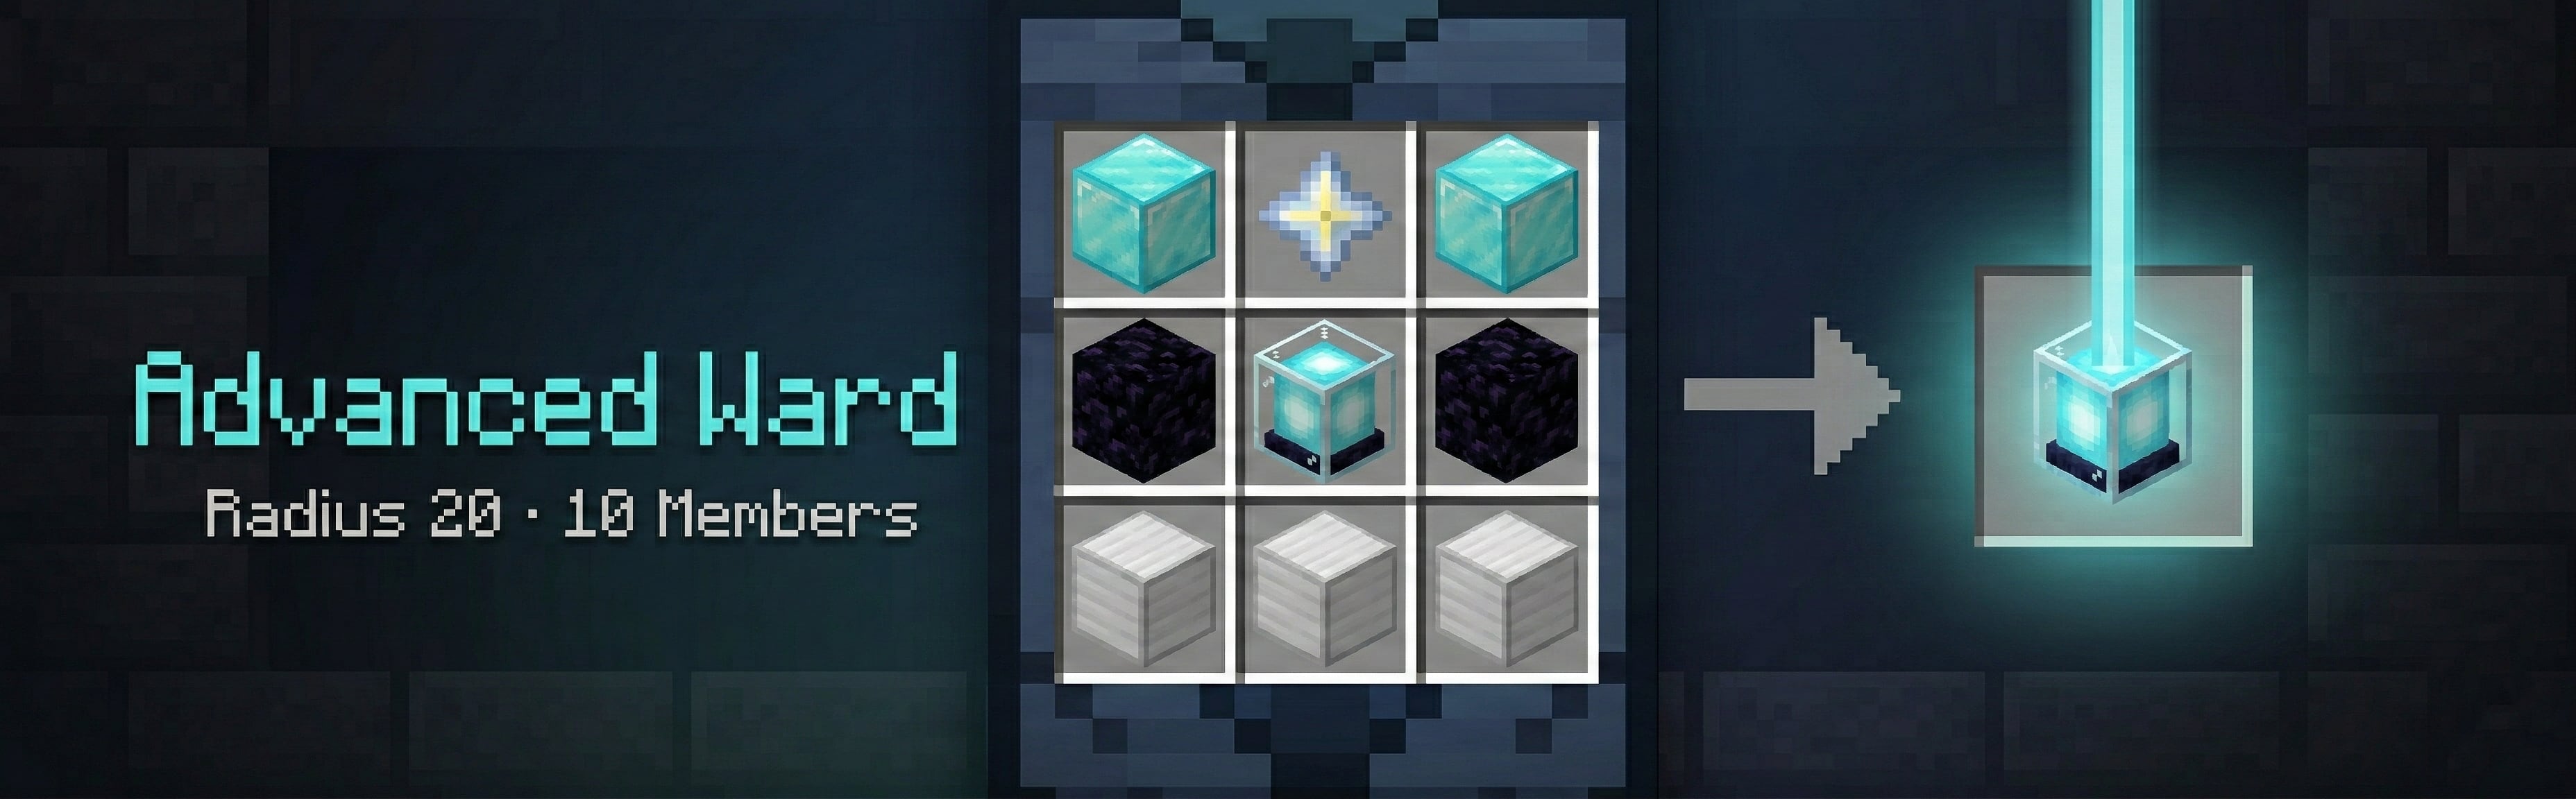

All tiers, recipes, radii, prices, and member limits are fully configurable in `config.yml`. Server operators can add or rename tiers freely.
—
## Protection
Inside a ward, the following are blocked for non-members (all toggleable per category in `config.yml`):
– Block placing and breaking
– Block interaction (buttons, chests, doors, etc.)
– Explosions (creeper, TNT, etc.)
– Fire spread
– **Piston pushing/pulling** blocks across ward boundaries
– **Entity grief** — Endermen, silverfish, Wither, Ravagers, and other griefing mobs can’t alter blocks inside a ward
– **Fluid flow** — lava and water can’t flow into a ward from outside
– **Hanging entities** — non-members can’t break item frames or paintings
– **PVP** — outsiders can’t attack players inside a ward *(per-ward override: Allow PVP flag)*
– **Entity damage** — outsiders can’t damage animals or mobs inside a ward *(per-ward override: Allow Mob Damage flag)*
– **Crop trampling** — non-members can’t trample farmland inside a ward
The ward owner and any added members bypass all restrictions. Players with `wards.admin` bypass everything.
Wards cannot overlap — placement is blocked if the new ward’s radius intersects an existing one, keeping protection zones unambiguous.
—
## Ward Menu
Right-clicking the ward block opens a GUI with:
– **Rename** — give your ward a custom name, shown in menus and `/ward list`
– **Entry Message** — set a custom message visitors see on entry. Supports `&` color codes and `&#RRGGBB` hex colors. Placeholders: `%ward%`, `%owner%`, `%tier%`, `%radius%`. Type `clear` to remove
– **Toggle Alerts** — turn entry notifications on/off for this ward
– **Members** — view all current members
– **Add Member** — type a player name in chat to add them (enforces tier member limit)
– **Remove Member** — click a player skull to remove them
– **History** — view the last 20 entry log entries
– **Show Radius** — draws a purple particle boundary for 10 seconds so you can visualize your claim
– **Allow PVP** — per-ward toggle to allow outsiders to PVP inside this specific ward
– **Allow Mob Damage** — per-ward toggle to allow outsiders to damage animals/mobs inside this specific ward
– **Ward Intelligence** *(Super Ward only)* — access the feature tracking system
—
## Super Ward — Ward Intelligence
Super wards include a **Ward Intelligence** menu with five toggleable tracking features:
| Feature | What It Tracks |
| ——————– | ———————————————————- |
| **Creeper Alert** | Notifies the owner when a creeper explodes inside the ward |
| **Mob Kills Player** | Logs and alerts when a mob kills a player inside the ward |
| **Mob Kills Entity** | Logs when a mob kills any entity inside the ward |
| **Player Death** | Logs every player death inside the ward |
| **Explosion Log** | Logs all explosions inside the ward |
Each feature has its own sub-menu where you can toggle it on/off, view recent logs, or clear the log history. All data is persisted to the database and wiped automatically when the ward is destroyed.
—
## Economy Shop
If **Vault** is installed with an economy provider (e.g. EssentialsX), players can purchase ward items directly using `/ward shop`. Prices are set per tier in `config.yml`.
—
## Commands
| Command | Description |
| —————————— | ————————————————————————– |
| `/ward` | Show help |
| `/ward shop` | Open the ward shop (requires Vault) |
| `/ward list` | List your wards with names, tiers, worlds, and coords |
| `/ward tp ` | Teleport to one of your wards by ID or name |
| `/ward compass [id|name]` | Point your compass at a ward (nearest, or by ID/name) |
| `/ward transfer ` | Transfer your nearby ward to another player |
| `/ward transfer ` | Transfer a specific ward to another player |
| `/ward addmember ` | Add a member to your nearby ward |
| `/ward removemember ` | Remove a member from your nearby ward |
| `/ward info [id|name]` | Show tier, radius, owner, and member info for a ward |
| `/ward nearby [radius]` | List wards within radius blocks (default 100, max 500), sorted by distance |
| `/ward admin list [player]` | *(admin)* List all wards, optionally filter by player |
| `/ward admin delete ` | *(admin)* Delete any ward by ID or name |
| `/ward admin tp ` | *(admin)* Teleport to any ward |
| `/ward admin stats` | *(admin)* Show total wards, per-world breakdown, members, and owner count |
| `/ward admin migrate mysql` | *(admin)* Copy all ward data from SQLite to MySQL |
| `/ward reload` | *(admin)* Reload config and re-register recipes |
—
## Permissions
| Node | Description |
| —————— | —————————————————————- |
| `wards.admin` | Full administrative access — bypass protection, delete any ward |
| `wards.place` | Allows placing ward blocks (default: true for all players) |
| `wards.player.` | Cap how many wards a player can own (e.g.`wards.player.3`) |
—
## Visual & Sound Effects
**Particles**
– **Ambient particles** — a subtle END_ROD effect floats above each ward block so you always know where your wards are (configurable interval)
– **Placement burst** — particle effect confirms a new ward was created
– **Deletion burst** — particle effect fires when a ward is broken or picked up
– **Radius preview** — purple particle ring shows your claim boundary for 10 seconds via the Show Radius button
**Sounds** *(all configurable in `config.yml → sounds:`)*
– `ward_place` — plays when a ward block is placed
– `ward_break` — plays when a ward is broken/removed
– `ward_pickup` — plays when a ward is picked up via sneak+right-click
– `entry_alert` — plays for the visitor when they enter a ward
Set any sound to `””` to disable it individually.
—
## Entry Warnings
When a non-member enters a ward they see an action bar notification showing the ward name and owner. This is configurable per ward — owners can set a fully custom entry message with color codes and hex colors directly from the ward menu. The message supports placeholders: `%ward%`, `%owner%`, `%tier%`, and `%radius%`. The visitor warning can be toggled globally in `config.yml`.
—
## Ward Compass
`/ward compass` sets your compass to point at your nearest ward in the current world. Specify an ID or name to target a specific ward. No special item is needed — any compass in your inventory will work.
—
## Ownership Transfer
`/ward transfer ` while standing in a ward transfers ownership to another player. Use `/ward transfer ` to transfer from anywhere. The new owner is notified immediately if they are online.
—
## Nearby Wards
`/ward nearby [radius]` lists all wards within the given radius (default 100 blocks, max 500), sorted by distance. Shows each ward’s name, tier, owner, and distance. Useful for scouts, admins, and players exploring unfamiliar territory.
—
## Anti-Abuse
– Ward items cannot be used as crafting ingredients
– Ward items cannot be inserted into beacon payment slots
– Wards cannot be placed overlapping an existing ward
– Picking up a ward block requires a second sneak+right-click confirmation within a configurable window (default 5 seconds) to prevent accidents
—
## Database
MachinaWards stores all ward data in a database. Two backends are supported:
**SQLite** *(default — no setup required)*
“`yaml
database:
type: sqlite
“`
Data is stored in `plugins/MachinaWards/MachinaWards.db`.
**MySQL / MariaDB**
“`yaml
database:
type: mysql
mysql:
host: localhost
port: 3306
database: machinawards
username: root
password: “”
“`
The MySQL driver is downloaded automatically — no manual installation needed. Use `/ward admin migrate mysql` to copy existing SQLite data to MySQL before switching.
—
## Configuration
Everything is configurable in `config.yml`:
– **Database:** SQLite (default) or MySQL/MariaDB
– **Shape:** `column` (vertical cylinder, unlimited height) or `sphere` (3D radius)
– **World whitelist** — restrict wards to specific worlds
– **Height limits** — `min_y` / `max_y`
– **Alert cooldown** — default 90 seconds between entry notifications
– **Protection toggles** — individually enable/disable each protection category
– **Per-tier:** display name, placed block material, crafting recipe, radius, price, member limit (`max_members`), features list
– **Particle type and interval**
– **Sound effects** — one config key per event, set to `””` to disable
– **Entry warning:** `entry.show_warning_to_visitor`, `entry.warning_format` with `%ward%`, `%owner%`, `%tier%`, `%radius%` placeholders
– **Pickup confirmation window:** `pickup.confirm_ms` (default 5000ms)
– **Color support:** all text fields support `&` color codes and `&#RRGGBB` hex colors
—
## Dependencies
– **Spigot / Paper / Purpur** 1.21+
– **Vault** *(optional)* — required only for the economy shop
– **MySQL/MariaDB** *(optional)* — only if you choose the MySQL database backend
WardenGuard
# WardenGuard
**WardenGuard** is a cross-server ban enforcement plugin that connects your Minecraft server to the centralized WardenGuard ban network. Keep banned players off your server automatically, detect alt accounts, and contribute to a shared ban database with your community.
—
## Features
### Ban Enforcement
– Checks players against the WardenGuard ban network on every join
– 3-tier ban level system – configure which severity triggers an auto-kick
– Local ban cache with configurable sync interval (default: every 5 minutes)
– Fallback enforcement from cache if the API is temporarily unreachable
– Retry queue for failed checks – no join goes unverified
### Alt Account Detection
– Detects linked accounts via exact IP match or /24 subnet matching
– Configurable action: kick or staff-warn only
– Set a minimum ban level threshold to filter false positives
– Logs all detected alts, even those without active bans
### Ban Reporting
– `/wg report ` generates a direct report URL for any online or recently seen player
– Automatic reporting when a ban is issued via LiteBans, AdvancedBan, or BanManager
– Staff receive clickable report links in chat (Spigot/Paper only)
### Staff Tools
– `/wg check ` – look up a player’s ban cache status by name or UUID
– `/wg scan` – scan all online players against the ban list
– `/wg sync` – force an immediate ban list refresh
– `/wg status` and `/wg ping` – monitor API connectivity and configuration
– Recent player cache: commands work on players who left within the last 30 minutes
—
## Platform Support
| Platform | Min Version |
|———-|————-|
| Spigot / Paper | 1.21.4 |
**Java 17 or newer is required.**
—
## Soft Dependencies (optional integrations)
– **LiteBans** – auto-reports bans to WardenGuard on issue
– **AdvancedBan** – auto-reports bans to WardenGuard on issue
– **BanManager** – auto-reports bans to WardenGuard on issue
—
## Commands and Permissions
| Command | Permission | Description |
|———|————|————-|
| `/wg report ` | `wardenguard.staff` | Generate a ban report URL |
| `/wg check ` | `wardenguard.staff` | Check a player’s ban status |
| `/wg sync` | `wardenguard.admin` | Force ban list sync |
| `/wg scan` | `wardenguard.admin` | Scan all online players |
| `/wg status` | `wardenguard.admin` | Show API status and config |
| `/wg ping` | `wardenguard.admin` | Test API connectivity |
| `/wg reload` | `wardenguard.admin` | Reload config.yml |
**Additional permission:** `wardenguard.bypass` – exempt a player from automatic ban enforcement.
—
## Configuration
WardenGuard is configured via `config.yml`. Key options:
“`yaml
wardenguard:
api_key: “your_api_key_here”
api_url: “https://wardenguard.com/api/v1”
auto_ban_level: 2 # 1, 2, 3, or 0 to disable auto-ban
sync_interval_seconds: 300 # how often to pull full ban list (default 5 min)
check_on_join: true # check player via API on every join
notify_staff_on_ban: true # send report URL to staff chat after ban
staff_permission: “wardenguard.staff”
alt_detection:
enabled: true
kick_enabled: true # kick on alt match (false = warn staff only)
min_ban_level: 2 # only trigger for linked accounts at this level or higher
include_subnet: false # also flag /24 subnet matches (higher false positive rate)
log_all: true # also log alts with no active ban
kick_message: “Your account is linked to a banned player ({linked}). Appeal at wardenguard.com/appeal”
warn_staff: “{player} flagged as potential alt of {linked} (Level {level} ban: {reason})”
warn_staff_all: “{player} shares an IP with {linked} (no active ban)”
messages:
banned_message: “You are banned from this network. Appeal at wardenguard.com/appeal”
report_url_message: “Submit your ban report: {url}”
not_banned: “{player} is not on the Warden Guard ban list.”
is_banned: “{player} is BANNED (Level {level}): {reason}”
sync_complete: “Ban list synced. {count} bans loaded.”
warn_staff_on_join: “{player} joined with a Level {level} ban: {reason}”
warn_staff_on_kick: “{player} tried to join but was blocked – Level {level} ban: {reason}”
“`
All messages are fully customizable. Available placeholders: `{player}`, `{level}`, `{reason}`, `{linked}`, `{url}`, `{count}`.
—
## Getting Started
1. Register your server at wardenguard.com to obtain an API key.
2. Drop the correct jar for your platform into your `plugins/` or `mods/` folder.
3. Start the server and add your `api_key` to `plugins/WardenGuard/config.yml`.
4. Reload with `/wg reload` or restart the server.
—
## Links
– Website: wardenguard.com
– Ban Feed: wardenguard.com/feed
– Support: wardenguard.com
Warden bossfight
## Overview
– Allows you to turn a player into a warden boss.
– To bring up the main menu, either use `/reload` or `/function warden/setup`. From there, you can turn yourself into a warden, change configs, stats, and ability cooldowns. Full explanation below.
– This datapack uses some tricks to be compatible with ALL minecraft versions from 1.20.5 up to 1.21.11, with a singular release.
## Warden stats
– 500 health
– 5 attack damage
– 70% knockback resistance
– +50% movement speed
– +20% water movement speed
– +10% size
– 0.5 block step height
– +0.5 block range
– no fall damage
– no soul sand slowdown
– fire resistance
– night vision
– infinite hunger, but no health regen
## Warden abilities
### Sonic boom
– Shoots a sonic blast.
– Default cooldown: 5s
### Descending dark
– Jump into the air before charging down, dealing damage and burning an area around the landing location.
– Default cooldown: 10s
### Wild charge
– Briefly wind up before gaining a huge speed boost, blowing up the first target you run into.
– Default cooldown: 15s
### Agitate
– Most abilties spread sculk. Cause nearby sculks to catch fire and spread to nearby sculk, blinding, weakening and slowing entities hit.
– Default cooldown: 20s
## Warden menu
### Give warden’s mark
– Give yourself an item you can shoot other players with to mark them. Marked players will initiate a transformation sequence upon death and gain their stats and abilities.
### Remove warden
– Remove the current warden’s attributes, abilities, and bossbar.
### Become warden
– `/tag @s add warden_mark`
– Running the command marks you as the next warden. You can also change `@s` to another player’s name to mark them instead
### Uninstall
– `/function foppy:uninstall`
– Uninstalls the datapack.
## Configs
### Infect blocks
– Whether warden can turn soft blocks into sculk. Agitate will work on all blocks if this is disabled.
– Default: 1 (true)
### Warden health
– How much health a warden starts with. Since you can change this value, wearing armor is not recommended.
– Default: 500
### Warden damage
– How much base damage the warden deals. Weapons are also not recommended.
– Default: 5
### Requires death
– Whether a marked player needs to die to turn into a warden. If disabled, whoever gets marked becomes a warden immediately.
– Default: 1 (true)
### Use custom game rules
– Whether the datapack will set its game rules during the next reload, being:
– doImmediateRespawn: true
– mobGriefing: false (Explosions will destroy blocks if true)
– sendCommandFeedback: false
– When disabled, you still need to set the gamerules manually. They just won’t be reset on the next `/reload`
## Final notes
– Join the discord server to suggest more features, configs and attacks.
– Don’t try to spawn two wardens at once, it won’t end well.
– Credit to `lowpolyellie` on discord for creating wild charge and descending dark.
– If you want to use this datapack for commercial purposes, please notify me before doing so. This is just for tracking purposes, I have no issues with people profiting off of my work
War Tower
### 🏰 War Tower
**Strategic country warfare with tower capture mechanics**
**Core Features:**
– **Create & manage countries** with territories and citizens
– **Build & defend towers** – key strategic points
– **Declare wars & capture** enemy towers while protecting yours
**Main Commands:**
– `/war add country ` – Create country (1 per player)
– `/war list` – List all countries
– `/war invite ` – Invite player to your country
– `/war accept` – Accept country invitation
– `/war decline` – Decline invitation
– `/war leave` – Leave your country
– `/war members ` – Show country members
– `/war color ` – Change country color
– `/war info ` – Country information
– `/war tower ` – Create tower (admin)
– `/war deletetower` – Remove nearest tower (admin)
– `/war start` – Start war (admin)
– `/war stop` – Stop war (admin)
—
### 🏰 War Tower
**Стратегические войны стран с механикой захвата башен**
**Основные возможности:**
– **Создание и управление странами** с территориями и гражданами
– **Строительство и защита башен** – ключевых стратегических точек
– **Объявление войн и захват** вражеских башен и защита своих
**Основные команды:**
– `/war add country ` – Создать страну (1 страна на игрока)
– `/war list` – Список стран
– `/war invite ` – Пригласить игрока в страну
– `/war accept` – Принять приглашение в страну
– `/war decline` – Отклонить приглашение
– `/war leave` – Покинуть страну
– `/war remove ` – Удалить игрока из страны
– `/war delete ` – Удалить страну
– `/war members ` – Участники страны
– `/war color <цвет>` – Изменить цвет страны
– `/war info ` – Информация о стране
– `/war tower ` – Создать башню (админ)
– `/war deletetower` – Удалить ближайшую башню (админ)
– `/war start` – Начать войну (админ)
– `/war stop` – Остановить войну (админ)
WanderingTraderAlert
# WanderingTraderAlert
A lightweight Paper plugin that broadcasts **Wandering Trader** spawns, shows **live coordinates**, adds a **direct Teleport button**, includes a configurable **despawn ETA**, and rates each trader’s offers with a **custom star rating**.
—
## Features
– **Global spawn broadcast** when a Wandering Trader appears.
– **Despawn message as broadcast**
– **Nearest player** info (with distance in blocks).
– **[Show Coordinates]** → prints *current* position (auto-updates while the trader moves).
– **[Teleport]** button (runs immediately if you have permission).
– **Despawn ETA**: shows `(~MM:SS left)` based on loaded time (configurable).
– **Custom rating (★)** of offers via configurable item weights.
– **Config file** (`config.yml`) for messages, timing, rating weights, etc.
– **Reload command**: `/traderalert reload`
—
## Commands
– `/tradercoords ` — show live coordinates (+ ETA & rating).
– `/traderteleport ` — teleport to the trader (instant).
– `/traderalert reload` — reload the config.
### Permissions
– `traderalert.use` — use Show Coordinates *(default: true)*
– `traderalert.teleport` — use Teleport button / command *(default: op)*
– `traderalert.admin` — `/traderalert reload` *(default: op)*
—
## Configuration (`config.yml`)
“`yaml
despawn_millis: 2400000 # 40 minutes loaded time
update_period_ticks: 40 # update every ~2s
rating:
enabled: true
weights:
NAUTILUS_SHELL: 5
CORAL_BLOCK: 4
MOSS_BLOCK: 3
DRIPSTONE_BLOCK: 3
PACKED_ICE: 2
PODZOL: 2
GLOW_BERRIES: 1
SAND: 1
DYE: 1
messages:
spawn_title: “A Wandering Trader spawned!”
closest_fmt: “The Wandering Trader is closest to {player} ({blocks} blocks)”
no_players: “No players in the same world.”
click_show: “[Show Coordinates]”
coords_fmt: “Wandering Trader @ {world}: x={x}, y={y}, z={z}”
remaining_fmt: ” (~{mm}:{ss} left)”
rating_fmt: ” [Rating: {stars}]”
teleport_btn: “[Teleport]”
no_perm_tp: “[Teleport]”
no_perm_hover: “No permission. Ask an admin.”
teleport_hover: “Click to teleport”
despawned: “A Wandering Trader despawned.”
reloaded: “WanderingTraderAlert config reloaded.”
“`
—
## Installation
1. Download the latest JAR.
2. Drop it into your server’s `plugins/` folder.
3. Start the server (first run will generate `config.yml`).
—
## FAQ
**Q:** Does the Wandering Trader have levels?
**A:** No — unlike villagers, Wandering Traders don’t level up. The plugin provides a *custom* star rating based on the trades it spawns with.
**Q:** What if a trader unloads?
**A:** Despawn ETA counts *loaded* time only. When the entity unloads, the timer pauses.
**Q:** Can I change messages/timings?
**A:** Yes, everything lives in `config.yml`. Use `/traderalert reload` to apply changes.
—
## Compatibility
– Paper 1.21.x. Other forks may work but aren’t officially supported.
—
## Changelog
– **1.1.0** — Config, reload, tab-completion, ETA & rating, instant TP button.
– **1.0.1** — Live updates, despawn broadcast, teleport command.
– **1.0.0** — Initial release (spawn broadcast, clickable coords, nearest player).
Wallet
# Wallet
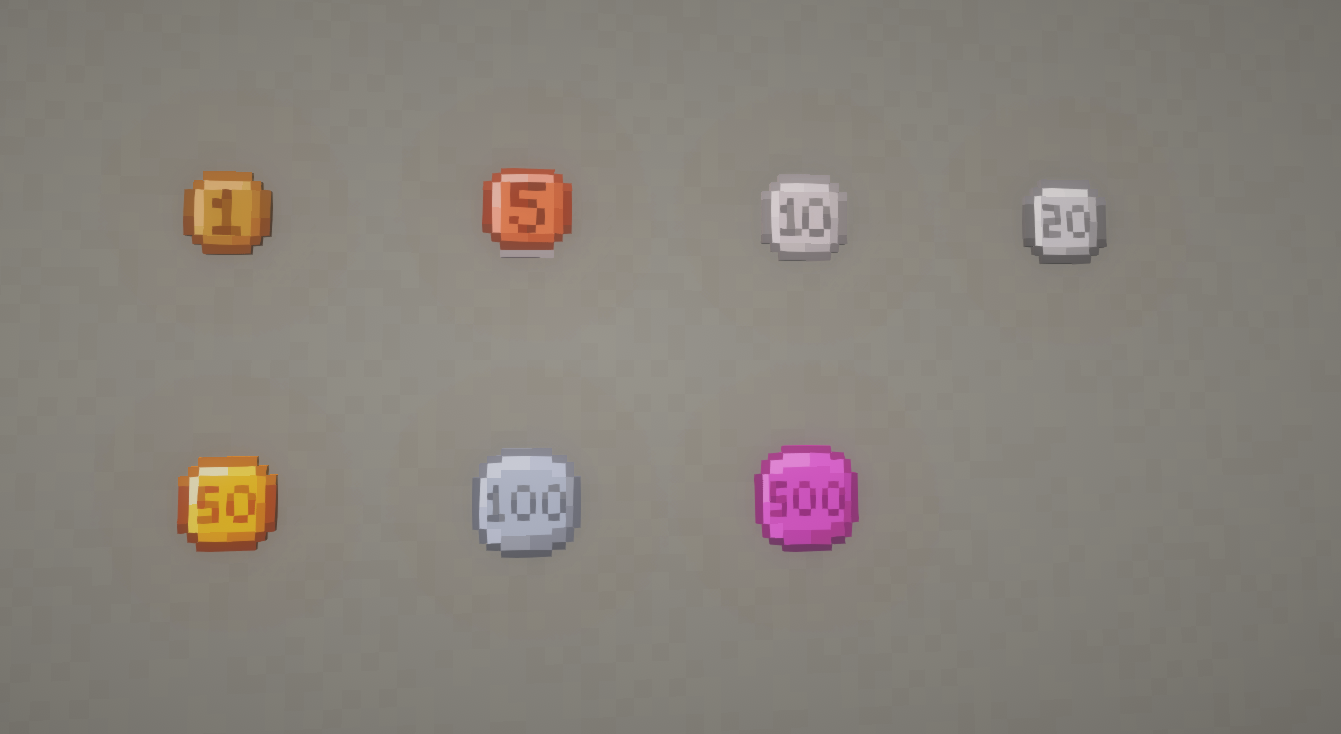
Immerse yourself in the world of Minecraft economics with the “Wallet” data pack! This economy data pack introduces currency to the system by sequentially adding 7 coin denominations: 1, 5, 10, 20, 50, 100, and 500. Players will now be able to trade using these coins to exchange goods and services. Coins can be obtained by looting villages, dungeons and other buildings.
# ⚠️Important⚠️
1. **This datapack contains a dependent resource-pack even if you install a mod , not counting the mod for version 1.21.4 , (don’t forget to install it)**.
## Features
– **Seven unique coins:** Each coin has its own unique design and denomination, making it easy to make transactions.
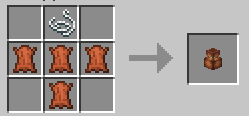
– **Wallet:** Convenient storage for your coins to help organize your wealth and manage your finances, and has an intuitive interface.
– 
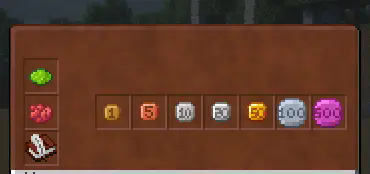
– **Trade Integration:** Coins can be used to buy items from other players, making the game more dynamic and interesting.
Walkie-Talkie
# Minecraft Walkie-Talkie Mod
> **Warning**
>
> This is not an official addon. **Please don’t go to the Simple Voice Chat discord server for support! Instead, please use GitHub issues
> for support.** I’ll try to provide support as soon as possible but there is no guarantee for how long it will take.
>
> This mod **requires Simple Voice Chat and Architectury API**
>
> If you use Fabric, this mod **require Fabric API.**
This mod adds two-way radios with different upgrades.
Discord
## Versions maintained
| Minecraft Version | Fabric | Forge |
|——————-|——–|——-|
| 1.20.4 | ✅ | ❌ |
| 1.20.2 | ✅ | ✅ |
| 1.20.1 | ✅ | ✅ |
| 1.19.4 | ❌ | ❌ |
| 1.19.3 | ❌ | ❌ |
| 1.19.2 | ✅ | ✅ |
| 1.18.2 | ✅ | ✅ |
| 1.16.5 | ❌ | ✅ |
## How to use
### Walkie-Talkie:
+ Right-click to open the Walkie-Talkie menu
+ Turn on the walkie-talkie
+ To speak, **make sure the walkie-talkie is in your hand**
+ To listen, **make sure the walkie-talkie is in your hotbar**
### Speaker:
+ Right-click on the speaker to open menu
+ Turn on the speaker
## Features
+ An interface for configuring the radio
+ Select a radio channel
+ Turn off the microphone (of the walkie-talkie)
+ Turn off the microphone (of the walkie-talkie)
+ Limited distance
+ Upgrade to extend the limit
+ Add speaker block
+ Volume category for speakers
+ Keybind to activate/deactivate the walkie-talkie
## Upgrades
+ Wood: 128 block distance
+ Stone: 256 block distance
+ Iron: 512 block distance
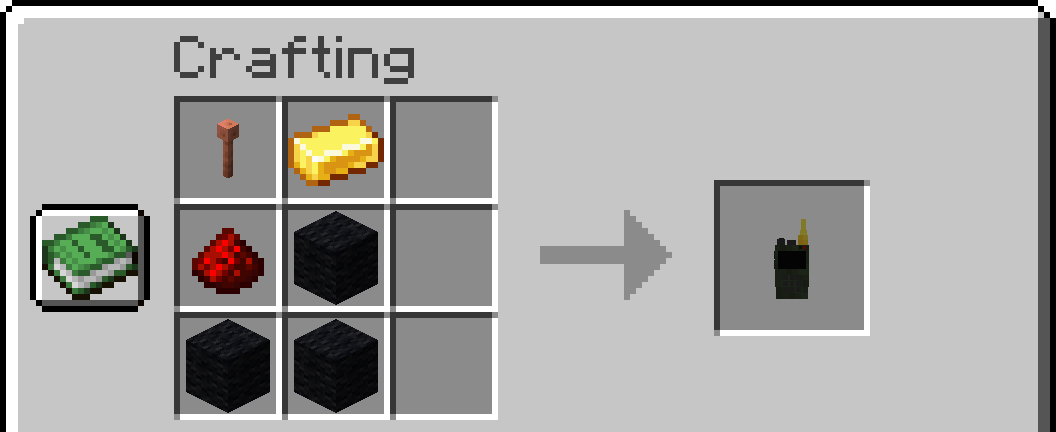
+ Gold: 1024 block distance
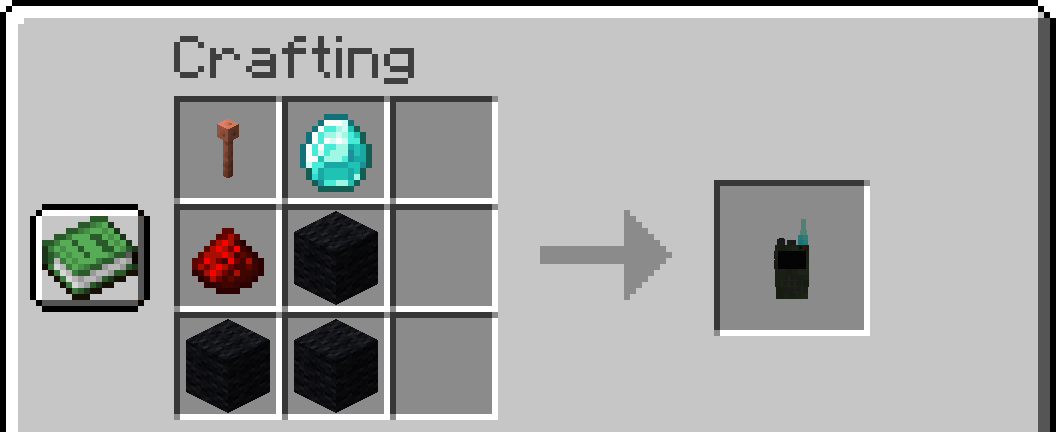
+ Diamond: 2048 block distance
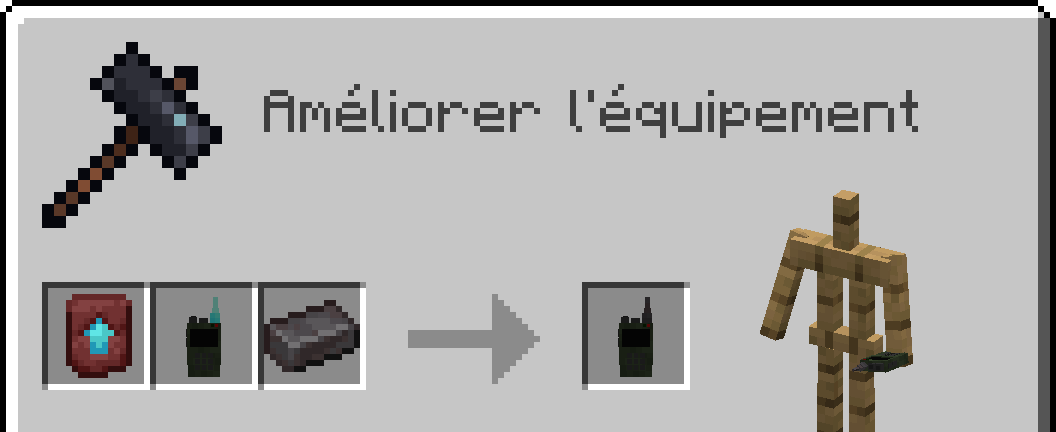
+ Netherite: 4096 block distance
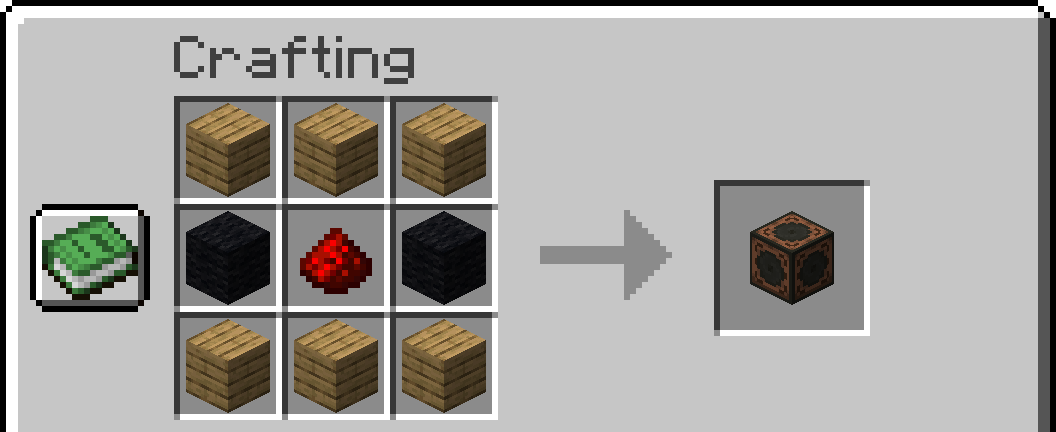
## Crafts:
***Notes: Any type of wood and wool is allowed. 1.16.5 replaced lightning rod with iron bars***
Wooden Walkie-Talkie
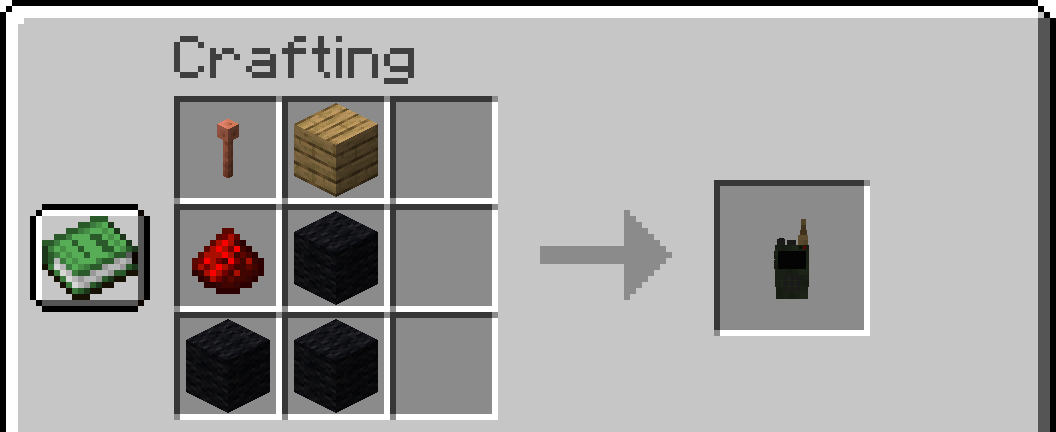
Stone Walkie-Talkie
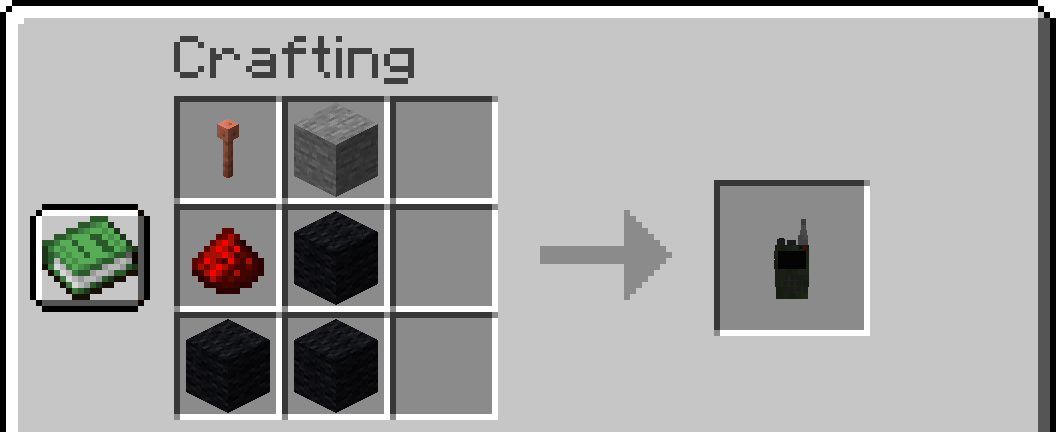
Iron Walkie-Talkie
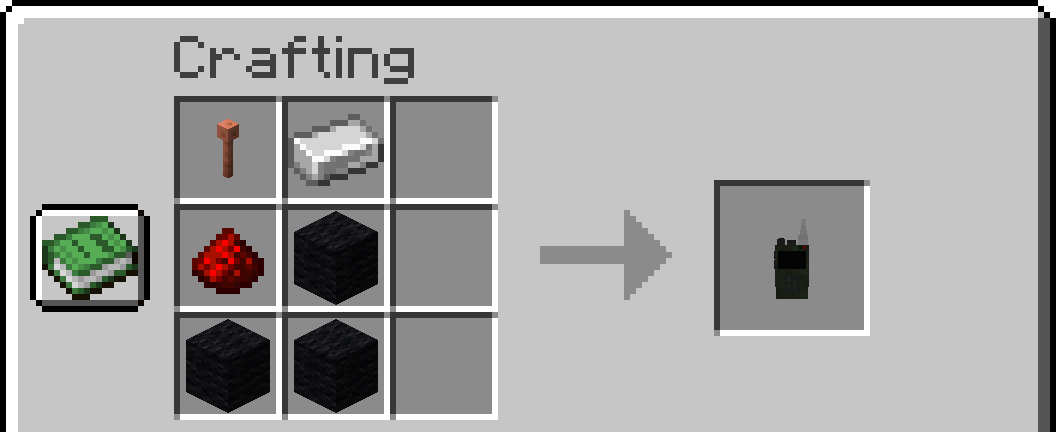
Gold Walkie-Talkie
Diamond Walkie-Talkie
Netherite Walkie-Talkie
Speaker
## Config
+ Max Channel
+ Speaker Distance
+ Speaker Voice Duplication
+ Walkie-Talkie Range
+ Cross dimensional behavior
## Credits
### Textures and models :
+ **4irwan**
### Translators :
+ Russian: **Heimdallr-1**
+ German: **Kampftroll**
### SFX :
+ **JustinBW**
### Mod :
+ Simple Voice Chat
+ Architectury API
LICENSE