# WebSocketServer
**This is a Plugin/Mod that starts a Websocket Server that provides Data about the Server.**
## Implemented Features
– Player Positions
## Planned Features
– Fabric/Quilt Support
– Players
– Inventories
– Health
– Mapping
– Custom Markers
– Areas (Factions, Spawn regions etc.)
– If you have an idea for something you want to see in this, please submit an Issue on Github.
## Need help?
**Read the official guide [here](docs/guide.md)**
## Features
Currently, WebhookIntegrations offers the following capabilities:
1. Sending customizable messages in response to various player actions:
– Joining the server
– Being kicked
– Leaving the server
– Sending a message
– Receiving an advancement
– Being killed by another player
– Dying from an NPC
2. Multi webhook support – you choose what events are sent where
3. Sending a configurable message upon server startup and shutdown.
4. Configurable censoring system.
5. Force ping prevention.
6. Dynamic loading and saving config presets with commands.
7. Multi-language support.
8. Support for vanish and permissions.
## Placeholders
WebhookIntegrations uses a special placeholder system to convert dynamic variables like `$player$` into the name of the player who triggered the event. You can view all placeholders in the plugin’s config. The plugin also supports `PlaceholderAPI` for additional placeholders you can use in your messages!
## bStats
This plugin uses the bStats plugin metrics for providing statistics for me and the community. You can view all collected data [here](https://bstats.org/plugin/bukkit/WebhookIntegrations/18509). All information sent is anonymous. You can opt-out at any time in the bStats configuration.
### Disclaimer: this plugin has an auto update feature that can be disabled in the config by setting `auto-update` to `false`, it is enabled by default.
#### Like the plugin? Consider leaving a review on [Spigot](https://www.spigotmc.org/resources/1-17-webhookintegrations-simplifying-discord-integrations.107688/)!
WebGUI
**WebGUI** lets you render real web interfaces inside Minecraft using the technologies you already know.
Open any web page — React, Vue, Svelte, or plain HTML/CSS/JavaScript — as a full-screen GUI or transparent HUD overlay directly in-game. Powered by real Chromium via MCEF, so modern web features just work: CSS animations, WebSockets, fetch, WebGL, localStorage, realtime updates, and more.
I’m a fullstack developer. Most of my work is building web applications — React frontends, APIs, realtime systems, dashboards, all the usual web stack.
I’ve always loved Minecraft not only as a game, but as a creative platform. Servers, custom mechanics, communities, minigames, roleplay worlds — Minecraft gives people incredible freedom to build experiences together.
At some point I realized something:
**Web developers already have amazing tools for building interfaces — but almost no good way to use them inside Minecraft.**
Every day we build polished UIs with responsive layouts, animations, maps, shops, live dashboards, and realtime interaction. But bringing that same workflow into Minecraft has always been difficult, limited, or awkward.
So I asked a simple question:
> **What if Minecraft could just open a real web app?**
Not a custom inventory GUI system.
Not another proprietary UI framework.
Not a new language to learn.
Just the web.
That’s how WebGUI started.
—
# Built for web developers
WebGUI is designed for developers who already know modern frontend development.
If you know:
– HTML
– CSS
– JavaScript
—you already know how to build Minecraft interfaces with WebGUI.
Use React, Vue, Svelte, Tailwind, WebSockets, REST APIs, animations, state managers, component libraries — whatever you already use for normal web development.
The server sends a URL to the client.
The client opens it inside embedded Chromium.
The page receives live player data automatically and can communicate back with the game in realtime.
—
# Features
– **Full-screen GUI** — replace Minecraft screens with your web app
– **HUD overlay** — transparent browser layer rendered over gameplay
– **Real Chromium browser** — powered by MCEF
– **Live player data** — position, username, UUID, dimension, server
– **Realtime communication** — browser ↔ Minecraft messaging
– **Signed player tokens** — secure backend authentication without login screens
– **Auto HUD on join**
– **Per-player main menu**
– **Server-side Mod API**
– **Works with any frontend stack**
# 🌐 WebDisplays REMASTER

**Bring the entire Internet into your Minecraft world.**
Forget about Alt-Tabbing to check a wiki, watch a tutorial, or listen to music. With **WebDisplays REMASTER**, you can build fully functional, interactive web screens of any size right inside the game.
This version is a **major overhaul** for Minecraft 1.21.1. It not only fixes critical bugs from previous ports but introduces a completely new operating system-like experience.
—
### 🔥 NEW: The Dynamic Home Hub
Gone are the days of a blank white screen. Every new screen you create now launches the **Dynamic Hub** — a custom-built start page that evolves over time.
* **📱 App Shortcuts:** Instant access to **YouTube, Twitch, TikTok, Instagram, Twitter (X)**, and more with a single click.
* **🎮 In-Game Mini-Games:** Bored while smelting ores? Play **Geometry Dash** and other HTML5 games directly on your Minecraft screen.
* **☁️ Dynamic Updates:** The Hub is cloud-based. This means new apps and features can appear without you needing to update the mod file!


—
### 🛠️ Critical Fixes (The Remaster)
This mod was rebuilt to resolve game-breaking issues found in other 1.21.1 ports:
* ✅ **CRASH FIX:** Fixed a critical server/client crash that occurred when a player physically collided (walked into) the **Keyboard** block.
* ✅ **INPUT FIX:** Solved the annoying “Double Typing” bug. Typing on the keyboard no longer produces `dduupplliiccaatteedd` text. Input is crisp and responsive.
* ✅ **LASER POINTER FIX:** The Laser Pointer is now fully functional. It renders a visible red beam and correctly registers clicks on distant screens.
* ✅ **LOCALIZATION:** Added full localization support (currently includes English and Russian).
—
### 📋 Prerequisites & Installation
To run this mod, you **MUST** install **MCEF** (Minecraft Chromium Embedded Framework). The mod handles the browser engine and is required for WebDisplays to function.
1. Download **NeoForge** for Minecraft 1.21.1.
2. Download **MCEF**: [CurseForge Link](https://www.curseforge.com/minecraft/mc-mods/mcef) or [Modrinth Link](https://modrinth.com/mod/mcef).
3. Download **WebDisplays REMASTER**.
4. Place both `.jar` files into your `.minecraft/mods` folder.
—
### ⚠️ Credits & Original Project
This is an unofficial remastered and improved version of the original WebDisplays mod.
* **Original Author:** Montoyo
* **Original Project:** [Link to CurseForge](https://www.curseforge.com/minecraft/mc-mods/webdisplays)
This project respects the original MIT license. The goal of this fork is to provide a stable, crash-free experience for modern Minecraft versions with added quality-of-life features.
—
### ❤️ Support the Author
If you enjoy the new Hub and the fixes, you can support my work here:
[**>> DonationAlerts <<**](https://www.donationalerts.com/r/xmutsix)
WebDisplays
# WebDisplays
WebDisplays is a mod for creating and interacting with web browsers in Minecraft. You can create screens in your world and browse the internet.
WebDisplays was originally written by montoyo. It is currently maintained by CinemaMod Group.
## Install
**WebDisplays Requires MCEF!** You must install MCEF in order for WebDisplays to work.
Download MCEF from either:
– CurseForge: https://curseforge.com/minecraft/mc-mods/mcef
– Modrinth: https://modrinth.com/mod/mcef
## Wiki
[Outdated Wiki from the original creator](https://montoyo.net/wdwiki/index.php?title=Main_Page)
# WebChat
**Webchat allows players to chat with players that are on the server via a webpage**
## Features
– Port and bind address config
– Custom web-to-game and game-to-web message format
– Very customizable config
– Modifiable page files
## Config
Config
“`
# WebChat Configuration
# Minecraft <-> Web chat bridge
# Web server settings
webserver:
# Port the built-in HTTP server listens on
port: 8765
# Bind address (0.0.0.0 = all interfaces, 127.0.0.1 = localhost only)
bind-address: “0.0.0.0”
# Secret token required for POST requests (change this!)
secret-token: “change-me-please”
# Chat settings
chat:
# Format for messages sent from the web to in-game
# Placeholders: {username}, {message}
web-to-game-format: “&7[&bWeb&7] &f{username}&7: &f{message}”
# Format for messages sent from in-game shown on web
# Placeholders: {username}, {message}
game-to-web-format: “{username}: {message}”
# Maximum message length allowed from web clients
max-message-length: 256
# Maximum username length for web clients
max-username-length: 16
# Minimum username length for web clients
min-username-length: 3
# How many messages to keep in history (shown to new web visitors)
history-size: 100
# Usernames that web clients are NOT allowed to use
# (to prevent impersonation of admins, etc.)
blocked-usernames:
– “Console”
– “Server”
– “Admin”
– “Notch”
– “Herobrine”
# Long-polling timeout in seconds (how long the server holds open a poll request)
poll-timeout-seconds: 30
“`
## Demo

Webcam
# Webcam
Mod and plugin that allows players to broadcast their webcams
## ⚠️ Warning
This plugin requires special setup on server to work.
If you are a server administrator, please read the section `Setup on server` first
## Features
– High-quality webcam broadcasting
– H.264 video codec
– Video transmission via UDP using custom protocol
– AES encryption
– Bitrate control
– Video resolution control
– Different display shapes
– Display size and position configuration
– Display on player model face
– Display distance limit
– Webcam broadcast and view permissions
– Advanced client configuration ([Mod Menu](https://modrinth.com/mod/modmenu) & [Cloth Config API](https://modrinth.com/mod/cloth-config) required)
– Ability to hide selected players’ webcams
– Velocity proxy support
– Compatibility with [ReplayMod](https://modrinth.com/mod/replaymod) & [Flashback](https://modrinth.com/mod/flashback)
| Icon | Description |
|:——————————————————–:|——————————–|
|  | Your webcam is enabled |
|  | Your webcam is disabled |
|  | Connecting to Webcam server |
|  | Not connected to Webcam server |
## Encryption
Webcam connection is encrypted, but we don’t guarantee the security of it. Use at your own risk!
## Setup on server
Webcam plugin uses UDP socket to transfer video packets.
So you need to open a UDP port in your server’s firewall and panel (if present) to make Webcam server work. This is port `25454/udp` by default. You can change the port in server config
If you are using Velocity, see `Setup on proxy`
Here are the default values with their descriptions:
“`
{
“port”: 25454, // Webcam UDP server port. This must not clash with any other used UDP port (like Simple Voice Chat port)
“bind_address”: “”, // Address to bind the Webcam server to. Leave blank to use the wildcard (0.0.0.0) address. F.e. use “127.0.0.1” to accept only local connections
“host”: “”, // The hostname that clients should use to connect to the Webcam server. Leave blank to use the address, that player is connected to Minecraft with. Can be a simple address or an address with port. This will be ignored, if the server is proxied
“keep_alive_period”: 1000, // Period of sending keep alive packets is milliseconds
“permission_check_period”: 60, // Period of checking webcam.broadcast and webcam.view permissions in ticks
“max_display_distance”: 100.0, // The distance in blocks from player, in which other players can see his webcam
“display_on_face”: false, // Whether to display webcam on player model face or above his head
“display_shape”: “round”, // Shape of webcams displayed above players’ head. Possible values: “round”, “square”
“display_offset_y”: 1.3, // Y offset of webcams displayed above players’ head
“display_size”: 1.2, // Size of webcams displayed above players’ head
“hide_nicknames”: true, // Whether to hide player’s nickname if his webcam is enabled
“display_self_webcam”: true, // Whether to show the player’s webcam to himself
“synced”: { // These settings are synchronized with clients
“image_dimension”: 360, // Side dimension of square webcam images
“mtu”: 1100, // Maximum Transmission Unit of packets. You can lower this, if image on webcam starts look glitchy or not arrives at all
“bitrate”: 500 // Target video bitrate (kbps)
},
“messages”: { // Custom transtalions for messages, that are sent to players in different situations. May contain placeholders – %s
“incompatible_mod_version”: “Incompatible Webcam version. Your – %s, server’s – %s” // The message that will be sent to player if he has incompatible Webcam mod version. You can set this to empty to disable sending this message
}
}
“`
### Commands
– `/webcamconfig [new_value]` – command to read/update config values. Requires `webcam.command.config` permission or OP.
### Permissions
– `webcam.command.config` – permission to modify Webcam server config (default: OP Level)
– `webcam.broadcast` – permission to broadcast webcam (default: true)
– `webcam.view` – permission to view webcams (default: true)
## Setup on proxy
Webcam has Velocity plugin that proxies Webcam servers on the backend MC servers and allows to connect to different Webcam servers through the single port.
So it acts like a UDP proxy.
If you running proxy and backend servers on the same machine, you need to configure different ports for them. See `Setup on server/Server config` and `Setup on proxy/Proxy config`
### Proxy config
Server config is located in `plugins/webcam/config.properties`
Here are the default values with their descriptions:
“`
#Webcam proxy config
# Webcam UDP server port. This must not clash with any other used UDP port (like Simple Voice Chat port)
port=25454
# Address to bind the Webcam server to. Leave blank to use the wildcard (0.0.0.0) address. F.e. use “127.0.0.1” to accept only local connections
bind_address=
# The hostname that clients should use to connect to the Webcam server. Leave blank to use the address, that player is connected to Minecraft with. Can be a simple address or an address with port. This will override configured values on backend server’s
host=
“`
## License
This mod is licensed under **No Unauthorized Distribution License**, which full text can be found at https://github.com/DimasKama/Webcam/blob/master/LICENSE.md
### Summary
– **Modpacks:** You can use this mod in modpacks, but you must not include its files directly. Instead, list it as a dependency (mod reference) that points to an official download source.
– **For Devs:** You’re allowed to create addons or integrate support for the mod, but you must not copy any of its code. Instead, make it an external dependency that gets downloaded from an official source.
– **Redistribution Limits:** You cannot re-upload or share the mod’s code or compiled files publicly without the author’s explicit permission. Forking for personal use is okay, but distributing a compiled fork is not allowed.
– **Personal Use:** You may use and modify the mod for personal use, but any changes must remain private and not be shared publicly.
– **Official Download Requirement:** Any dependency or modpack reference must point to the official download sources provided by the author.
WebCam Bubbles
# WebCam Bubbles Mod
Minecraft mod that shows webcam
## Features
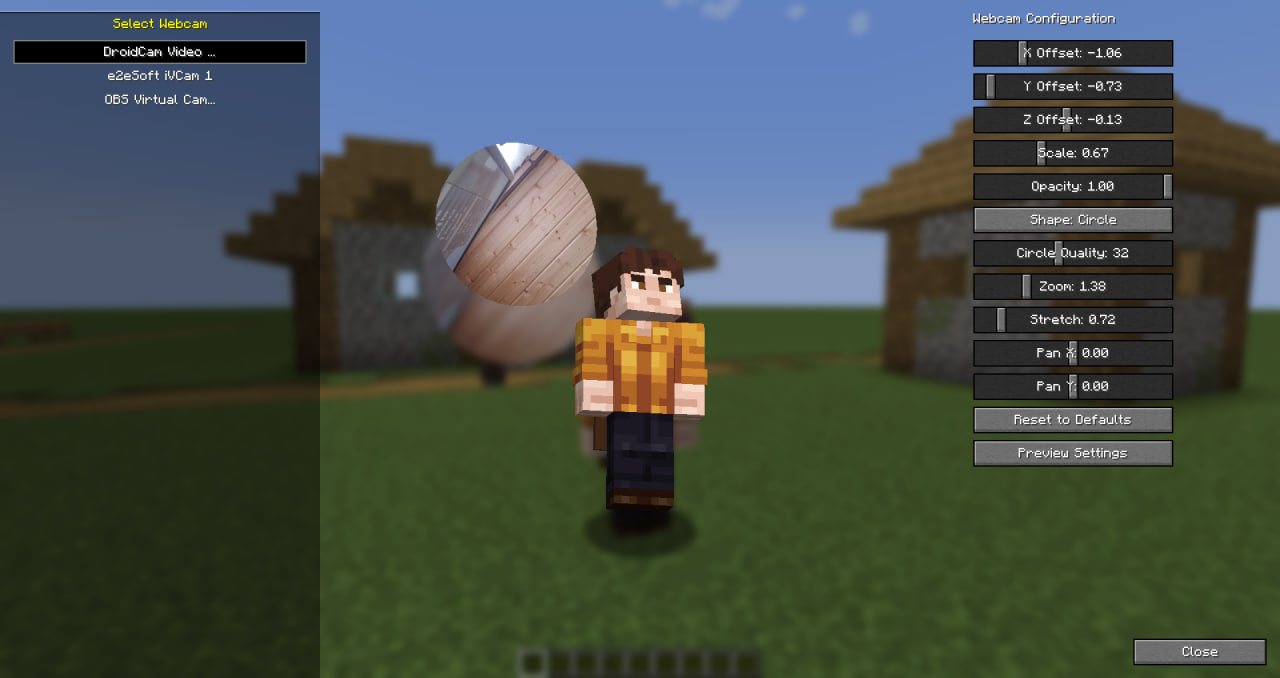
Adds a customizable pop-up (aka bubble) that displays a live image from your webcam! Works on LAN and servers
This is a server/client mod, so it needs to be installed on both.
**You need to install a [server plugin](https://modrinth.com/plugin/webcam/versions?l=bukkit&l=paper&l=purpur&l=spigot) to make webcams work on your server. If you have a Fabric server – install the [fabric mod](https://modrinth.com/plugin/webcam/versions?l=fabric) on your server**
### WARNING! If the server plugin does not work, use Fabric mod instead
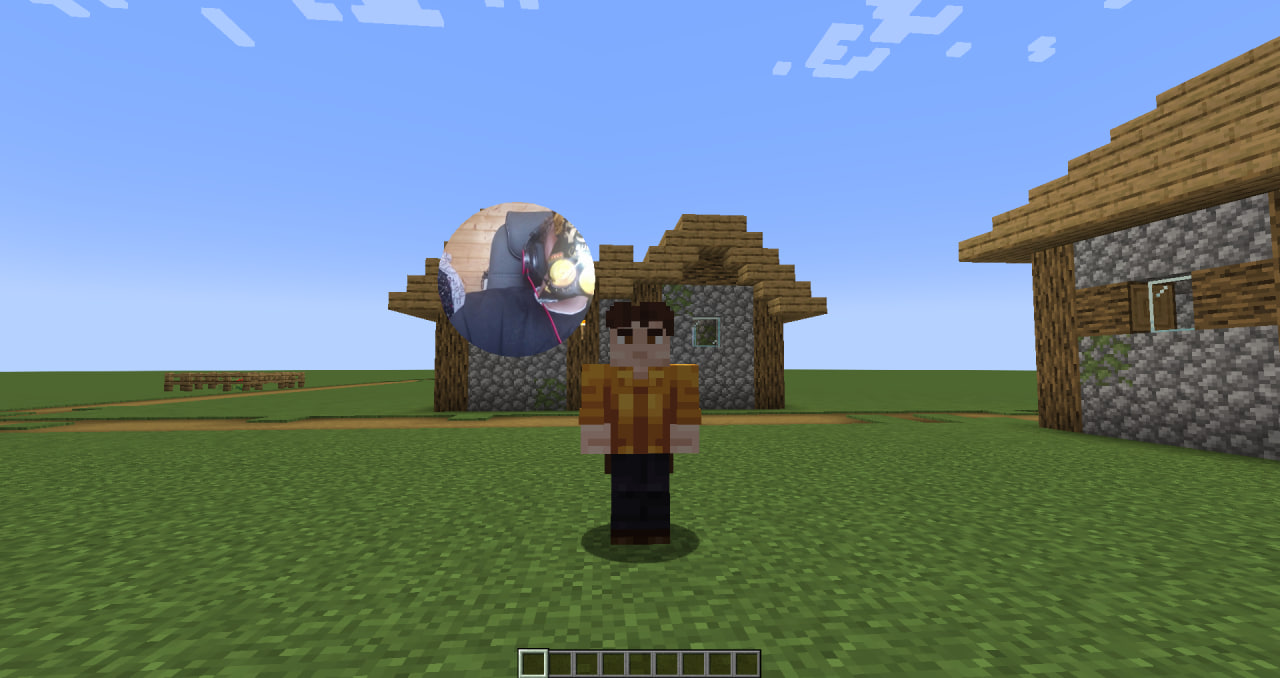
You can use the command `/webcam-settings` or press `(default) K` to open a menu where you can choose the device you want to use and customize bubbles:
Web Chat
Web chat is a **client only** mod that gives you access to the Minecraft chat of your running game window. This allows you to chat with other players while having minecraft in the background. Great for things like semi-afk farming and similar things!
# Features
– Access chat through any web browser.
– Chat history is stored and available when you are on a server and open chat in a browser.
– Tab completion of usernames.
– Tab icon notification for new messages when the browser isn’t focused.
– Fully client side, works on any server.
– Ping support for your username & configurable keywords.
– Support for `/tell`, `/msg`, `/w` and `/me` commands.
– Full support for Minecraft’s text formatting (colors, bold, italic, translation, etc.)
– Support for official click and hover interactions (opening URLs, achievement details, etc.)
– Minecraft version:
– 1.21.11 supported by Web Chat v1.5.0+
– 1.21.8 supported by Web Chat v1.4.0
– 1.21.1 – 1.21.4 are supported up to Web Chat v1.3.0 and not further.
– Mod loader: Fabric only
## Installation
1. Install the mod [from Modrinth](https://modrinth.com/mod/web-chat) or grab the [latest release from GitHub](https://github.com/Tildes-MC/minecraft-web-chat/releases).
2. Start minecraft.
3. Join a server.
4. Go to `localhost:8080` on the same computer, or use your computer’s local IP address (like `192.168.1.x:8080`) from other devices on your network.
5. Start chatting.
## Settings
### Message settings
– `Ping on Username` – This will ping the browser window any time a player’s username appears in the chat.
– `Extra Ping keywords` – This will ping the browser window any time one of these words appear in the chat.
### Network settings
– `HTTP Port` – Port number used to serve the web interface. `8080` by default.
# Security & Privacy
This mod turns minecraft into a small web server on your computer that’s only accessible (using `localhost` or your local IP) on your home network. This means that you can access Web Chat on a different device on your network, but not over the internet.
No data is sent over the internet beyond your normal Minecraft traffic.
**Important:** This mod is designed for local use only. **Do not** expose the web chat port to the internet. If you need remote access, setup a VPN (such as [Tailscale](https://tailscale.com/)).