Zoe Isn’t Cyberpunk

### Summary:
**Zoe Isn’t Cyberpunk (Zoe)** is a Cyberpunk-influenced (*Influences include* Cyberpunk 2077, Cyberpunk RED *and* Cyberpunk: Edgerunners) mod. It takes many aspects of these universes and implements them in its own way.
# A new (https://www.youtube.com/watch?v=bDYwRxKdzEk) is now available!
## A new [wiki](https://zoeisntcyberpunk.wiki.gg/) is now available!
# The Zoe SMP is now live! Join the [discord](https://discord.com/invite/H3dTXFBPCA) for more information
**Features**: Implants, custom weapons, custom software, custom mobs, 2 bosses, building blocks and more.
The mod is recommended for multiplayer.
Stats
**Cybertechne:** Affects the quality of crafted implants, increased via crafting implants.
**Biotechne:** Represents your “humanity” – your capacity for handling implants. Increased by killing mechanical mobs (especially bosses) and having implants equipped.
**Robotechne:** Increases the power of software. Increased by having software equipped/using software.
Commands
**/zoe_techne** – Used to change a player’s Cybertechne/Biotechne/Robotechne
**/zoe_implant** – Used to generate or clear implants
**/zoe_software** – Used to equip or clear Software
Config
**zoe_config.toml** – General configurations to the Zoe experience
**zoe** (folder) – Configurable settings for each individual implant, including disabling them entirely
Compatibility & Support
### Implants:
Zoe uses JSON files for its implant attributes. If you wish to change them, you can find them in your game file directory (%appdata%) under …/config/zoe and you are free to change it as you wish.
the JSON file names must follow this format: ‘zoe_‘ or it will **not** work.
**NOTE:** If you want your implant changes to stay PERMANENT between mod updates, set their “update” value to ‘false’!
While it is possible to change implant details during runtime, I highly advise against it on servers and even in Singleplayer to avoid any issues (for example, the attribute application system breaking). You should close your world/server before making changes to the JSON files.
### Other
Zoe uses tags and similar things to try and be as friendly as possible for compatibility with other mods. Joining the discord and asking me directly is the best way to learn more about this.
Notice
This mod does not associate itself officially with any of the influences mentioned above, it is merely inspired by them.
This mod is made using **MCreator**. I hope to improve my coding so I’ll eventually be able to move to full-on coding, but MCreator will remain my main method of development until further notice.
While MCreator does get a lot of flak for understandable reasons (and also some pre-determined disinclination), I’ve tried my very best to implement proper compatibility and support where I could for server owners, other mods and the like.
For more info regarding compatibility/support, please check the ‘Compatibility & Support’ section.
znodes
# znodes

Map painting – but in block game. Fork of the original minecraft-nodes project by phonon
I created this fork due to the the last commit on phonon’s repo being from two years ago. I have no intention of supporting older versions, if you are on an outdated version, update.
Other plugin modules such as the dynmap and ports plugin will be moved to seperate repos.
## What is nodes?
Nodes takes inspiration from Towny, Hearts of Iron 4, and the famous Minecraft factions experience from 2014.
* Map segmented into pre-created territories which are groups of contiguous minecraft chunks.
* Territories have different resource nodes which provide different resource yields from mining and different rates for farming, animal breeding, etc…
* Players form a town which controls territories. Initial territory claims must be connected.
* War is capturing territories from another town.
* Towns choose 1 territory to be their capital which cannot be taken until all other territories are captured.
* A captured territory is occupied and provides resource benefits to the occupier. The occupier has the option to annex a territory and add it to their town.
## Notable Changes Over Upstream
* Folia Support
* Modern version support
original author: phonon
znodes fork maintainer: tlm920
ZMiracle (MIRACULOUS) RABBIT MIRACULOUS
– Hi, this is the ZMiracle mod. This mod is dedicated to the cartoon series LadyBug and Cat Noir. The mod is early, but it will develop quickly! (The mod supports survival)
– Compatible with optifine
– The mod adds Kwami to the game, which make it possible to transform into a hero. Kwami come from Miraculous Jewelry that can be created thanks to a Grimoir. (it is advised to use JEI for crafting)
– Also in mod there is a full localization of the Russian language and a choice of suit and camouflage – /zmenu
> Key Bing:
1. Z – Detransformation
2. X – Transformation
3. C – Power
4. V – Hide/Show kwami
5. B – Renounce
6. N – Weapon Mode
– Rabbit update last. Mod closed. I`m sorry
ZLives

# Please read the concept of this plugin
## Concept :
– **1. Player A and Player B gets default 3 lives and 10 Hearts**
– **2. Player A killed Player B, then Player B will lose 1 live (remaining = 2) and in exchange of the live, player B will get +5 Hearts (total = 15).**
– **3. If Player A again killed Player B, then Player B will lose 1 live (remaining = 1) and in exchange of the live player B will get +5 Hearts (total = 20)**
– **4. After this if Player B killed Player A, then Player B will gain 1 live and -5 Hearts.**
– ### *NOTE : The maximum hearts obtainable are 25 and maximum lives are 3, so no one can go beyond it (untill changed from config.yml)*
## 1. Plugin Description
**ZLives** is a unique Minecraft plugin that introduces a **lives and heart system** to your server. Players start with a limited number of lives and hearts, and their actions (such as killing other players or being killed) affect their lives and hearts. Key features include:
– **Lives System**:
Players start with a default number of **3 lives**. When a player loses all their lives, they are eliminated and put into spectator mode.
– **Heart System**:
Players have a limited number of hearts, **default is 10** (20 Heart points). Hearts determine the player’s max health.
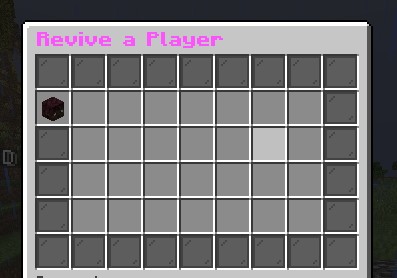
– **Revival System**: Eliminated players can be revived using a special **Revive Book** or by an admin using the `/revive` command.
– **Elimination Animation**: When a player is eliminated, a dramatic animation and sound effect play to signify their elimination.
– **Customizable Config**: The plugin allows server admins to configure default lives, hearts, and other settings via the `config.yml` file.
– **Commands**:
– `/lives`: Check your remaining lives and hearts.
– `/revive `: Revive an eliminated player (admin-only).
– `/elimination-animation`: Play the elimination animation on a player or at specific coordinates (admin-only).
## 2. Installation Guide
Follow these steps to install and set up the **ZLives** plugin on your Minecraft server:
#### **Step 1: Download the Plugin**
1. Download the `ZLives.jar` file from the provided source (e.g., SpigotMC, GitHub, or your custom build).
2. Place the `ZLives.jar` file in your server’s `plugins` folder.
#### **Step 2: Start the Server**
1. Start or restart your Minecraft server.
2. The plugin will generate a default `config.yml` file in the `plugins/ZLives` folder.
#### **Step 3: Configure the Plugin**
1. Open the `config.yml` file located in the `plugins/ZLives` folder.
2. Customize the settings as needed.
#### **Step 4: Test the Plugin**
1. Join your server and test the plugin’s features.
2. Use the `/lives` command to check your lives and hearts.
3. Test the elimination and revival mechanics.
—
## **3. Screenshots**
### **Elimination Animation**
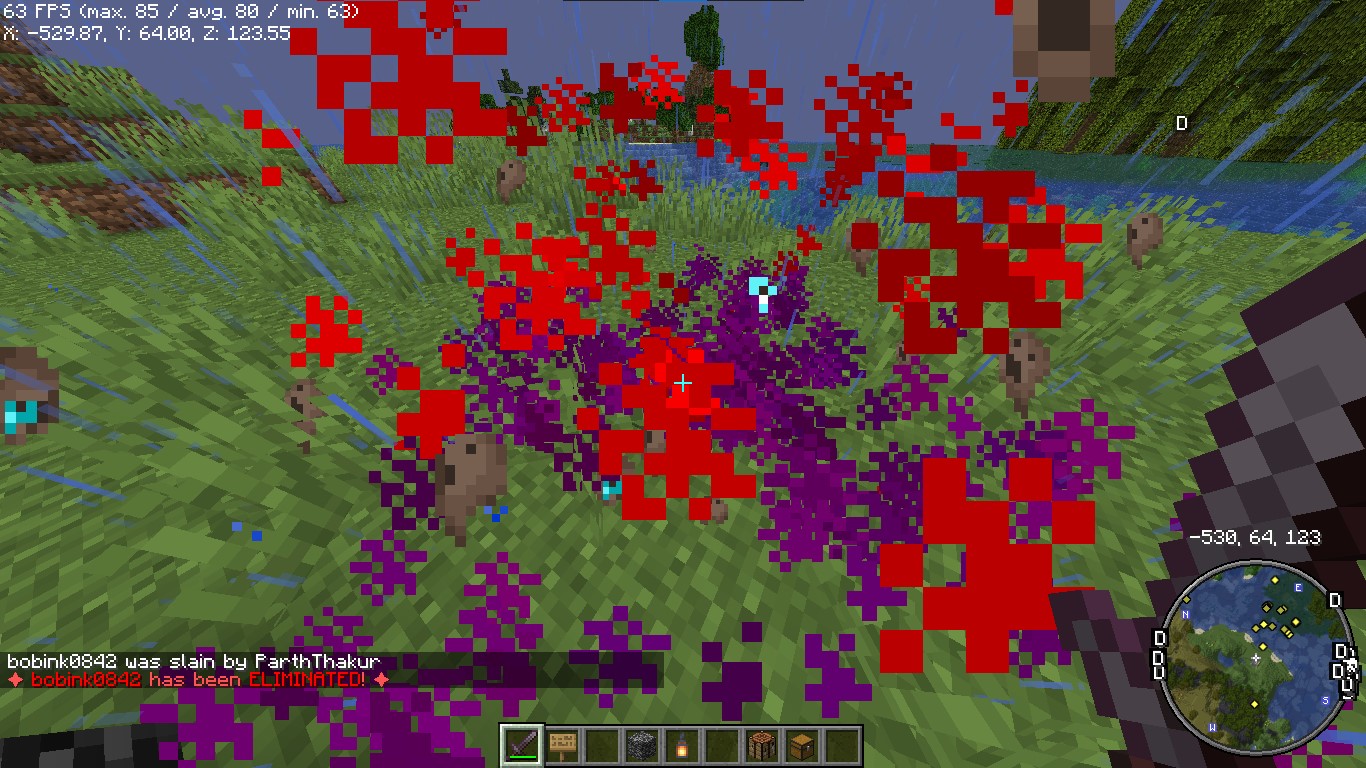
*Players see a dramatic animation when they are eliminated.*
### **Revival Animation**
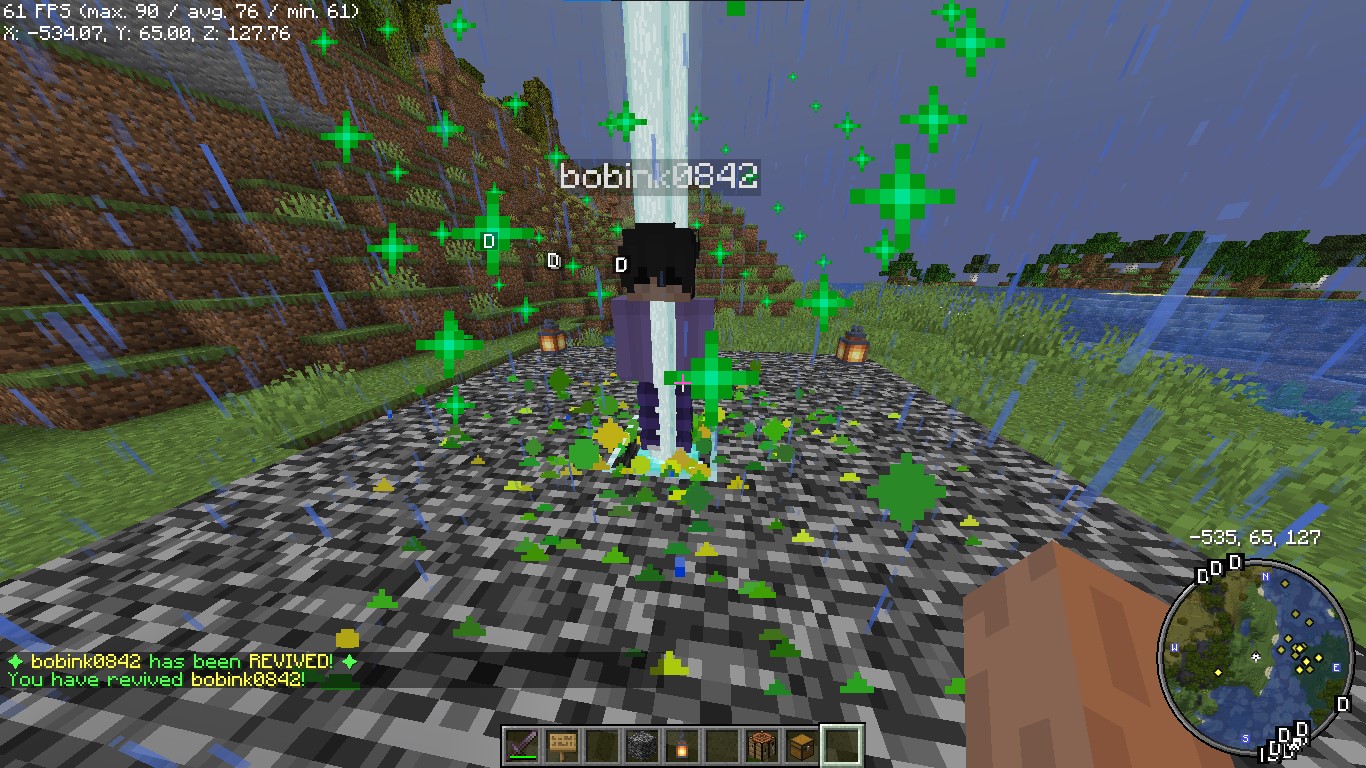
*Players see a dramatic animation when they are eliminated.*
### **Revive Book**

*The Revive Book can be crafted and used to revive eliminated players.*
### *Note: This recipe can be changed from config.yml.*
### **Remaining Lives message after killed by a player**

### **+5 Hearts on every death by a player**
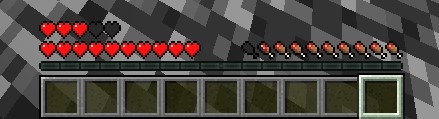
*+5 Hearts when a player is killed by other player*
### **Elimination Message**
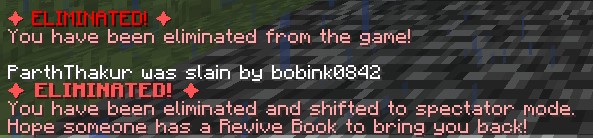
### **ReviveGUI**
## **4. Donations**
### Liked my Content? Want to support me?
– **Support me by sending money on this UPI QR Code**.

## **5. Reporting Issues**
**Need Help? Contact Us!**
Encountered a problem or have suggestions? We’re here to assist you!
### 📧 **Discord Support**: Contact me on Discord at **@iitian_69**.
#### **Step 1: Check the Logs**
1. Look for error messages in the server console or `logs/latest.log`.
2. Copy the relevant error message.
#### **Step 2: Provide Details**
When reporting an issue, include the following information:
– **Minecraft Version**: The version of Minecraft your server is running.
– **Server Software**: The server software you’re using (e.g., Spigot, Paper).
– **Plugin Version**: The version of the **ZLives** plugin you’re using.
– **Steps to Reproduce**: A detailed description of how to reproduce the issue.
– **Error Logs**: The error message or log snippet.
#### **Step 3: Submit the Issue**
**Contact me at discord username is : @iitian_69**
#### **Example Issue Report**
“`
**Minecraft Version**: 1.21.4
**Server Software**: Paper
**Plugin Version**: 1.0.0
**Issue**: Players are not losing hearts when they kill another player.
**Steps to Reproduce**:
1. Set default lives to 3 and hearts to 10 in the config.
2. Have a player with 2 lives kill another player.
3. Check the killer’s hearts after the kill.
**Error Logs**: [No errors in the logs]
“`
### **Final Notes**
The **ZLives** plugin adds a unique and engaging gameplay mechanic to your Minecraft server. If you have any questions, need further assistance, or want to suggest new features, feel free to reach out! 😊
Happy gaming! 🚀
zLink
zLink is your custom link plugin. It works by connecting to a database and giving the user a code, that code the user can input into your project to link their account. Right now you can fetch the users uuid, luckperms rank, display name, world, game mode and when they first joined.
**Please Note: This plugin is still in beta, there will be bugs and it will not be perfect.**
If you would like to get releases before it comes here please visit: [Our Official Website](https://link.zavrobot.tech/)
zLife Season 1
Start with 1 heart and 7–13 lives. On death: lose 1 life, gain 1 heart. On kill: gain 1 life. Name color shows lives: Red (1–3), Yellow (4–6), Lime (7–9), Dark Green (10+). Run out of lives = elimination.
ZLDiscord
**ZLDiscord is a universal plugin for Minecraft servers that provides advanced features, including a voting system, integration with placeholders for voice chats, and the creation of custom messages. This plugin is designed to simplify and automate server management.**
**Version:** 1.16.5 – 1.20.x
**Minimum** Java: 17
**Mandatory dependencies:**
[PlaceholderAPI](https://www.spigotmc.org/resources/placeholderapi.6245/)
**Development:** [here](https://plugin.zoliryzik.ru/en)
# **Commands in the game:**
“`
• /zevent “title” “command” “time” “channel_id” — Creates a new poll. (Administrator rights required).
• /zembed “Unique Name” “Title” “Description” “Channel ID” “Image URL” “Thumbnail URL” “Footer Text”” “Footer Icon URL” — creates a new embed. (administrator rights required).
(Administrator rights required).
• /zembedmanage “action” “unique_name” “new_value” — Manage created embed messages. (Administrator rights required).
• /zlink — Link your account to Discord.
• /zunlink — Unlink your account from Discord.
“`
# **Commands in Discord:**
“`
• /zevent — Creates a new poll. (Administrator rights required).
• !embed — Creates an Embed message in Discord. (Requires administrator rights ).
• /link < code > — Link your account to Discord. (In the bot’s private messages)
• /unlink — Unlink your account from Discord.
“`
# **Permisheny:**
“`
zoliryzik.use
zoliryzik.zlink
zoliryzik.zunlink
zoliryzik.zembed
zoliryzik.zembed_manage
“`
# **Placeholders (PlaceholderAPI)**
ZLDiscord integrates with PlaceholderAPI to display voice chat status. Make sure you have PlaceholderAPI installed.
**Available placeholders:**
“`
• %zoliryzik_in_vc% — Returns “In voice chat”, “Not in voice chat” and “Not bound”.
“`
# **Examples of use**
**Create a poll for an event:**
To create a poll for an event, simply type the following into the chat:
“`• /zevent “Siege of the ship” “boat run” “20m” “0000000000000000000”“`
Players will be able to vote in the Discord channel you specified.
**Create an embed message in Discord:**
To create an embed message in Discord, simply type the following into the chat:
“`• /zembed “Siege of the ship” “Siege of the ship” “The Siege of the Ship event is underwaynCords X: 0 Y: 0” “0000000000000000000”“`
Players will be able to see this message in the Discord channel you specified.
ZlAutoGive
## ✨ Overview
ZlAutoGive is a **powerful, lightweight, and fully configurable plugin** that automatically gives players the **vanilla drops** of blocks directly to their inventory! Perfect for servers that want to streamline resource collection while keeping the **vanilla Minecraft experience intact**.
With ZlAutoGive, you can:
* 💎 Automatically get blocks and items from mining or harvesting **without losing vanilla mechanics**.
* 🍏 Receive **apple drops from oak leaves** with the same probability as vanilla.
* 🛠 Respect **Silk Touch & Fortune enchantments** on your tools.
* 🎛 Apply **multipliers per permission group** (e.g., VIP, MVP) to increase drops.
* 📦 Handle **full inventories gracefully**, dropping items to the ground with a clear warning message.
* ⚡ Enable or disable the system dynamically, reload config/messages, and customize **prefixes & colors**.
—
## 🧩 Features
* ✅ Automatic vanilla drops
* ✅ Silk Touch & Fortune support
* ✅ Multipliers per permission (`zlautogive.multiplier.X`)
* ✅ Configurable messages with **colors** (`&x`, `&#hex`, `&`)
* ✅ Inventory full handling with item drop + warning message
* ✅ Works for **Minecraft 1.18 and above**
* ✅ Lightweight & server-friendly
—
## ⚙ Configuration
ZlAutoGive comes with:
* `config.yml` – Enable/disable system, set multipliers per permission.
* `messages.yml` – Customize all messages, including prefix, help, and inventory full warnings.
**Example config snippet:**
“`yaml
system-enabled: true
multipliers:
vip: 3
mvp: 5
“`
**Example message:**
“`yaml
inventory-full: “%prefix%&cYour inventory is full! Dropped &b%amount%x &f%item%”
“`
—
## 📝 Commands
| Command | Permission | Description |
| ——————– | ———————– | —————————————— |
| `/zlautogive on` | `zlautogive.admin` / OP | Enable the system (applies after restart) |
| `/zlautogive off` | `zlautogive.admin` / OP | Disable the system (applies after restart) |
| `/zlautogive reload` | `zlautogive.admin` / OP | Reload config and messages |
| `/zlautogive` | Any with permission | Show help message |
—
## 🎨 Customization
* Full **color support**: `&`, `&x`, `&#hex`
* **Prefix customization** in `messages.yml`
* Control multipliers per **LuckPerms groups**
—
## 💡 Why use ZlAutoGive?
* Saves players time without breaking vanilla Minecraft.
* Perfect for **semi-vanilla, survival, and minigame servers**.
* Fully **configurable and permission-based**, giving you complete control.
* Lightweight and **optimized for 1.18+ servers**.
—
## 🚀 Installation
1. Place `ZlAutoGive.jar` in your `/plugins` folder.
2. Start your server once to generate config/messages.
3. Configure multipliers and messages to your liking.
4. Reload with `/zlautogive reload` or restart the server.
—
## 📣 Support & Credits
* Developed by **Zeralyth Studios**
* For support or suggestions, contact your server dev team or reach out to Zeralyth Studios.
—
### 🎉 Enjoy streamlined mining & harvesting while keeping Minecraft fully vanilla! 🍀💎
zItemStacker
[](https://minestrator.com/a/GROUPEZ)
zItemStacker
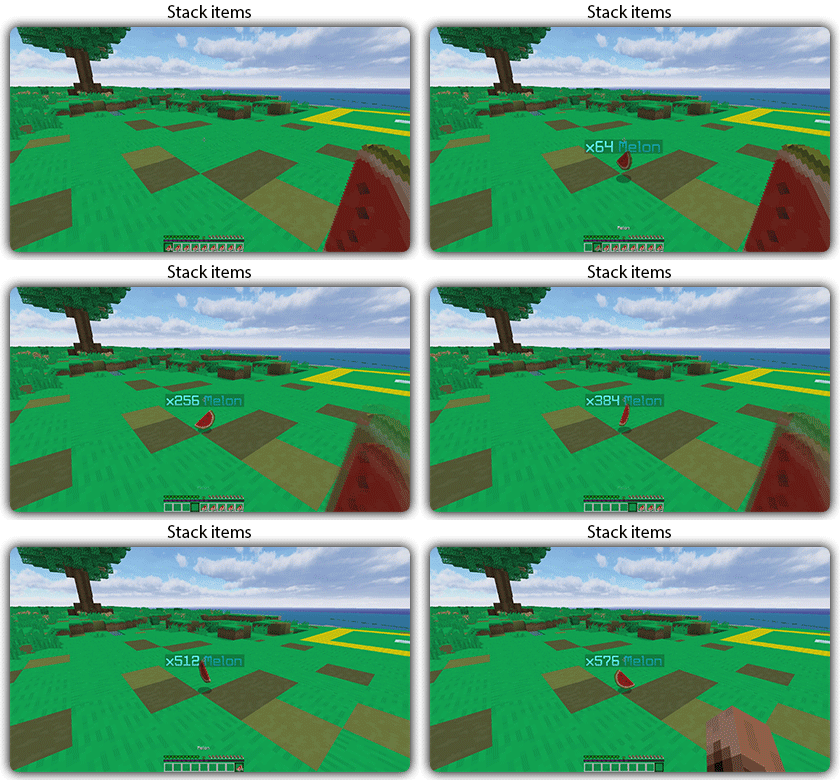
Allows you to stack your items
## Features:
– You can whitelist items to be taken into account by the plugin.
– You can blacklist the items that should not be taken into account by the plugin.
## Commands:
– /zitemstacker reload – reload lang and config file
– /zitemstacker version – show plugin version
Source code: https://github.com/Maxlego08/zItemStacker
Support: http://discord.groupez.dev/
ZInvisItemFrames
# ZInvisItemFrames
Allow players to craft and place invisible item frames. Folia-compatible invisible item frame plugin.
## Features
– Craft invisible item frames
– Customizable crafting recipe. (Can choose ANY ITEM for the recipe)
– Empty invisible frames can have a glowing outline (configurable)
– MiniMessage support for all text formatting
## Compatibility
– Paper 1.20.1 -> 1.21.4
– Folia-compatible
– Java 17+
## Dependencies
– [MCKotlin](https://modrinth.com/plugin/mckotlin)
## Crafting Recipe
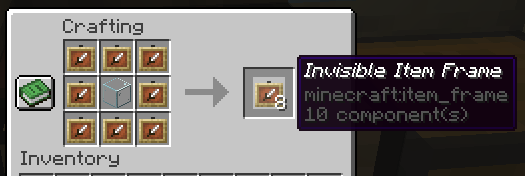
The default crafting recipe is 8 item_frame (or glow_item_frame) in a circle with one custom item in the middle.
You can change the middle-item with `/ziif item`.
You can also configure how many invisible item frames are crafted from the recipe.
## Commands
– `/ziif help` – Show help information
– `/ziif item` – Set the recipe item to the item in your hand
– `/ziif reload` – Reload the configuration
– `/ziif give [–glow]` – Give invisible item frames to a player
## Permissions
– `zinvisitemframes.craft.item_frame` – Allow crafting invisible item frames
– `zinvisitemframes.craft.glow_item_frame` – Allow crafting invisible glow item frames
– `zinvisitemframes.place.item_frame` – Allow placing invisible item frames
– `zinvisitemframes.place.glow_item_frame` – Allow placing invisible glow item frames
– `zinvisitemframes.admin` – Access to all plugin commands
## Installation
1. Download the latest version of ZInvisItemFrames from [Modrinth](https://modrinth.com/plugin/zInvisItemFrames/versions).
2. Download the appropriate version of MCKotlin from [Modrinth](https://modrinth.com/plugin/mckotlin)
3. Place the downloaded `.jar` files into your server’s `plugins/` folder.
4. Restart your server.
5. Configure the plugin to your liking by editing the `.yml` files in the `plugins/ZInvisItemFrames/` folder.
## Configuration
“`yaml
recipe:
item: [] # Set with `/ziif item` command
quantity: 8 # How many frames are crafted per recipe
check-permission: # Whether to check permissions for crafting/placing invis frames
craft: false
place: false
empty-frame:
glow: true # Whether empty frames should glow
visible: true # Whether empty invis frames should be visible
name:
invisible_item_frame: “Invisible Item Frame”
invisible_glow_item_frame: “Invisible Glow Item Frame”
“`