Vanilla Entity Shader Effects
# Showcase
# Overview
This resource pack allows entities to have animated shader effects baked into their texture. In many ways, it’s a vanilla-friendly version of the [Entity Texture Features](https://www.curseforge.com/minecraft/mc-mods/entity-texture-features-fabric) mod.
This pack is designed to be used in conjunction with other resource packs that add textures with animated effects. Shader data is embedded into a texture file, and when the VESE shader reads that texture file, it will display the encoded effects. Because of the nature of the encoding, texture files can have a static fallback texture that can be displayed to the user if they opt not to turn on VESE.
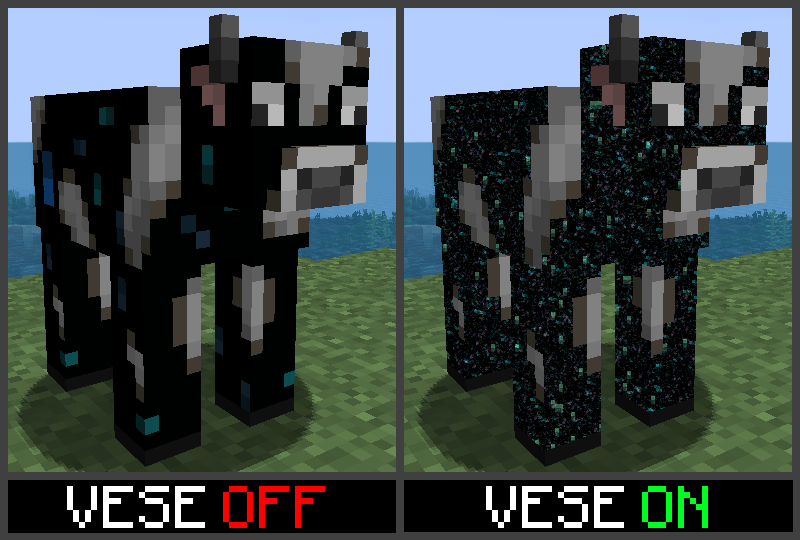
For example, the textures below are for a resource pack that adds _void cows_. The resource pack that adds void cows to the game shows the texture on the left if the player does not have VESE enabled, while it shows the texture on the right if it is:
VESE also works with player skins! If you update your skin to use VESE effects, it will still render as a normal skin to other players without VESE enabled, but will show the effects to anyone who does have it enabled.
# Texture Editor Webapp
Shader effects can be added to textues with the with the [Texture Animator](https://dqwertyc.github.io/animated-entities/) webapp. To show how it works, I’ll be creating an animated Cheshire Cat texture with glowing eyes and a body that fades to black from tail to head.
To begin, upload the base texture that you want displayed to users that don’t have VESE enabled. The webapp will detect the texture size and provide a list of options for texture types. If the specific entity isn’t listed in the available options, selecte the ‘other’ option for the given texture size:
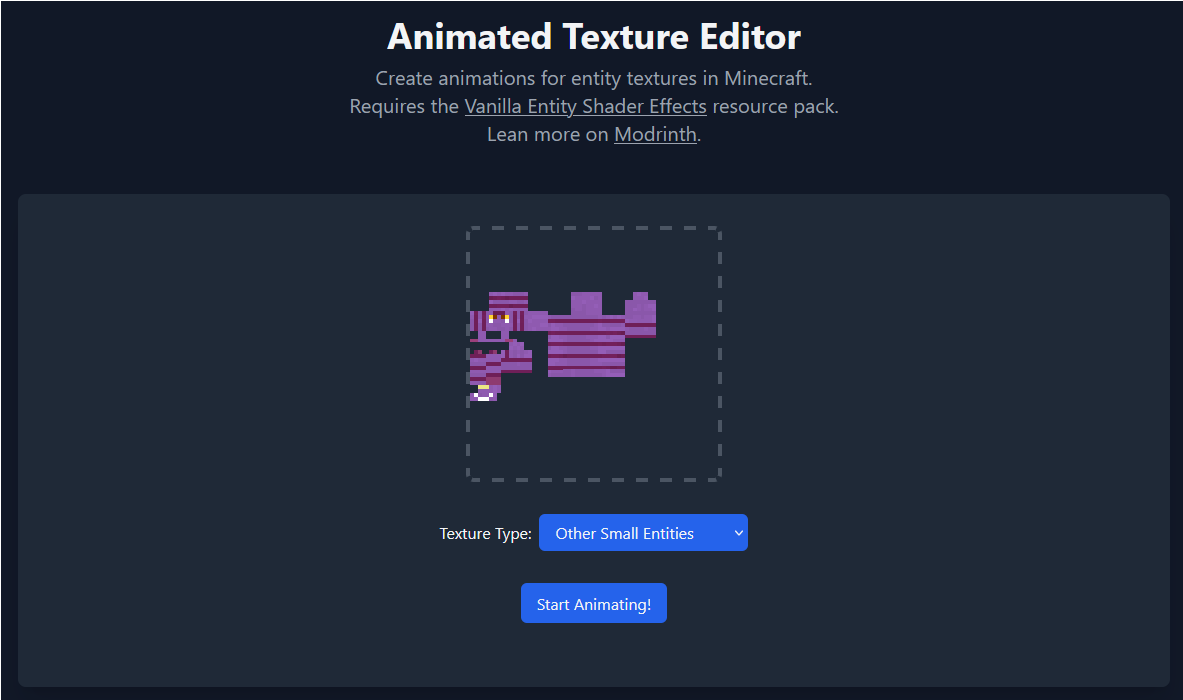
Click ‘Start Animating’ to open the editor. The editor has three main regions – the Color Palette on the left, the Program Palette on the right, and the main texture in the center.
Click a pixel in the Color Palette to edit its color. These colors can be referenced later on by programs in the Program Palette:
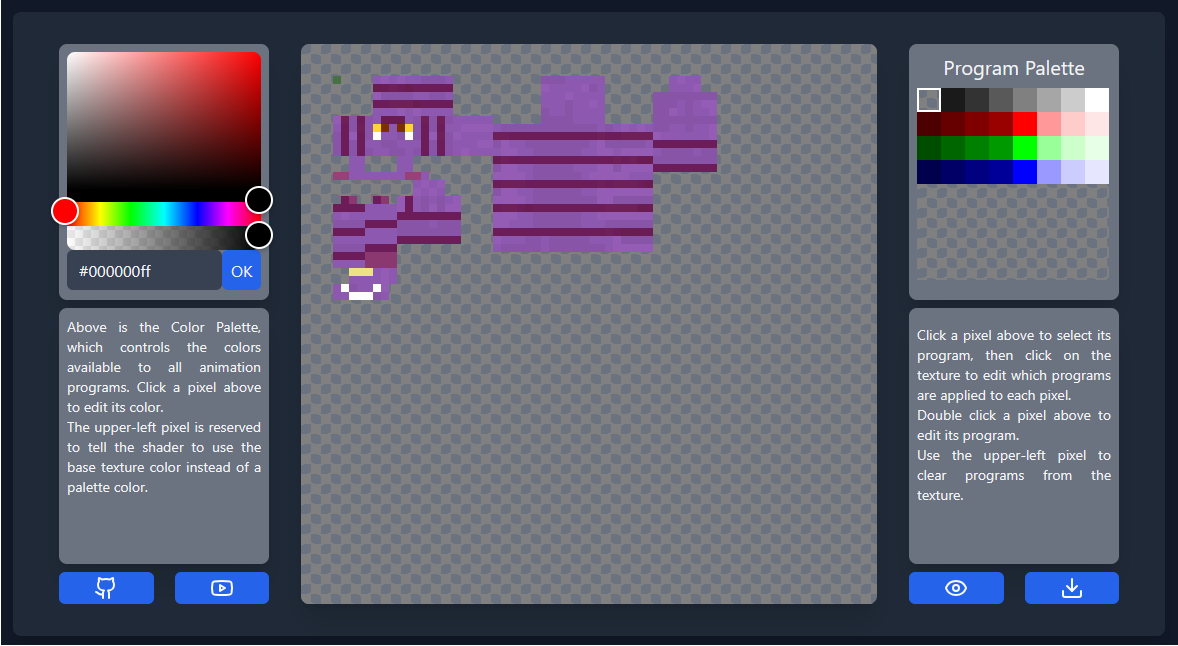
For most entities, you have access to 31 colors, though players have access to 63. As you edit the colors, you should see them appearing on the texture in an unused region. The upper left color in the palette is not editable, and tells the program to use the base color from the texture.
Double click a pixel in the Program Palette to edit its program. These programs can later be applied to any pixel in the texture. The first program we’ll create is for the glowing eyes. By selecting ‘constant’ as the program type and checking the box that says “Glow A”, we’ll create a program that does nothing but make the existing color glow:
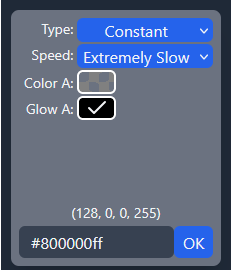
Click ‘OK’ to finalize the program, then click pixels on the main texture to apply the program. Use the upper left pixel in the program palette to clear programs from the texture.
Our second program will periodically fade between our fallback color and solid black. Double click the first program pixel on the second row. For this program, we’ll select ‘Sine Wave’ and ‘Normal Speed’, then for color B select the solid black from our color palette. Set pause to ‘3’ and leave offset at ‘0’. The resulting color code should be ‘#00016430’. Copy this value, then click ‘OK’. The preview beneath the program editor should show a grid of colors fading to and from black.
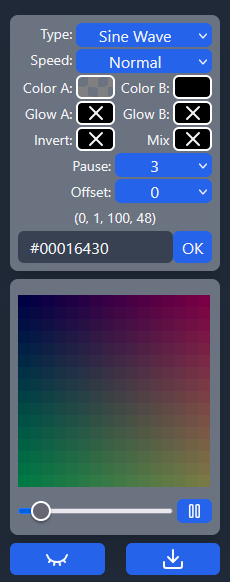
Edit the rest of the programs in the row, incrementing the offset each time. This will cause the fade on the program to start slightly later for each subsequent program.
Now, starting with the tail, add the programs to the pixels. Because of the length of the cat, we’ll apply the same program to every 4 pixels. The end result should look something like this:
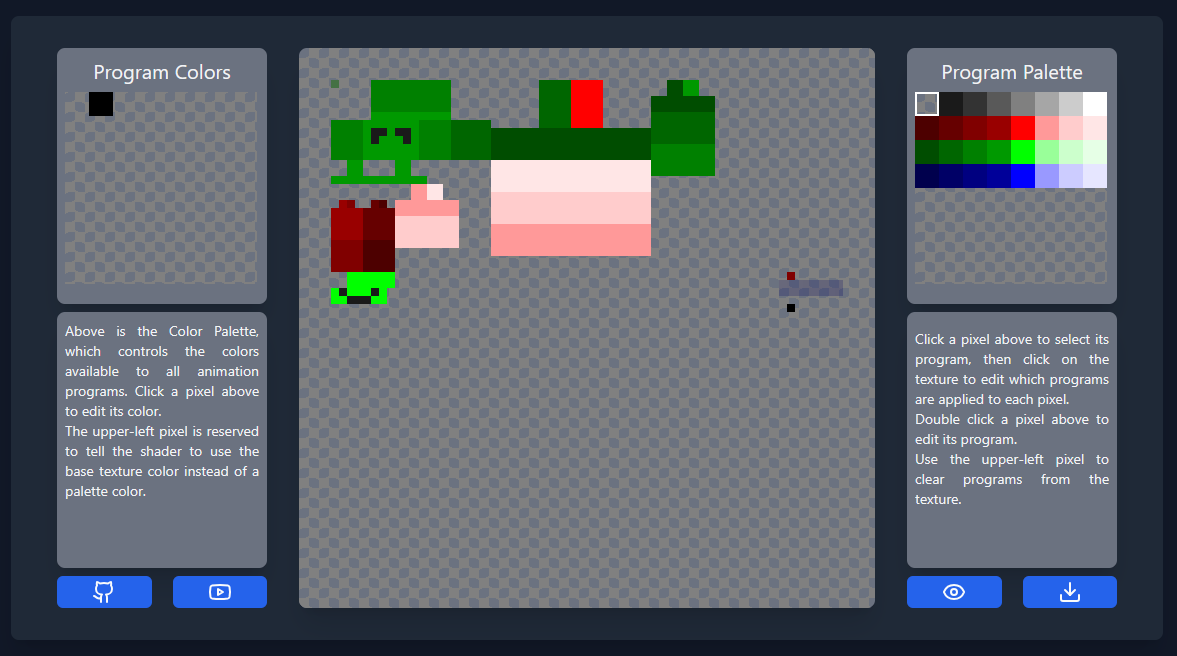
If you want, click the eye in the lower right corner to get a view of what the actual texture will look like without the program overlay. Download the texture with the download button in the lower right corner.
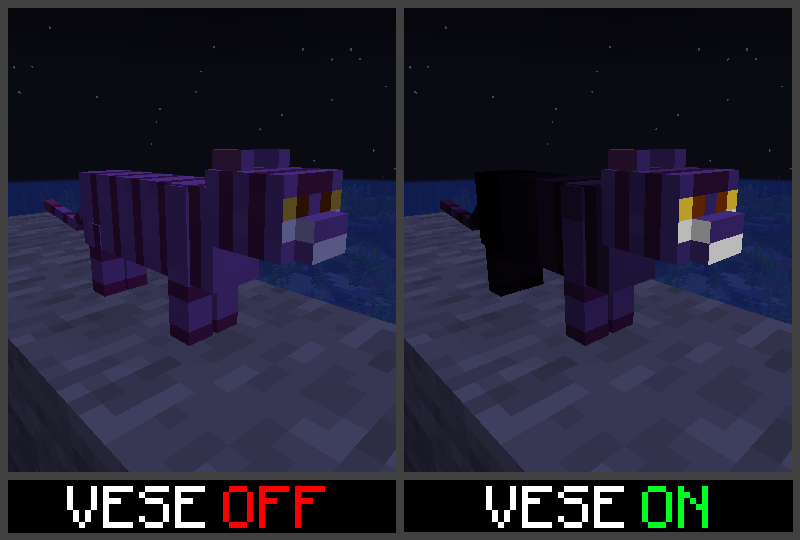
Loading the new texture into our world, we can see what it looks like with and without VESE enabled:
Vanilla Cloud Fix
**Vanilla Cloud Fix** addresses two issues that I have with vanila clouds. The clouds are now properly centered on the player, and correctly fade out at the edge of the sky. This resourcepack uses vanilla shaders and may not work correctly for future versions.
Minecraft versions 1.21.2 and above please use the latest version!!
Vanila Cloud Fix (1.21.2+) (v1.1)
Older Minecraft versions use Vanilla Cloud Fix 1.17-1.21.1 (v1.0.1)
When using with versions below 1.20.2, you will be told that the pack is made for an older version. You can safely ignore this and it should work!
**Vanilla Cloud Fix** is also on [curseforge](https://www.curseforge.com/minecraft/texture-packs/vanilla-cloud-fix).
Note that some performance enhancing mods already correct for the cloud issues present in vanilla, so the effects of this shader can vary.
## Features
Vanilla clouds don’t always appear to fade out correctly at the edge of the view. **Vanilla Cloud Fix** improves the fade out by properly scaling opacity with distance. View the results below.
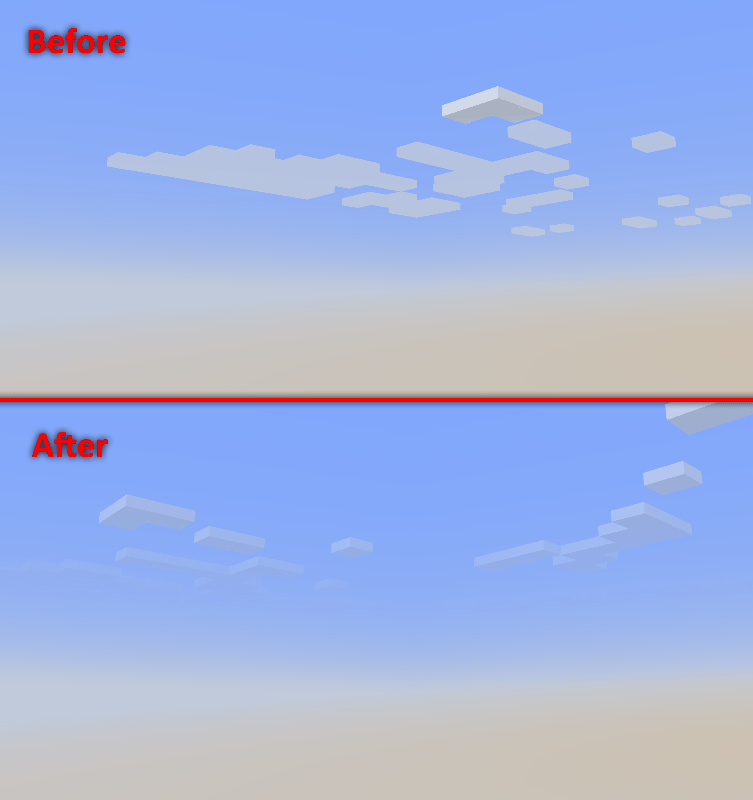
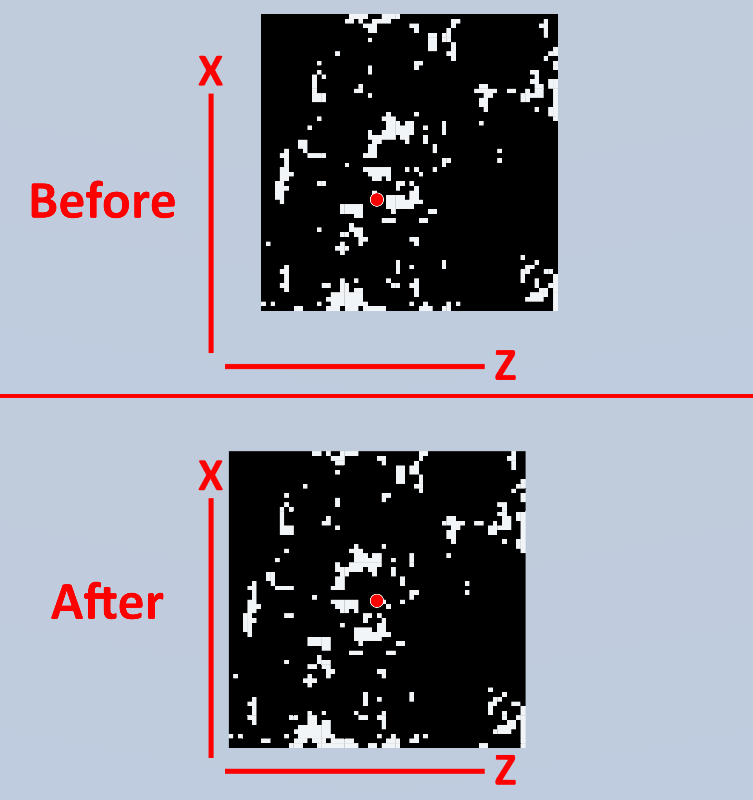
The vanilla clouds are not properly centered on the player and have an inaccurate offset in the positive X and Z direction, as shown in the figure below. **Vanilla Cloud Fix** corrects this offset using an approximation of -7 to correctly center the clouds. View the results below.
This comparison uses real screenshots at Y level 600~ looking down at the clouds using a modified cloud shader.
Upside Down
[ ](https://www.youtube.com/channel/UC7BiNDV1kaK5ehVzNA8wKPA)
[ ](https://www.reddit.com/user/JoeFly2009/)
[ ](https://www.planetminecraft.com/texture-pack/joefly-upside-down/)
### ⚠️ Requires _Fabulous!_ Graphics
Do you want to have a different Minecraft experience?
Well, with this resource pack, you can play it upside down!
## Features
– Turns the field of view (FOV) upside down.
– Turns most of the blocks and items upside down.
## How to download
1. Download the Featured Version.
2. Open Minecraft and go to Options > Resource Packs / Texture Packs > Open Pack Folder.
3. Copy/Cut and Paste the file downloaded there.
4. Active the Resource Pack.
5. Change your graphics to _Fabulous!_.
Note: If it appear as Incompatible, don’t worry, it should work on 1.17 or above.
## FAQ
### Can I make a post/video about it on social medias?
Yes, if you give me the credits including a direct link to this page. Please do not distribute modified versions.
Enjoy! 🙂
Unofficial Immersive Interfaces Integration
This resource pack does exactly one thing: it takes the same pixel-art GUI charm from Immersive Interfaces and brings it to mods the original doesn’t cover. No gameplay changes. No weird surprises. Just more consistent visuals for your modded setup.More mods will follow as development continues.
### Mod Support
This add-on is designed to extend the Immersive Interfaces style to mods that the original doesn’t cover.
Currently supported:
– L_Ender’s Cataclysm
### Is this official?
Officially permitted, but unofficially made. The original author has given blessing, but this is still a fan-driven project.
### Installation?
This is a resource pack. Drop it in your resource pack folder, load it above the original Immersive Interfaces, and you’re done.
### Rendering issue?
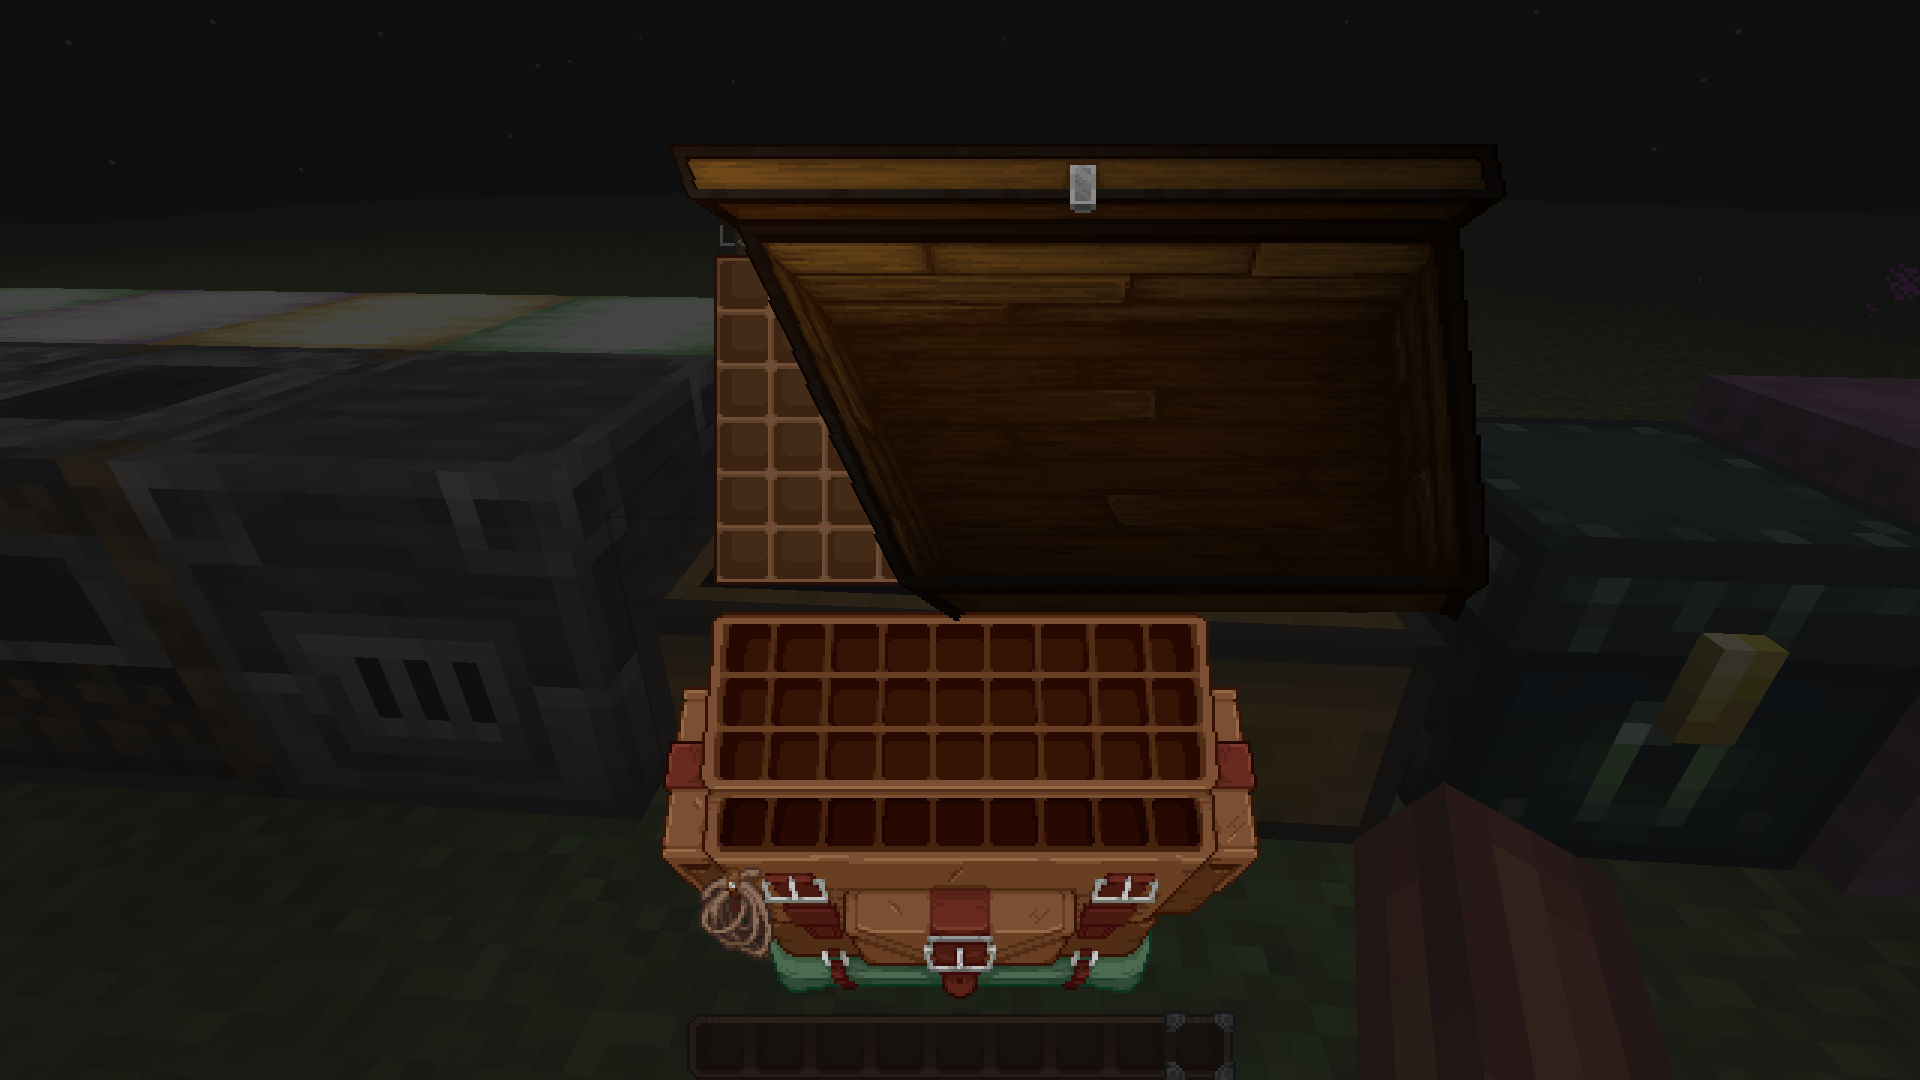
If you encounter the issue shown in the image below, try reloading resources — pressing F3 + T might help.
If you’re tired of seeing mismatched mod GUIs next to that beautiful Immersive Interfaces style, give this pack a try. It’s small, it’s simple, and it does one job.
Undopia Patch

—
[
](https://modrinth.com/resourcepack/undopia-patch)
[
](https://www.curseforge.com/minecraft/texture-packs/undopia-patch)
[](https://ko-fi.com/undugt)
Undopia Patch is a Minecraft Resource Pack that aims to improve the vanilla game without fundamentally changing it. It adds a variety of features that fit perfectly into the Vanilla gameplay. The added features help to improve the game, make it more beautiful, add more variety or simply fix visual errors.
—
[](https://patch.undopia.net)
—
### This Resource Pack comes with 4 different Flavours


—
### The Default and Dark Edition require
[](https://optifine.net/)

[](https://modrinth.com/mod/entitytexturefeatures)
[](https://modrinth.com/mod/entity-model-features)
[](https://modrinth.com/mod/cit-resewn)
—
[](https://patch.undopia.net)
Don’t like some features or only want certain ones?
Then try out the Undopia Patch Customizer and create your own version.
—
[](https://patch.undopia.net/custom-downloads/)
[](https://patch.undopia.net/faq)
[](https://patch.undopia.net/terms-and-conditions)
[](https://github.com/UnduGT/undopiapatch/issues)
Ultra PvP
**⚔️ Ultra PvP – The Ultimate Minecraft Combat Pack 💥**
Ultra PvP is a fast, clean, and explosive 16× resource pack designed for Crystal PvP, Cart PvP, Anchor PvP, and Classic PvP. Built for visibility, speed, and combat clarity — every pixel is made for players who want to click fast and win faster.
**🔧 Features**
– ✅ 16× FPS-optimized textures – performance without compromise
– 💠 Clear End Crystals – place and break with confidence
– 🧊 Short swords – clean screens = better fights
– 🔥 Low fire & minimal particles – see every frame
– 🛡️ Custom armor and totem textures – instant feedback in battle
– 🎯 Centered crosshair – perfect aim, always
– 🛠️ Anchor and glowstone textures – made for charged plays
– 🛒 Rails, minecarts & more – ready for Cart PvP setups
**🧠 PvP Styles Supported**
– 💎 Crystal PvP
– 🕳️ Anchor PvP
– 🛒 Cart PvP
– ⚔️ General PvP (Melee, Pot, Soup, etc.)
UGtRP
## **This resource is also created for your game on servers and in singleplayer!**

### **English**
> **UGtRP** is a Ukrainian resource pack for Minecraft: Java
> Edition 1.20.+. Which is a role-playing action game, that’s what it’s for
> uses the capabilities of its own textures
> Subjects (CIT) with Optifine modification.
>
> Thank you [PhantomEye](https://portalmod.net/)!
### **Українська**
> **UGtRP** – це український ресурс пак для Minecraft: Java
> Edition 1.20.+. Який націлений на Ролі плей дії, для цього він
> використовує можливості власних текстур
> Предметів (CIT) з модифікацією Optifine.
Twemoji Visibility
# Twemoji Visibility

–
Twemoji Visibility is a resource pack that replaces the standard Minecraft emojis with [Twemoji](https://github.com/jdecked/twemoji) emojis, the same ones that Twitter/X and Discord use.
## 📝 Notes
**If you are experiencing crashes or other weird behavior while using Twemoji Visibility 1.5 or higher, try using the latest version of 1.4.x.** When downloading the resource pack, it is listed as the Release version. (in green)
– There are multiple ways to paste in emojis.
– On Windows: you can use Windows + . to open the emoji menu.
– On MacOS: you can use Control + Command + Space to open the emoji menu.
– You can use the [Symbol Chat](https://modrinth.com/mod/symbol-chat) mod, which is officially supported by this Resource Pack.
– Sequence emojis are not supported by Minecraft, and by extension, this resource pack.
– This means that some emojis will come out as multiple parts when attempted to type in.
– Flags, skin tones, families, and some other emojis (such as 😶🌫️ and 🐦⬛) do not work properly.
– Force Unicode Font must be disabled for emojis to be visible.
– Game Menu (Escape) > Options… > Language… > Font Settings… > Force Unicode Font (set to OFF).
– If you are using the DiscordSRV plugin on a server, set `EmojiBehavior` to `show` in the config.yml file to force all emojis sent in chat to display as their emoji and not the name.
– You must be the host of the server to change this.
– The Beta version supports emojis on text that isn’t white.
– It is considered Beta because emojis may not render correctly in certain places. Please see the release notes to see what is broken.
## ⚖️ License and Credits
– The emoji images in this resource pack are used from Twitter’s [Twemoji](https://twemoji.twitter.com/) and jdecked’s forked [Twemoji](https://github.com/jdecked/twemoji), which are both licensed by [CC BY 4.0](https://creativecommons.org/licenses/by/4.0/).
– This resource pack was based on [AndrosDiscordEmojis](https://github.com/Androkai/AndrosDiscordEmojis) and both resource packs are also licensed by [CC BY 4.0](https://creativecommons.org/licenses/by/4.0/). Feel free to use and adapt in your own resource pack but give appropriate credit and provde a link to the license.
– [Androkai](https://github.com/Androkai) (the creator of [AndrosDiscordEmojis](https://github.com/Androkai/AndrosDiscordEmojis)) gave me permission to make this pack in [this GitHub issue](https://github.com/Androkai/AndrosDiscordEmojis/issues/4).
– The custom shader that allows emojis to keep their color on Signs and Books in the Beta build was created by [AlphaLeoli](https://modrinth.com/user/AlphaLeoli). You can join his discord server [here](https://discord.gg/gymTft2GbV). He also helped with Symbol Chat support.
True Stars
**True Stars** makes stars brighter, and adds color and flicker to them!
The colors are predefined, there is:
– Orange,
– Yellow,
– White
– And Blue
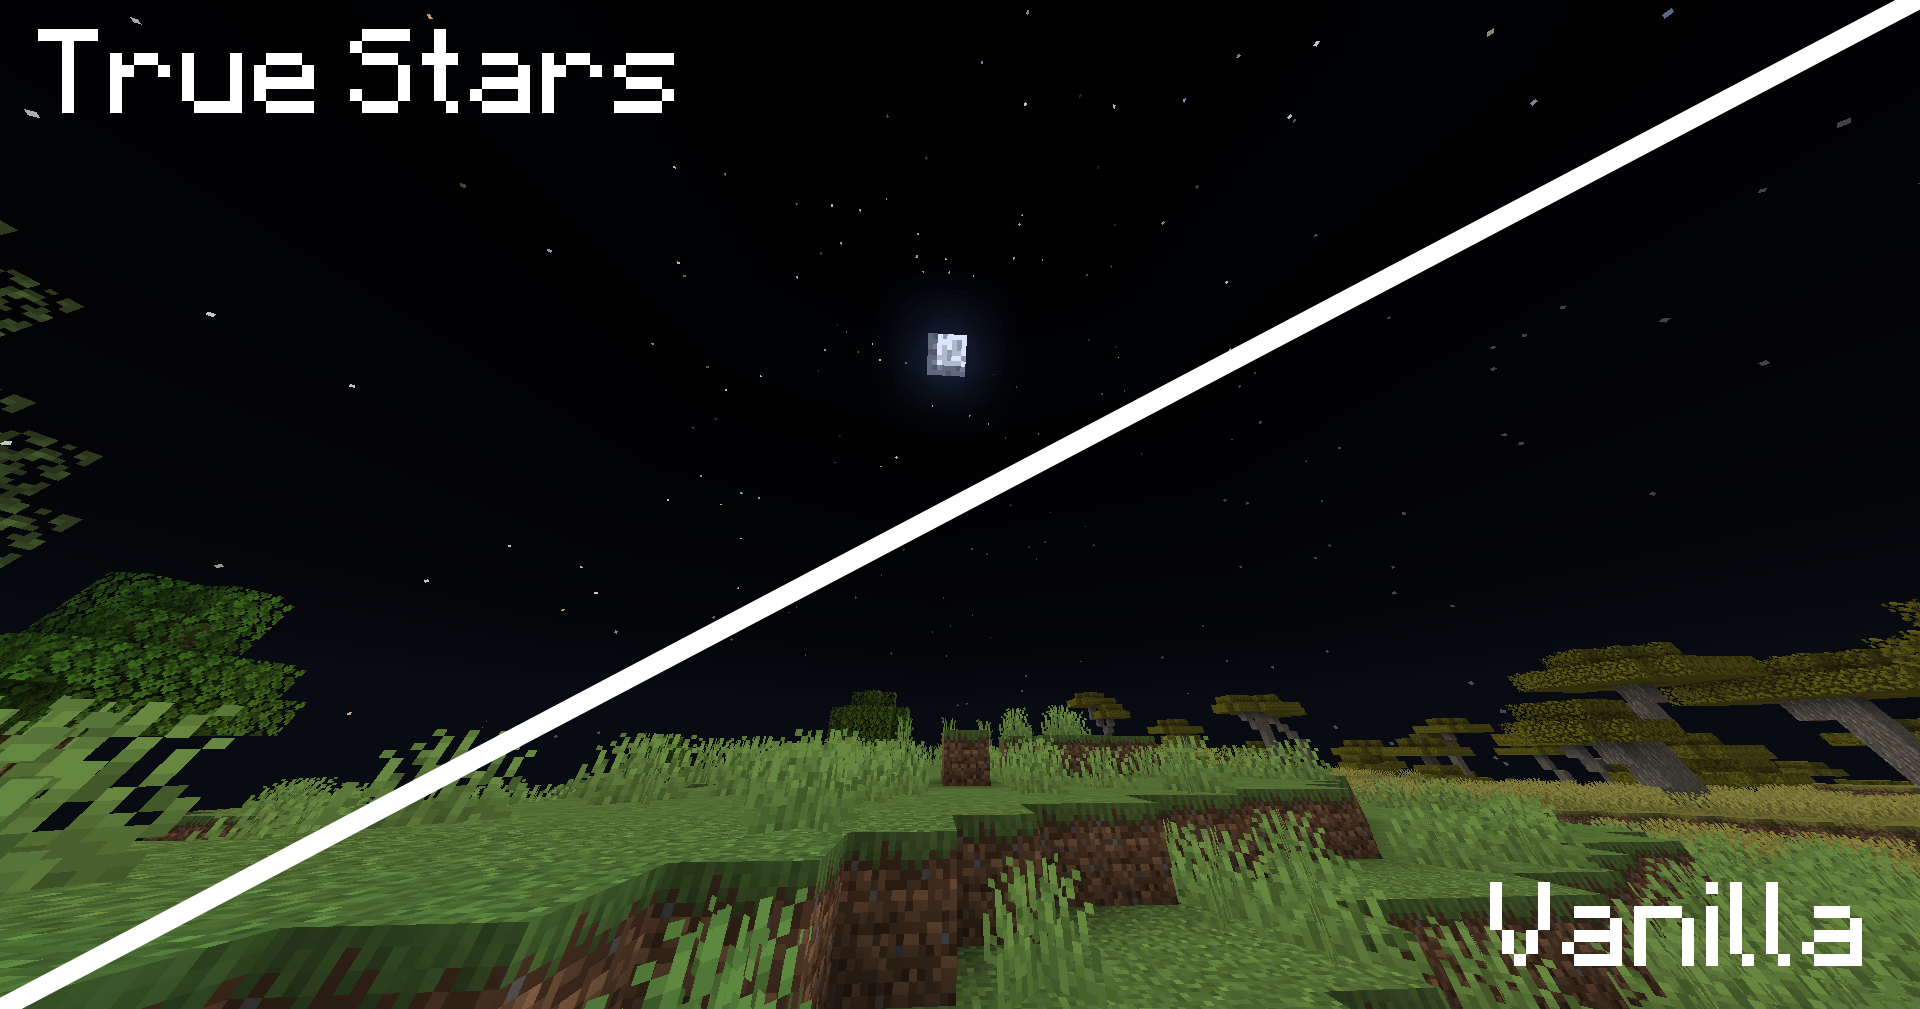
The flicker is working, while tick rate is not freezed, and speeds up then rate is bigger.
The idea was taken from [Better Stars](https://modrinth.com/resourcepack/better-stars), which i liked, and tried make it cooler.
True Harmony

True Harmony brings consistency and visual harmony to Minecraft by redesigning textures and integrating sprites and 3D models into game items. The pack is intended to provide a solution to Minecraft’s lack of artistic cohesion.
The project remains under development and will receive new features constantly.
### Details
* True Harmony is designed for Minecraft 1.21.4 and above.
* If you wish, you can use the pack in older versions down to 1.18.2, but the game will not be able to display 2D sprites and, instead, you will always see the 3D model in the inventory and item frames.
* True Harmony works perfectly in Vanilla Minecraft; that is, it does not require external mods to function.
* The pack is compatible with the Hold My Items mod.
* It is compatible with my other pack, Enchantment Glows.