WeatherStucture
🌦️ Weather & Structure Mod
Dynamic weather cycles and increased structure generation for Fabric 1.21.11
✨ Features
🌤️ Dynamic Weather Cycling
Tired of the same weather staying for hours? This mod takes control of the Overworld’s weather and randomly cycles between Clear, Rain, and Thunder every 5 to 15 minutes — keeping your world feeling alive and unpredictable.
Fully random intervals between 5 and 15 minutes
Equal chance of clear skies, rain, or a thunderstorm
Works seamlessly in both singleplayer and multiplayer
Only affects the Overworld — the Nether and End are untouched
🏘️ Increased Structure Spawning (+15%)
Explore a world packed with more to discover. Structure placement spacing is reduced by ~13%, giving you roughly 15% more structures across your world — from villages and woodland mansions to pillager outposts, desert temples, and more.
Affects all naturally generated structures
New chunks generate with boosted structure density
No changes to existing already-generated chunks
📋 License
This mod is licensed under the Apache 2.0 License — free to use, modify, and include in modpacks.
WeaponSkin
# ⚔️ WeaponSkin
A Minecraft plugin that lets players apply and remove cosmetic skins on weapons — without replacing the item itself.
> Supports **Oraxen** and a fully **built-in resource pack system** (no dependencies required).
—
## ✨ Features
– Apply custom weapon skins via drag-and-drop (inventory interaction)
– Remove skins with a dedicated **Skin Remover** item
– Preview skins before applying with **Shift + Right Click**
– Built-in resource pack builder, HTTP host server, and auto-push to players
– Supports **Oraxen** as an alternative provider
– `auto` provider detection — uses Oraxen if available, falls back to built-in automatically
– **Multi-language support** — configurable language files (English, Vietnamese)
– **Granular permissions** — individual permission nodes for each sub-command
—
## 📚 Documentation
Full documentation is available at: **[https://k4han.github.io/WeaponSkin/](https://k4han.github.io/WeaponSkin/)**
—
## 📋 Requirements
| Dependency | Type | Notes |
|—|—|—|
| [PacketEvents](https://github.com/retrooper/packetevents) | Required | For equipment packet handling |
| [Oraxen](https://oraxen.com/) | Optional | Only needed if `provider: oraxen` |
| Minecraft | 1.21+ | API version `1.21`, `item_model` provider requires 1.21.4+ |
—
## 🚀 Installation
1. Download `WeaponSkin.jar` and place it in your `plugins/` folder
2. Download [PacketEvents](https://github.com/retrooper/packetevents/releases) and place it in `plugins/` as well
3. Start the server — config files will be generated automatically
4. Edit `plugins/WeaponSkin/config.yml` and `skins.yml`
5. Run `/weaponskin pack build` (or `/ws pack build`) to generate and host the resource pack
—
## ⚙️ Configuration
### `config.yml`
“`yaml
# Prefix for all plugin messages
prefix: “&7[&eWeaponSkin&7] ”
# ============================================
# Update Checker
# ============================================
# Automatically check for updates on startup
update-checker: true
# ============================================
# Language Configuration
# ============================================
# Language setting: en | vi
language: en
# Sounds for applying/removing skins (global, no per-skin override)
apply-sound: ENTITY_PLAYER_LEVELUP
remove-sound: ENTITY_ITEM_BREAK
# Provider: auto | oraxen | item_model
provider: auto
# Resource Pack metadata (used by built-in pack builder)
pack:
description: “WeaponSkin resource pack”
namespace: “weaponskin”
# Auto-Host Configuration (only used when provider = item_model)
host:
enabled: true # Enable/disable HTTP server
required: true # Whether clients MUST accept the resource pack
type: “self-host” # self-host | external-host
self-host:
ip: “localhost” # Public IP or domain of your server
port: 8765
external-host:
url: “https://example.com/packs”
“`
### `skins.yml`
“`yaml
rivers_of_blood:
model_id: riversofblood_sword
allowed_materials:
– DIAMOND_SWORD
– NETHERITE_SWORD
“`
> Each skin requires a `model_id` (matching a key in `skins/*/items.yml`) and a list of `allowed_materials`.
—
## 📦 Provider Modes
| Provider | Description |
|—|—|
| `auto` | Uses Oraxen if installed, otherwise falls back to `item_model` |
| `item_model` | Built-in system — manages resource pack generation and hosting |
| `oraxen` | Delegates skin model lookup entirely to Oraxen |
—
## 🗂️ Adding Custom Skins (Built-in Provider)
Place your skin assets inside `plugins/WeaponSkin/pack/skins//`:
“`
pack/skins/my_skin/
├── items.yml
├── models/item/
│ └── my_sword.json
└── textures/item/
└── my_sword.png
“`
**`items.yml` format:**
“`yaml
items:
# Case 1: Model provided (you have a custom JSON model)
my_sword:
model: item/my_sword
# Case 2: Implicit Model Generation (only texture provided)
my_simple_sword:
parent_model: item/handheld
texture: item/my_simple_texture
“`
Then register the skin in `skins.yml` and run `/weaponskin pack build` (or `/ws pack build`).
—
## 🔧 Commands
| Command | Description |
|—|—|
| `/weaponskin give [amount]` | Give a skin item to a player |
| `/weaponskin remove [amount]` | Give a Skin Remover item to a player |
| `/weaponskin remover [amount]` | Alias for `/weaponskin remove` |
| `/weaponskin list` | List all registered skins |
| `/weaponskin reload` | Reload config, skins, language, and host settings |
| `/weaponskin pack build` | Build the resource pack from skin assets |
| `/weaponskin pack apply ` | Apply a built pack hosted on an external URL |
> **Alias:** `/ws` can be used as a shortcut for `/weaponskin` (e.g., `/ws give `)
—
## 🔐 Permissions
| Permission | Description | Default |
|—|—|—|
| `weaponskin.admin` | Full access to all commands (parent node) | OP |
| `weaponskin.give` | Give skin items | OP |
| `weaponskin.remove` | Give remover items | OP |
| `weaponskin.list` | List all skins | OP |
| `weaponskin.reload` | Reload configuration | OP |
| `weaponskin.pack` | Build and apply resource packs | OP |
> `weaponskin.admin` grants all child permissions automatically.
—
## 🎮 How It Works (Player Side)
| Action | Result |
|—|—|
| Drag skin item onto a weapon in inventory | Applies the skin |
| Drag Skin Remover onto a skinned weapon | Removes the skin |
| Shift + Right Click a skin item | Preview the skin on your equipped weapon |
—
## 🌐 Resource Pack Hosting
### Self-host (default)
The plugin starts an internal HTTP server on the configured port. Players automatically receive the pack on join.
> Make sure the port is open in your firewall and accessible from the internet.
### External host
Build the pack with `/weaponskin pack build` (or `/ws pack build`), then upload `plugins/WeaponSkin/pack/WeaponSkin-pack.zip` to your CDN or file host. Finally run:
“`
/weaponskin pack apply https://your-cdn.com/WeaponSkin-pack.zip
“`
—
## 🌍 Multi-Language Support
The plugin supports multiple languages for all user-facing messages.
### Available Languages
| Language | Code | File |
|—|—|—|
| English | `en` | `langs/en.yml` |
| Vietnamese | `vi` | `langs/vi.yml` |
### How to Change Language
1. Open `plugins/WeaponSkin/config.yml`
2. Set `language:` to your desired language code (e.g., `language: vi`)
3. Run `/weaponskin reload` (or `/ws reload`)
### Adding Custom Languages
1. Create a new file in `plugins/WeaponSkin/langs/` (e.g., `fr.yml` for French)
2. Copy the structure from an existing language file
3. Translate all messages
4. Set `language: fr` in `config.yml`
—
## 🛠️ Building from Source
“`bash
git clone https://github.com/k4han/WeaponSkin.git
cd WeaponSkin
./gradlew build
“`
Output: `build/libs/WeaponSkin-*.jar`
—
## 📄 License
This project is licensed under the MIT License.
—
## ☕ Support
If you find this plugin helpful and want to support its development, consider buying me a coffee!
[](https://buymeacoffee.com/kh4n)
WeaponsAddon
⚔️ Military Arsenal – Advanced Warfare for Slimefun4
Transform your Slimefun server into a tactical battlefield with cutting-edge military technology!
⚠️ DISCLAIMER: This is an UNOFFICIAL community addon. It is not affiliated with or endorsed by the official Slimefun4 team.
━━━━━━━━━━━━━━━━━━━━━━━━━━━━━━━━━━━━━━━━
✨ FEATURES
━━━━━━━━━━━━━━━━━━━━━━━━━━━━━━━━━━━━━━━━
⚔️ MACHINE GUN
• Automatic burst-fire weapon with devastating power
• 5-shot rapid burst mode
• 5 HP damage per shot (25 HP total per burst)
• Unbreakable – never breaks from use
• Requires custom ammunition
• Epic particle effects and realistic sounds
💣 BOMBARDMENT TERMINAL
• GPS coordinate-based airstrike system
• Input exact X Y Z coordinates for precision strikes
• Powered by Slimefun energy network (2M J per strike)
• Dual fuel system: TNT + Nether Stars
• 2 waves of 4 TNT bombs with 10-block radius
• Interactive GUI with real-time energy display
⚙️ MILITARY COMPONENTS
Progressive 3-tier crafting system:
• Tier 1: Military Circuit (base component)
• Tier 2: Targeting System, Guidance Chip, Reinforced Frame
• Tier 3: Quantum Processor, Explosive Core
🎯 AMMUNITION SYSTEM
• Craftable Machine Gun Bullets
• Auto-consumption when firing
• Balanced resource economy
AND MORE…
━━━━━━━━━━━━━━━━━━━━━━━━━━━━━━━━━━━━━━━━
📋 REQUIREMENTS
━━━━━━━━━━━━━━━━━━━━━━━━━━━━━━━━━━━━━━━━
✅ Minecraft 1.20.6
✅ Spigot or Paper 1.20.6+
✅ Java 17+
✅ Slimefun4 RC-37 or newer
━━━━━━━━━━━━━━━━━━━━━━━━━━━━━━━━━━━━━━━━
🎮 HOW TO USE
━━━━━━━━━━━━━━━━━━━━━━━━━━━━━━━━━━━━━━━━
1. Install Slimefun4 and this addon
2. Open Slimefun Guide: /sf guide
3. Navigate to “MILITARY ARSENAL” category
4. Craft components and weapons
5. Dominate the battlefield!
━━━━━━━━━━━━━━━━━━━━━━━━━━━━━━━━━━━━━━━━
⚠️ IMPORTANT NOTES
━━━━━━━━━━━━━━━━━━━━━━━━━━━━━━━━━━━━━━━━
• This is an UNOFFICIAL community-made addon
• Not listed on official Slimefun addons page
• Independently developed and maintained
• Compatible with Slimefun4 API
━━━━━━━━━━━━━━━━━━━━━━━━━━━━━━━━━━━━━━━━
🔗 LINKS
━━━━━━━━━━━━━━━━━━━━━━━━━━━━━━━━━━━━━━━━
📦 GitHub: https://github.com/Chagui68/Military-Arsenal-addon-for-Slimefun4
🐛 Report Issues: https://github.com/Chagui68/Military-Arsenal-addon-for-Slimefun4/issues
━━━━━━━━━━━━━━━━━━━━━━━━━━━━━━━━━━━━━━━━━━━━━━━━━━━━━━━━━━━━━━━━━━━━━━━━━━━━━━━━━━━━━━━━━━━━━━━━━━━━━━━━━━━━━
Made with ❤️ for the Slimefun community by Chagui68
━━━━━━━━━━━━━━━━━━━━━━━━━━━━━━━━━━━━━━━━━━━━━━━━━━━━━━━━━━━━━━━━━━━━━━━━━━━━━━━━━━━━━━━━━━━━━━━━━━━━━━━━━━━━━
Weapon Maker
**Weapon Maker** is a high-performance Minecraft plugin built for server owners who demand a modern, balanced, and deeply customizable weapon system. Moving beyond standard material-based setups, ArmiMilitari introduces cutting-edge technologies like PDC Binding and a physics-driven Special Attack system.
**💎 Core Features**
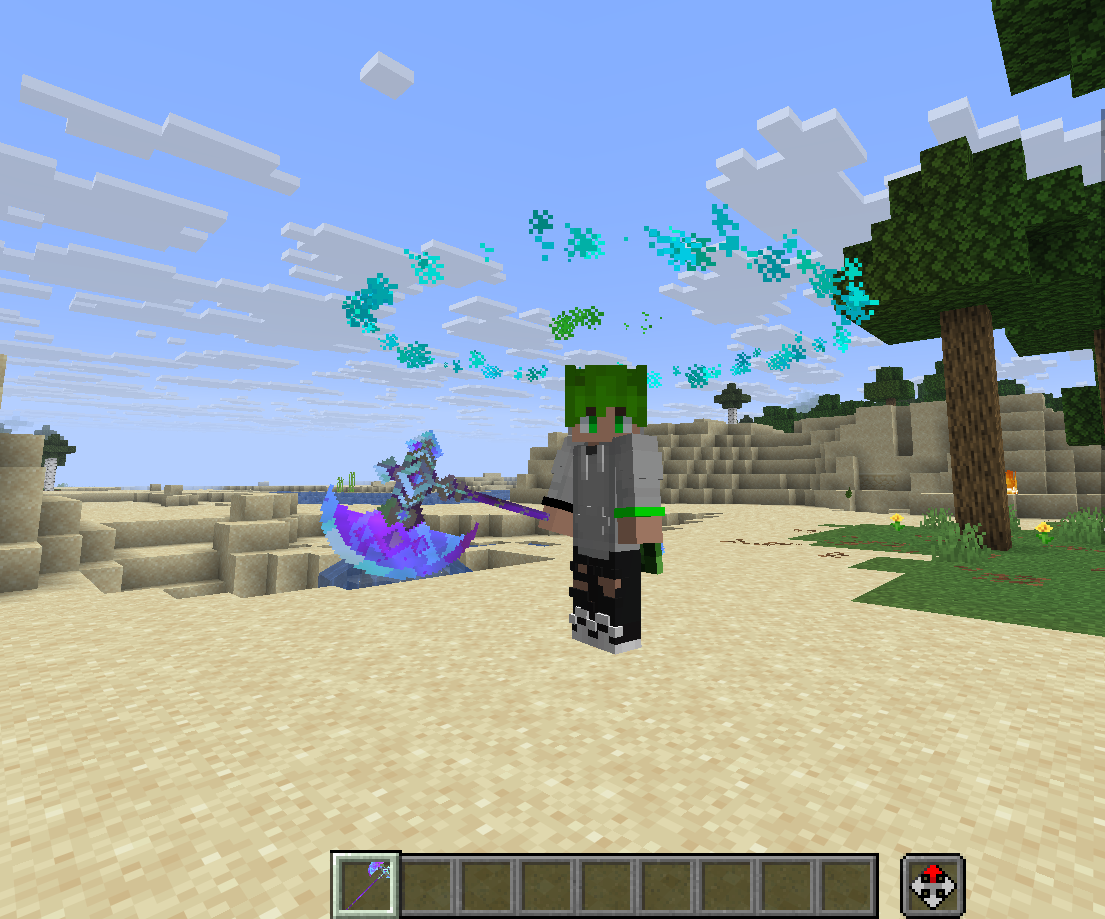
Universal PDC Binding: Utilizing Persistent Data Containers, you can turn any item into a weapon. The plugin identifies weapons via hidden unique IDs rather than just materials, allowing for limitless variety using the same base items!
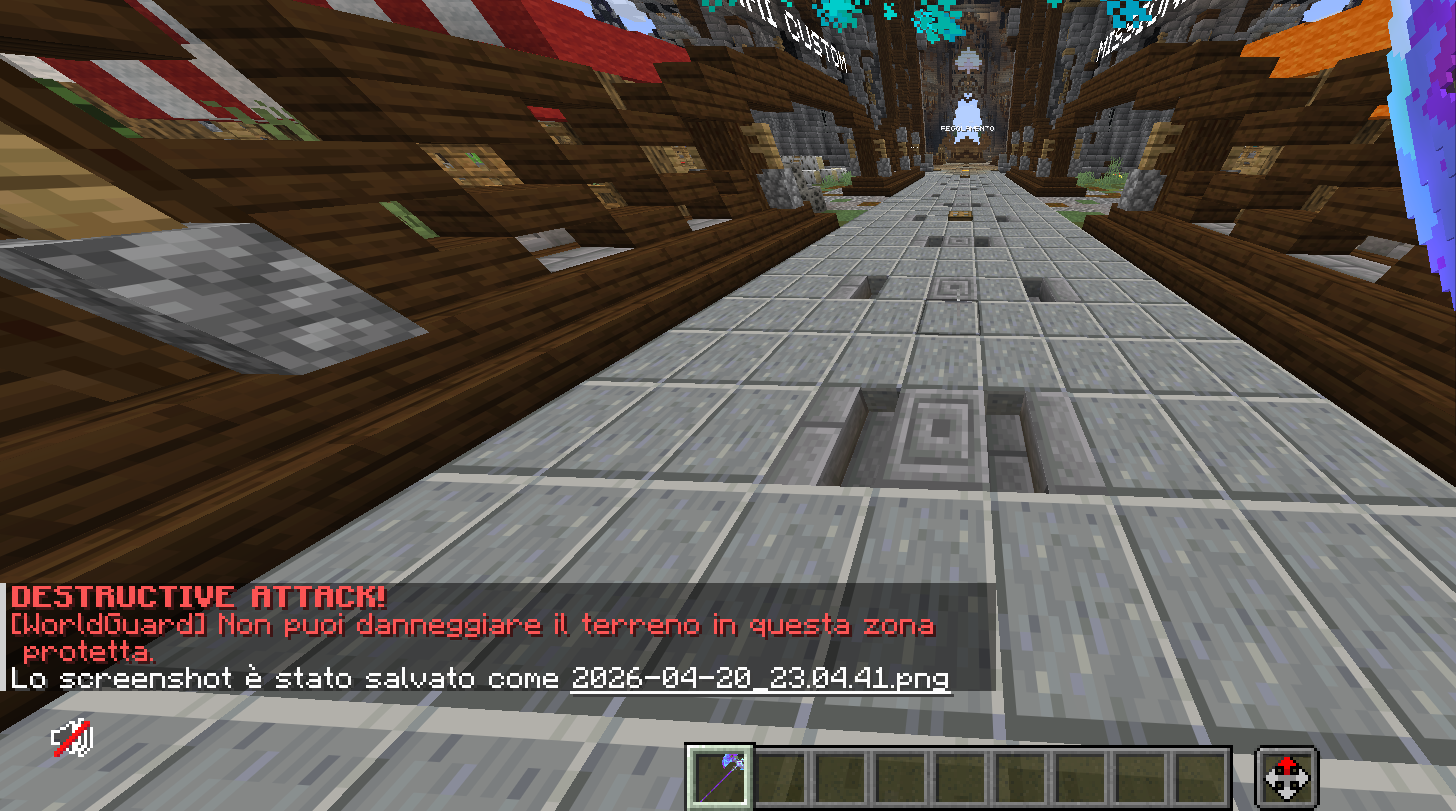
Special Attack: “Destructive”: Perform a dynamic leap (Shift + Right Click) followed by a ground-shaking impact that strikes enemies with lightning and creates realistic craters.
**🛡️ Grief Protection** (WorldGuard): Native WorldGuard integration. The plugin automatically detects protected regions (like Spawns) and prevents crater creation or environment damage if the player lacks build permissions.
**✨ Custom Halos:** Display dynamic particle rings around players. Customize color, size, and vertical offset (halo_y) for each individual weapon for a premium look.
Advanced Gunplay: Support for rapid automatic fire, configurable spread, custom projectiles (Hitscan or Physical Entities), and dynamic lightning patterns.
**🛠️ In-Game Editor:** Modify every single weapon stat in real-time through commands without needing to restart the server or reload files manually.
**📜 Main Commands**
/WeaponMaker give – Give a specific weapon to a player.
/WeaponMaker bind – Bind the item in your hand to an existing weapon ID.
/WeaponMaker edit – Edit stats on the fly (e.g., damage, fire_rate, destructive).
/WeaponMaker create – Create a new weapon template.
⚙️ Technical Requirements
Version: Minecraft 1.21 / 1.21.1
Server: Paper, Purpur, or Folia (highly recommended)
Java: Version 21
Dependencies: WorldGuard (optional, for region protection)
🚀 Quick Usage Guide
The recommended workflow to get your first weapon up and running:
Create the Template: Use /WeaponMaker create . This initializes a default configuration in the guns.yml file.
Get the Item:
Use /WeaponMaker give to receive the default item.
Or (Binding): Hold any item in your hand (e.g., a stick or a custom sword) and use /WeaponMaker bind . From that moment, that specific item will function as the chosen weapon!
Customize: Use /WeaponMaker edit to change behavior, damage, and effects in real-time.
🛠️ Editing Variants (Properties)
Works with custom modeled weapons and pre-made weapons, using /weapons bind
Properties are divided into categories to help you understand exactly what you are modifying:
1. General Information
name: The display name of the weapon. Supports colors/MiniMessage (e.g., Military Gun).
material: The base Minecraft item material (e.g., DIAMOND_SWORD, IRON_HOE).
cmd (CustomModelData): The numeric ID for your custom textures (Resource Pack).
enchanted: (true/false) Whether the item should have the glowing enchantment glint.
2. Combat & Balancing
damage: Damage dealt per projectile.
firerate: The firing speed. The lower the number, the faster the weapon fires (delay between shots).
bullets: How many projectiles are fired at once (perfect for shotguns).
spread: Accuracy. 0.0 is a laser; higher values increase bullet deviation.
spread_type: RANDOM (circular dispersion) or HORIZONTAL (flat dispersion).
type: Defines base behavior (e.g., PISTOL, MILITARY, GRAVITY).
3. Projectiles & Physics
projectile: The type of projectile fired.
HITSCAN: Hits instantly where you aim (beam).
ARROW, SNOWBALL, FIREBALL, TNT: Fires physical entities.
BLOCK: Fires blocks (defined by projectile_block).
MOB: Fires mobs (defined by projectile_mob).
projectile_speed: The travel speed of physical projectiles.
projectile_block: The block type to fire (e.g., SAND, STONE).
projectile_mob: The mob type to fire (e.g., ZOMBIE, PIG).
4. Visual Effects & Animations
particle: The trail left by the shot (e.g., FIREWORK, FLAME, SOUL_FIRE_FLAME, NONE).
holding_animation: Animation while holding the weapon.
VIBRATION: The weapon shakes slightly (ideal for heavy weaponry).
PARTICLES: Small effects centered around the item.
halo: (true/false) Enables a particle ring around the player.
halo_color: The ring color (e.g., RED, AQUA, WHITE or HEX codes like #FF0000).
halo_size: The radius of the ring.
halo_y: The height of the ring relative to the player’s feet (e.g., 2.3 puts it above the head).
5. Special Features (Lightning & Destruction)
destructive: (true/false) Special ability.
6. If true, pressing Shift + Right Click performs a giant leap forward and triggers an explosive impact with a crater (protected by WorldGuard).
lightning_pattern: The shape in which lightning strikes (e.g., CIRCLE, STAR, CROSS, RANDOM).
lightning_origin: Where the lightning strikes. PLAYER (around you) or TARGET (where the shot lands).![Works with custom modeled weapons and pre-made weapons, using /WeaponMaker bind, and also works very well in spawn with worldguard (tested in 1.21.11)]![and also works very well in spawn with worldguard (tested in 1.21.11)]
lightning_count: How many lightning bolts to summon during the attack.
lightning_min_dist / max_dist: The minimum and maximum strike radius.
and also works very well in spawn with worldguard (tested in 1.21.11)
💡 Pro Tip
Use the /WeaponMaker info command while holding a weapon to see all its current statistics in a clean, easy-to-read list!
WeaponEffect
# WeaponEffect
Required Plugin: https://modrinth.com/plugin/kotlinplugins
Provides customizable weapons that provide effects while held in main hand.
Weapons include all vanilla weapons: swords, bow, trident, crossbow.
– Usage: “`/weaponeffect [LevelOfTheEffect]“`
– Required permission to use the command: “`weaponeffect.give“`
– Players with op (/op nickname) have this required permission by default.
Make your fights legendary! Turn useless weapons into real deal.
– Check out other plugins: https://modrinth.com/user/Winlyps
WeakPoint
ArmorDurabilityWeakSpots is a highly configurable Bukkit/Paper/Spigot plugin for Minecraft 1.21.4 that adds realistic armor mechanics, including weak spot targeting, critical hits, and temporary armor failure. Enhance combat strategy with location-based damage, smart mob targeting, and customizable durability scaling, all with immersive particle and sound feedback.
We are homeless
🏠 Features
✅ Commands
– /sethome [name] – Set a home (default: “home”)
– /home [name] – Teleport to home
– /delhome – Delete a home
– /homes – List all homes with clickable names
✅ Features
– 5 homes per player (configurable)
– Persistent storage (saves to homes.yml)
– 3 second cooldown (configurable)
– Clickable home list – Click to teleport!
– Named homes – bedroom, base, shop, etc.
💬 Example Usage
Player: /sethome
✅ Home “home” set!
Player: /sethome bedroom
✅ Home “bedroom” set!
Player: /homes
=== Your Homes ===
• home – world (100, 64, 200)
• bedroom – world (150, 70, 250)
Click a home name to teleport!
Player: Clicks “bedroom”
✅ Teleporting to bedroom…
Waystone Warps
# 🧭 Waystone Warps
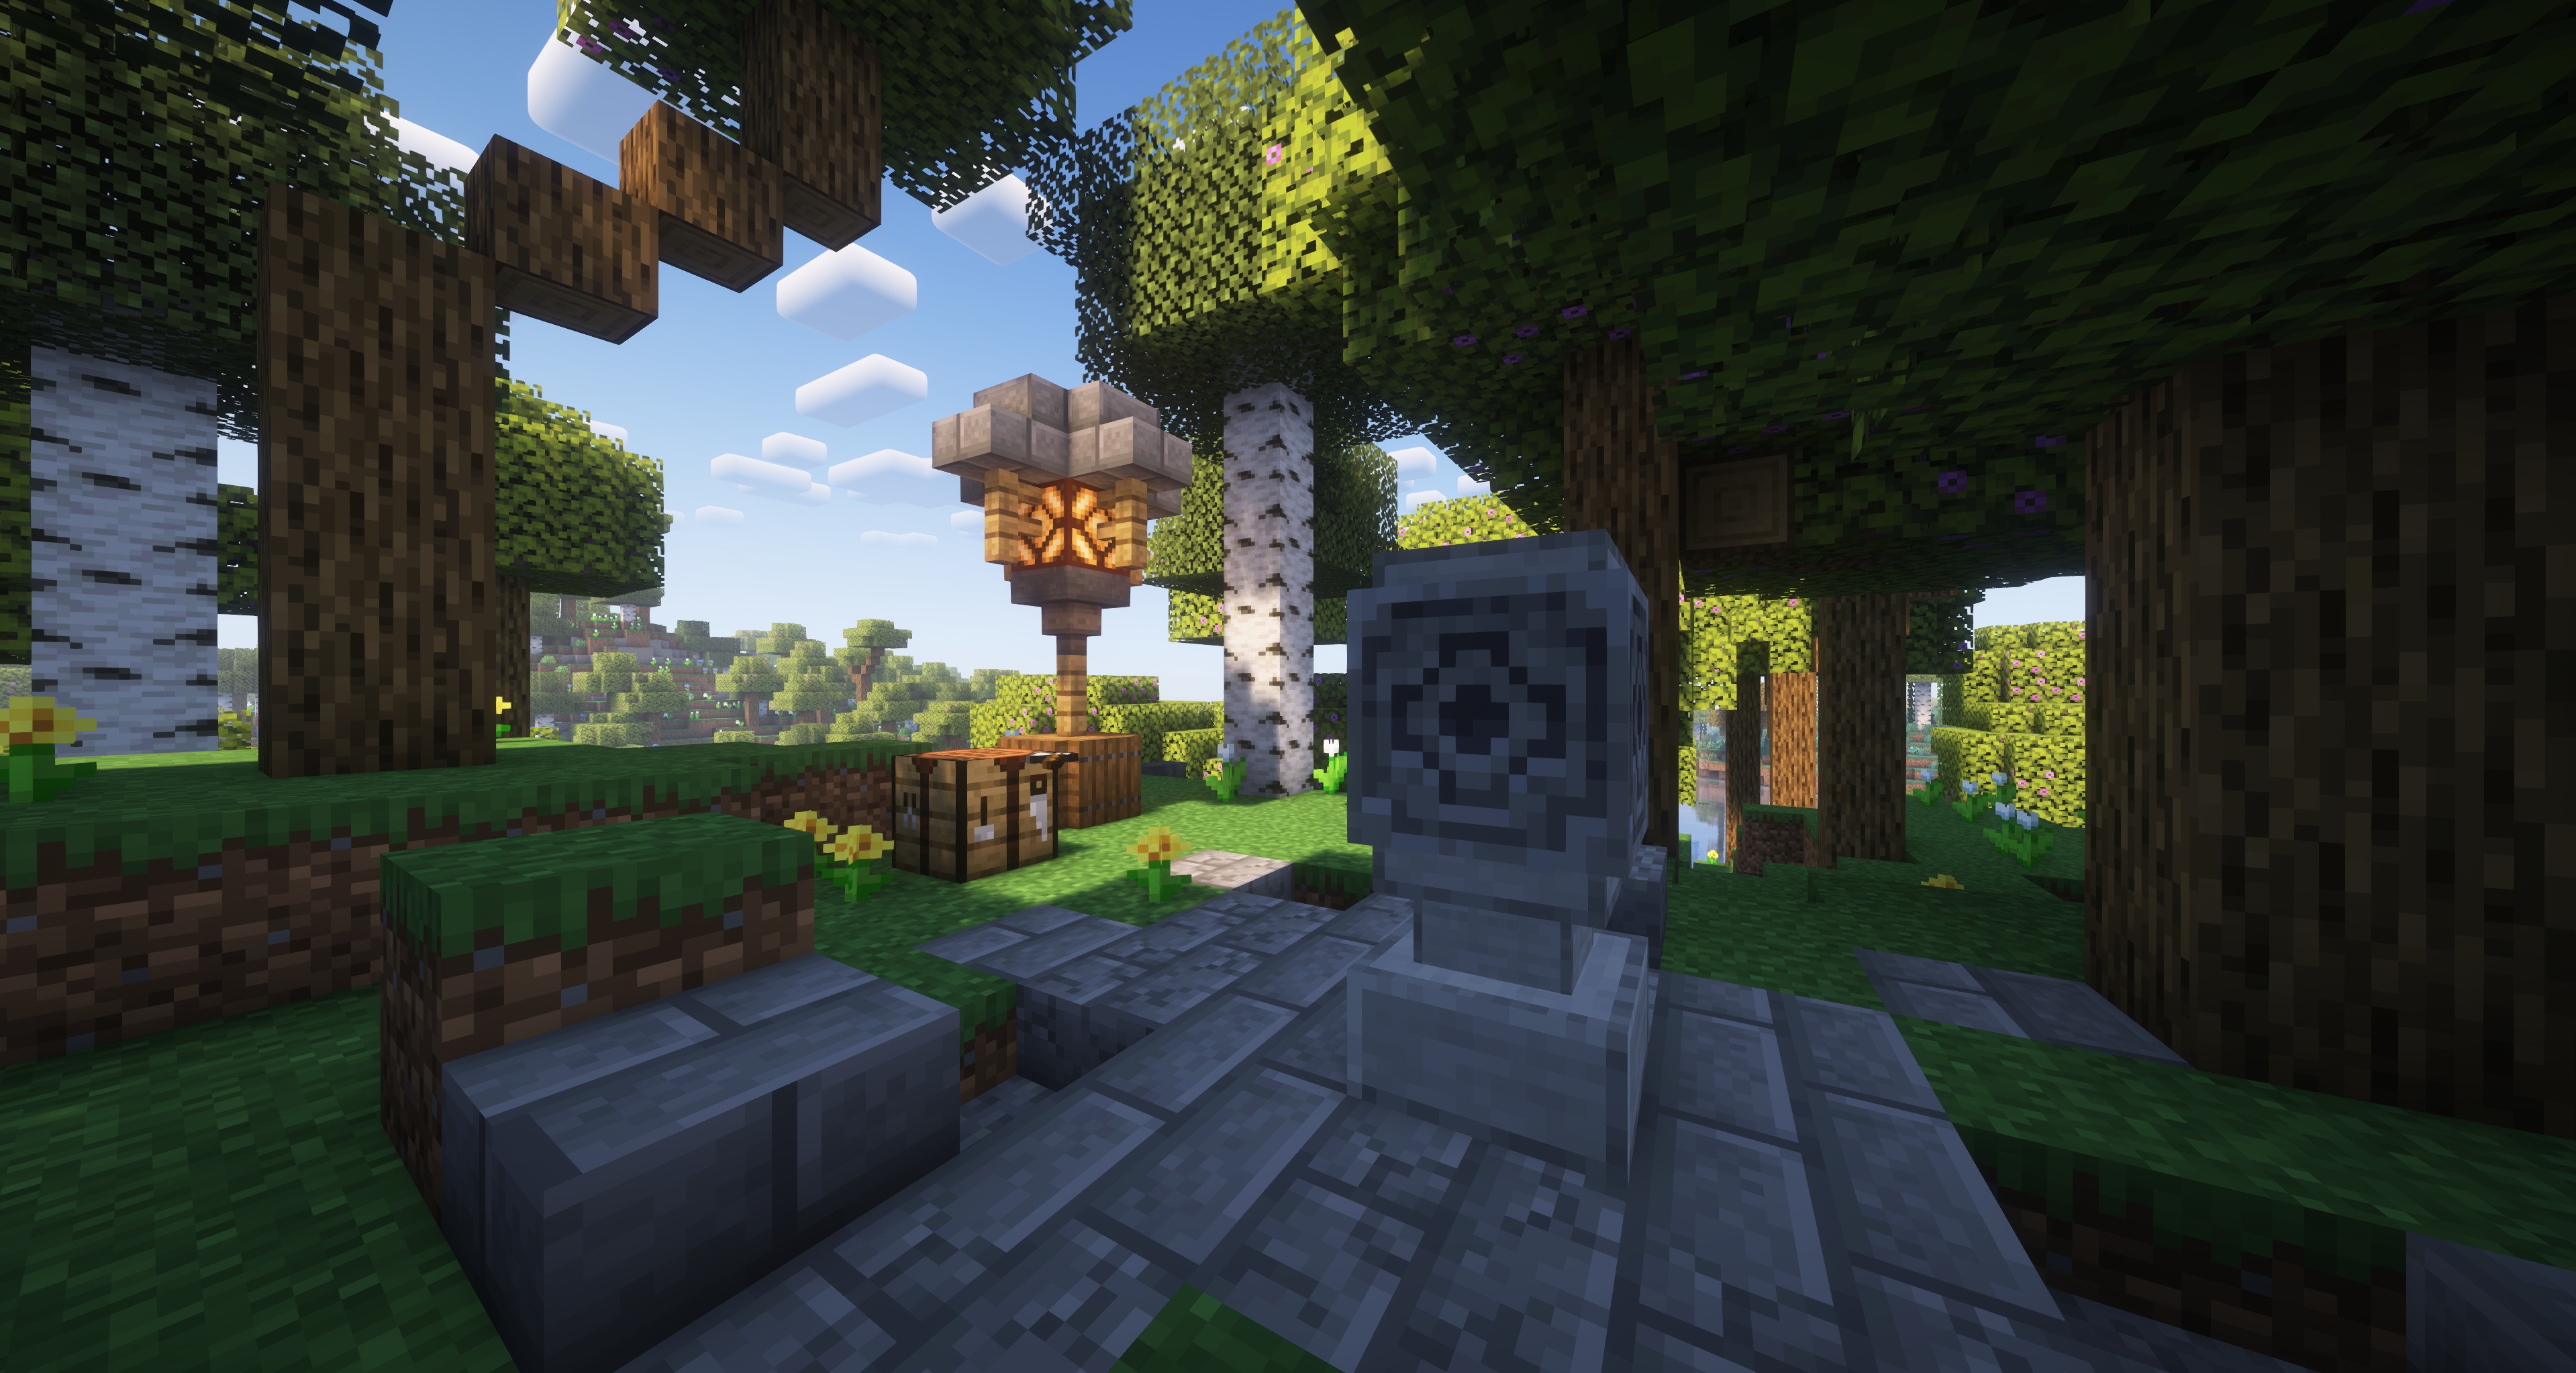
Transform your travels with the Waystone Warps plugin! Craft and place waystones to set up teleportation points throughout your world. Discover new waystones placed by others as you explore and easily teleport between them. Streamline your journey across the world knowing you can always teleport back home in a snap, or simply visit your friends in an instant.
Here are some of the cool features you can expect:
– **Physically Grounded** – Warps are bound via a physical waystone structure in the world, making the experience much more immersive.
– **Intuitive GUI Menus** – Your entire waystone can be managed using click menus. Never need to type a command ever again.
– **Manage Access Easily** – Limit your waystones to only you, open it up to your friends, or leave it out there for the public to find.
– **Teleportation Fees** – Let your players work for it! Change teleportation costs between xp, items, or even a provided economy plugin.
## Installation
Download the latest release (.jar file) from the releases tab and place it in your server’s plugins folder.
For additional functionality such as per player/rank permissions and warp limits, you must install
[Vault](https://www.spigotmc.org/resources/vault.34315/) as well as a compatible permission and chat
metadata provider. [LuckPerms](https://luckperms.net/) is a recommended plugin for handling both.
## Getting Started
To establish a waystone warp, place down a lodestone on top of a smooth stone block, then right click the lodestone. This opens up a creation menu where you are able to
name your warp. Once the waystone warp is established, you will be presented with various options to do with warp management.
To discover waystones made by other players, right click a waystone and watch the particles change colours.
To teleport to waystones, right click with a compass in hand. This will bring up a menu listing all your discovered waystons. Click on the waystone of choice to teleport to it.
## Permissions
– waystonewarps.command.warpmenu – Allows the use of the warpmenu command to open up the menu that allows players to teleport to warps.
– waystonewarps.bypass.open_menu – Allows access to open the management menu.
– waystonewarps.bypass.access_control – Allows access to change the access control.
– waystonewarps.bypass.manage_players – Allows access to manage players.
– waystonewarps.bypass.rename – Allows access to rename the waystone.
– waystonewarps.bypass.icon – Allows access to change the waystone icon.
– waystonewarps.bypass.relocate – Allows access to relocate the waystone.
– waystonewarps.admin.invalids.list – Allows usage of the list command.
– waystonewarps.admin.invalids.remove – Allows usage of remove command.
– waystonewarps.admin.invalids.removeall – Allows usage of removeall command.
– waystonewarps.teleport – Allows teleportation
– waystonewarps.teleport.interworld – Allows teleportation to undiscovered warps
– waystonewarps.teleport.cooldown_bypass – Allows bypassing the cooldown timer
– waystonewarps.create – Allow the creation of warps
– waystonewarps.discover – Allow the discovery of warps
## Per Player Limits
Ensure that you have a Vault provider installed to set limits as described out in the installation section. Each Vault
provider plugin has its own way of implementing this feature. As LuckPerms is the recommended provider, instructions
will make use of it as such.
To set a metadata for a player, use command:
`/lp group meta set `
For groups:
`/lp user meta set `
Here are the different limits you can set:
– waystonewarps.warp_limit – Defines how many waystone warps a player can create.
– waystonewarps.teleport_cost – Defines how much it costs to teleport.
– waystonewarps.teleport_timer – Defines how long it takes to teleport.
## Building from Source
### Requirements
– Java JDK 21 or newer
– Git
### Compiling
“`
git clone https://gitlab.com/Mizarc/waystonewarps.git
cd waystone-warps/
./gradlew shadowJar
“`
Built .jar binary can be found in the `build/libs` folder.
## Support
If you encounter any bugs, crashes, or unexpected behaviour, please [open an issue](https://github.com/mizarc/waystone-warps/issues) in this repository.
## License
Waystone Warps is licensed under the permissive MIT license. Please view [LICENSE](LICENSE) for more info.
Waypoint
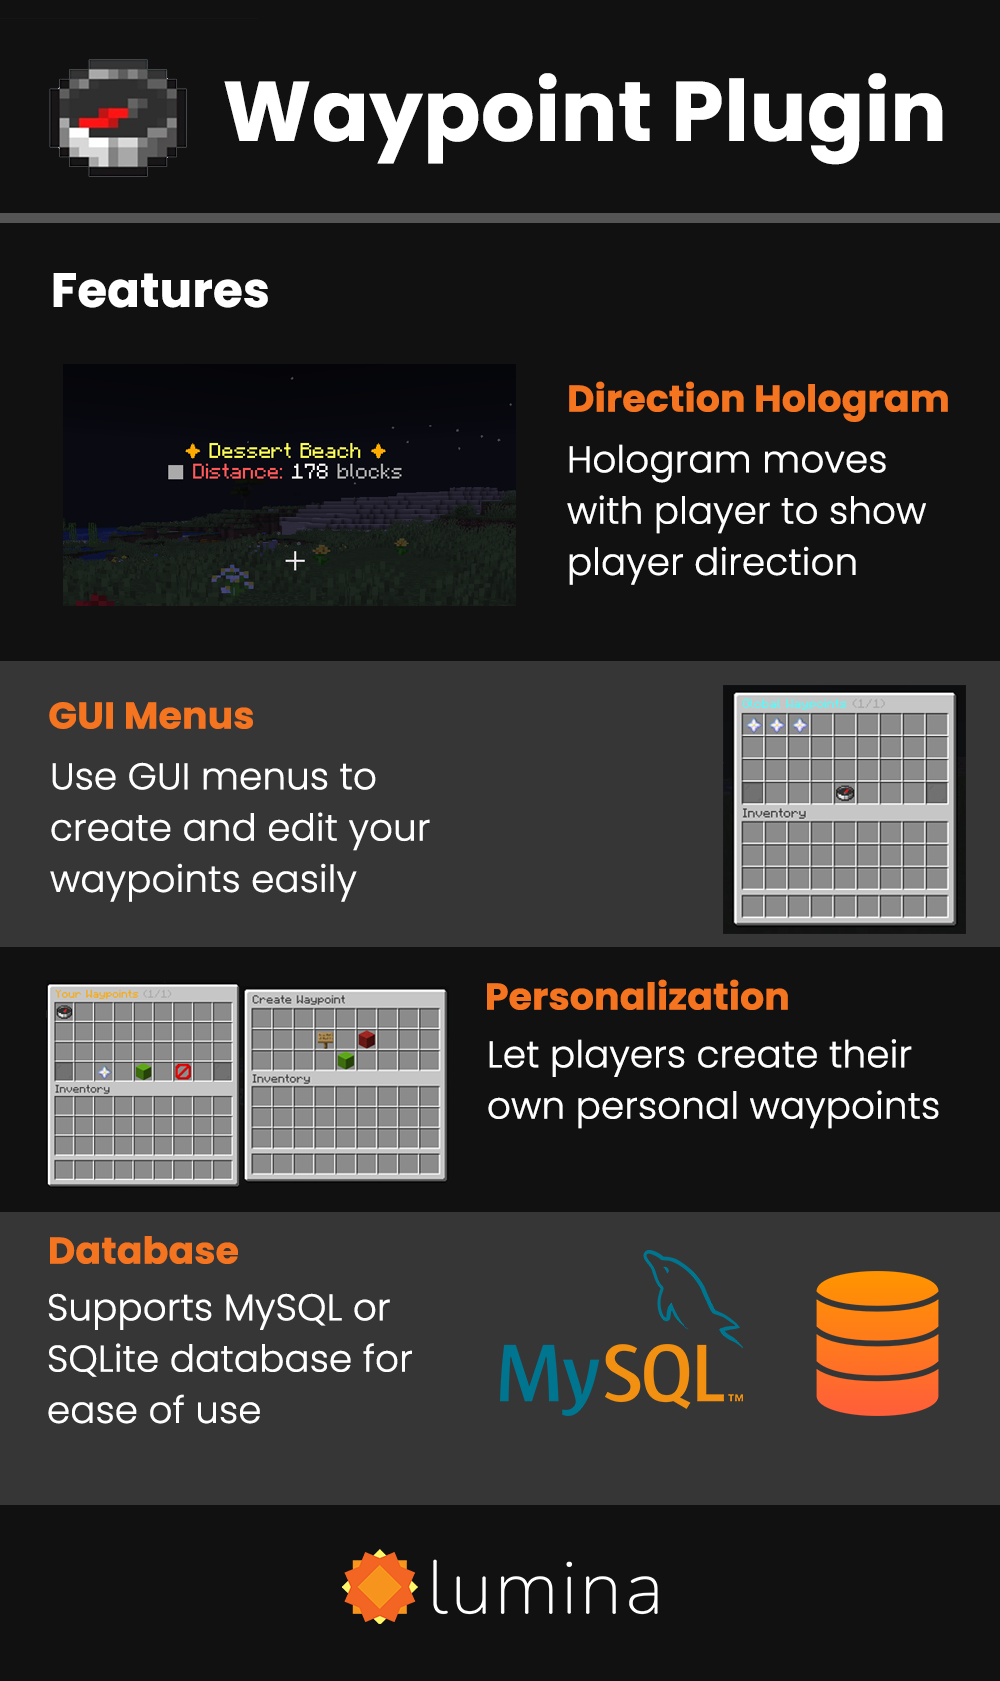
# Waypoint Plugin
Show your players the path!
## Features
– GUI based waypoint creation and navigation
– Players can create their own personal waypoints
– Admins can set global waypoints for the players (like warps)
– Plugin supports SQLite and MySQL databases
This plugins was made by Lumina Games. Opensource under GPL-V3 License
WayBar – Vanilla locator bar waypoints
# WayBar – Locator Bar Waypoints
A Minecraft server plugin that displays **personal** and **global** waypoints in the native **Locator Bar**.

## Features
– **Personal waypoints** — save locations, teleport, customize appearance
– **Global waypoints** — server-wide points visible to all players
– **Locator Bar display** — waypoints appear in the vanilla compass UI via ProtocolLib
– **Custom colors** — preset colors or hex values (`#RRGGBB`)
– **Multiple icon styles** — different waypoint markers
– **Visibility radius** — min/max distance filtering per waypoint
– **Per-player visibility** — players can hide/show individual global waypoints
## Resource Packs (Custom Icons)

By default, waypoints use vanilla style. For custom waypoint styles, download a resource pack from [Releases](https://github.com/stanislavlysenko0912/waybar/releases) and configure it in `config.yml`:
“`yaml
resource-pack:
enabled: true
url: “https://your-host.com/waybar-icons.zip”
sha1: “abc123…”
“`
Once players accept the pack, custom styles become available via `/wp style` and `/wp styles`.
If players don’t accept the pack, they will see the vanilla style.
Also available `/wp rp` command to suggest pack again.
## Requirements
– **Server:** Paper or Spigot **1.21.6+**
– **Java:** 21+
– **Dependency:** [ProtocolLib](https://www.spigotmc.org/resources/protocollib.1997/)
> Other Bukkit-based servers may work if they support ProtocolLib. If you hit a version/build where Locator Bar waypoints don’t work, please open an issue with your server and ProtocolLib versions.
## Commands
Main command: `/wp` (aliases: `/waybar`, `/wb`)
### Personal Waypoints
| Command | Description |
|———|————-|
| `/wp set [color:…] [style:…] [radius:…]` | Create waypoint at your location |
| `/wp tp ` | Teleport to waypoint |
| `/wp del ` | Delete waypoint |
| `/wp list` | List your waypoints |
| `/wp color ` | Change color |
| `/wp style ` | Change icon |
| `/wp radius ` | Set visibility radius |
### Global Waypoints
| Command | Description |
|———|————-|
| `/wp gset [color:…] [style:…] [radius:…]` | Create global waypoint (admin) |
| `/wp gtp ` | Teleport to global waypoint |
| `/wp gdel ` | Delete global waypoint (admin) |
| `/wp glist` | List visible global waypoints |
| `/wp globals` | Open visibility GUI |
| `/wp ghide ` / `/wp gshow ` | Hide/show specific global |
| `/wp ghideall` / `/wp gshowall` | Hide/show all globals |
### Utility
| Command | Description |
|———|————-|
| `/wp help` | Show help |
| `/wp colors` | List available colors |
| `/wp styles` | List available icon styles |
## Permissions
| Permission | Default | Description |
|————|———|————-|
| `waypoints.use` | true | Access to `/wp` command |
| `waypoints.personal` | true | Manage personal waypoints |
| `waypoints.personal.tp` | true | Teleport to personal waypoints |
| `waypoints.global.use` | true | View globals & visibility controls |
| `waypoints.global.tp` | true | Teleport to global waypoints |
| `waypoints.global.manage` | op | Create/delete/edit global waypoints |
## Configuration
Config file: `plugins/WayBar/config.yml`
Default config.yml
“`yaml
limits:
personal: 10
global: 20
gui:
enabled: true
title: “Global waypoints”
locator-bar:
enabled: true
display:
# If true, waypoints are shown only while holding a specific item (main hand or off-hand).
require-item: false
# Item material name to require for waypoint visibility.
item: “minecraft:compass”
distance:
# If true, waypoints are only shown within their effective min/max radius.
enabled: true
# Default radius values (in blocks). Individual waypoints can override these via /wp radius.
# -1 means “no limit” (always visible) for max.
default-min: 0
default-max: -1
# Hysteresis buffer (in blocks) to avoid flicker near the boundary.
hysteresis: 16
# How often (in ticks) to re-check moving players (20 ticks = 1 second).
check-period-ticks: 10
resource-pack:
# If enabled and url is set, the server will offer a resource pack to players (optional).
enabled: false
# HTTPS URL to the pack zip (leave empty to disable sending).
url: “”
# Optional SHA-1 hash (40 hex chars). If set, helps clients cache/verify the pack.
sha1: “”
# Optional prompt shown to players.
prompt: “Waypoints icons pack (optional)”
messages:
# If true, adds the permission node to the “no permission” message (useful for debugging).
show-permission-node: false
“`