DockBridge
# DockBridge
Velocity plugin to auto-register Docker-backed servers (e.g., Limbo) and check for updates on Modrinth.
## Features
– Auto-discovery: Containers with label `net.uebliche.dockbridge.autoregister=true` are registered as Velocity servers. Host from container name, port from label `net.uebliche.dockbridge.server_port` (fallback: first exposed port, else 25565).
– Name collisions: Default `suffix` → append short container id (`basename-abcdef`). Alternative `overwrite` → keep basename, last writer wins.
– `/dockbridge` command (permission `dockbridge.command`): Shows label filter, duplicate strategy, last scan stats, and registered servers (no sensitive data).
– Modrinth update check on proxy start; login hint for players with permission `dockbridge.update.notify`.
## Installation
1) Download the latest DockBridge release from Modrinth (jar file).
2) Place the jar into your Velocity `plugins/` folder.
3) (Optional) If Velocity runs in Docker, mount `/var/run/docker.sock` into the Velocity container so DockBridge can discover containers.
4) Start Velocity. On first start, the config file `dockbridge.conf` is created in the Velocity data folder; adjust settings and restart.
5) Permissions:
– `dockbridge.command` for `/dockbridge`
– `dockbridge.update.notify` for update hints on login
## Configuration
`dockbridge.conf` (created in the Velocity data folder on first start):
“`
docker.endpoint=unix:///var/run/docker.sock
docker.poll_interval_seconds=30
filters.proxy_group=default
docker.autoregister.label_key=net.uebliche.dockbridge.autoregister
docker.autoregister.label_value=true
docker.autoregister.name_label=net.uebliche.dockbridge.server_name
docker.autoregister.port_label=net.uebliche.dockbridge.server_port
docker.autoregister.duplicate_strategy=suffix # suffix | overwrite
“`
## Docker labels (example)
“`
net.uebliche.dockbridge.autoregister=true
net.uebliche.dockbridge.server_name=limbo
net.uebliche.dockbridge.server_port=30000
“`
## Local testing
### Gradle run
“`
./gradlew runVelocity
“`
Downloads Velocity, builds the plugin (shadowJar), and starts the proxy with the plugin loaded.
### Docker Compose (Limbo set)
“`
docker compose up –build # or: docker compose -f docker-compose.limbo.yml up –build
“`
Includes three Limbo backends (ports 30000/30001/30002) and Velocity on host port 26678. Velocity runs via `runVelocity` inside the container and mounts your sources/config.
## Commands & permissions
– `/dockbridge` (permission `dockbridge.command`): Status and registered servers.
– Update hint on login: permission `dockbridge.update.notify`.
## Troubleshooting
– No servers registered?
– Ensure your containers have the label `net.uebliche.dockbridge.autoregister=true` and a valid `net.uebliche.dockbridge.server_port`.
– Make sure Velocity can reach Docker: mount `/var/run/docker.sock` (or set `docker.endpoint` to a reachable TCP endpoint).
– Check `/dockbridge` output for last scan count and registered servers.
– Port mismatch or forwarding errors?
– Verify the Limbo (or other backend) port matches the label and the server properties.
– For Velocity forwarding, ensure forwarding secret/mode match on both ends.
– Duplicate names?
– Default strategy is `suffix`. Switch to `overwrite` via `docker.autoregister.duplicate_strategy` if you want last-writer-wins.
## Build
“`
./gradlew build
“`
Produces the shaded jar at `build/libs/DockBridge-.jar`.
## Contributing
– Fork & PRs welcome. Keep code comments minimal but purposeful.
– Default Java 21, Gradle Kotlin DSL, Velocity API 3.4.0-SNAPSHOT for run task; 3.1.1 for compileOnly/annotationProcessor.
– Run `./gradlew build` before submitting; Docker-based tests are optional.
Dithering3D
# 🎨 Dithering3D – Surface-Stable Fractal Dithering




—
## 🖼️ Screenshots
—
## ✨ A Revolutionary Visual Experience
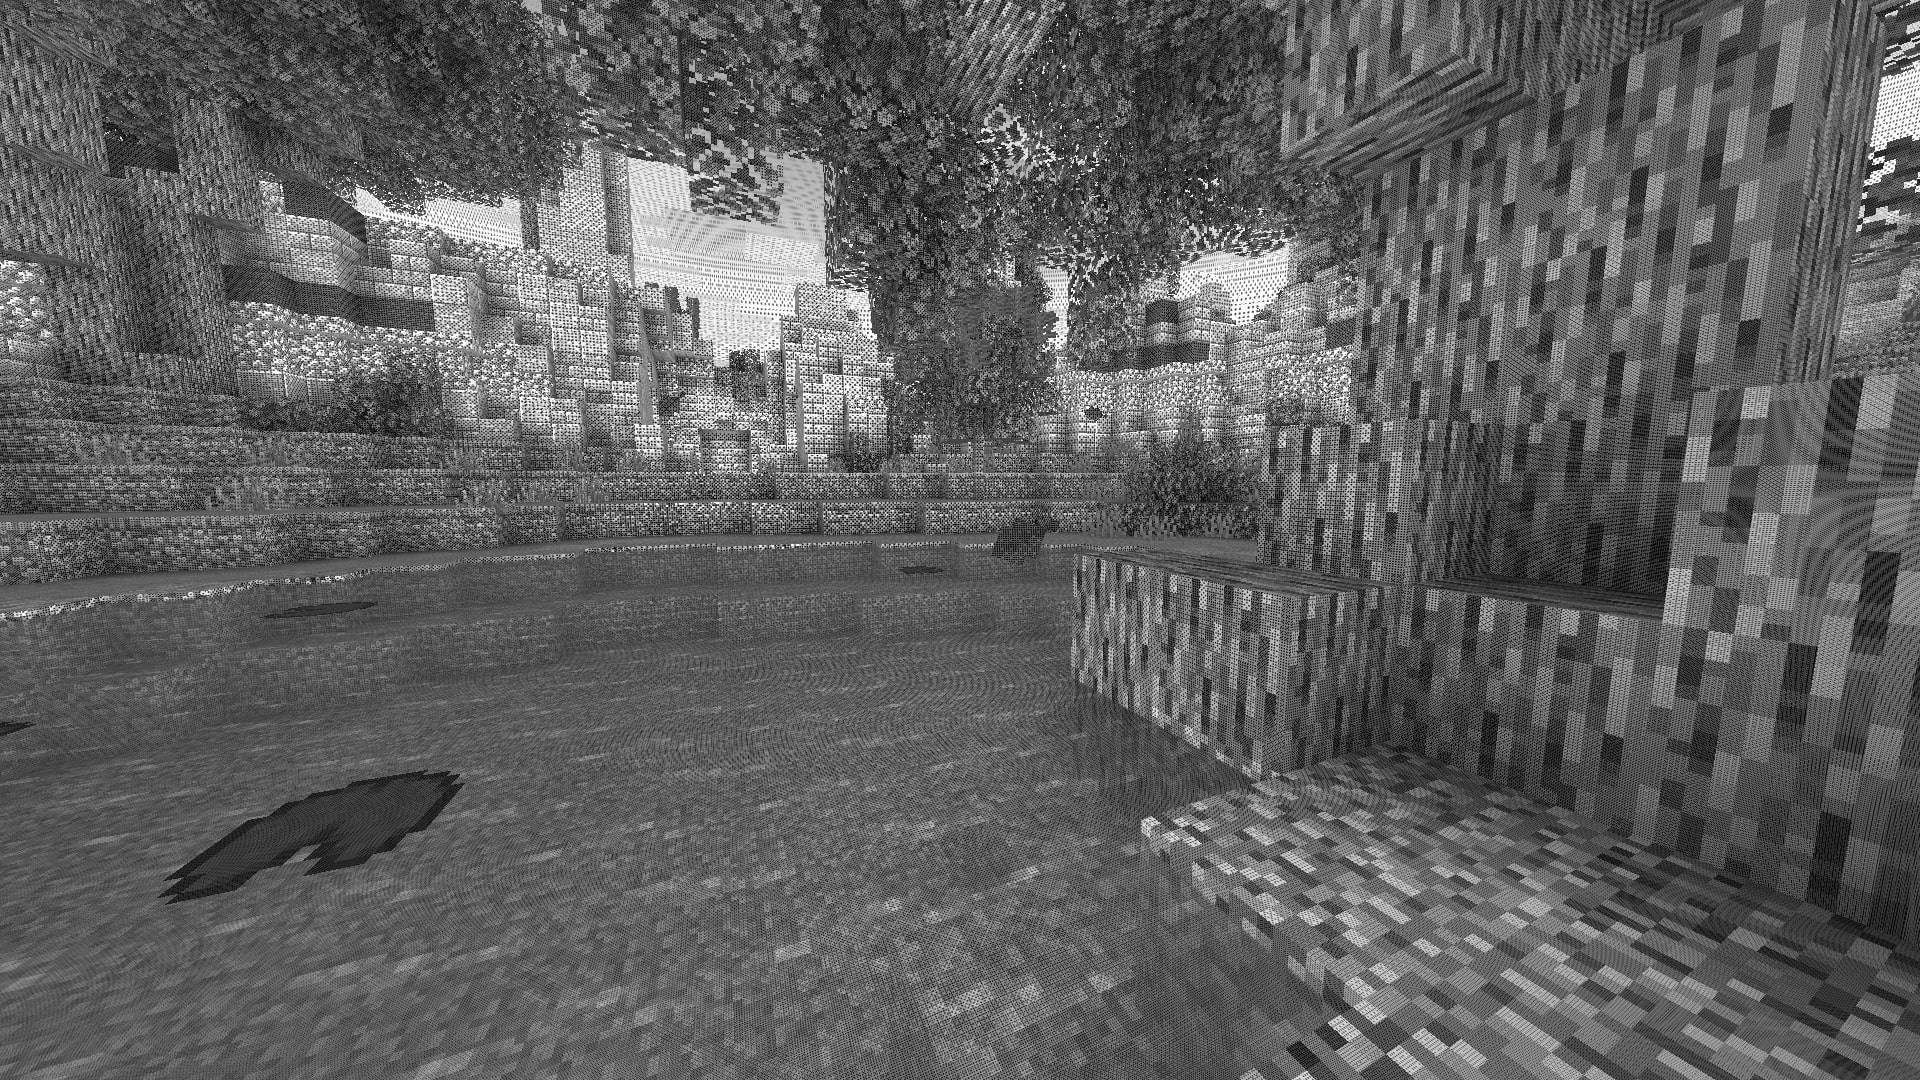
Transform your Minecraft world with **Surface-Stable Fractal Dithering** — a groundbreaking rendering technique where dither dots **stick to 3D surfaces** instead of the screen, creating a unique manga/comic book aesthetic that feels alive.
> 🎬 *Based on the innovative work by [Rune Skovbo Johansen](https://github.com/runevision/Dither3D)* — **[Watch the explainer video](https://youtu.be/HPqGaIMVuLs)**
—
## 🖼️ What Makes This Shader Special?
### 📌 **Surface-Stable Dots**
Unlike traditional dithering where patterns “swim” on screen, Dither3D anchors each dot to the actual 3D surface. Walk around blocks, and the dots stay perfectly attached!
### 🔄 **Fractal Scaling Magic**
As you move closer or farther from surfaces, dots dynamically split or merge to maintain **constant screen-space density**. It’s mesmerizing to watch!
### 🎨 **Three Color Modes**
| Mode | Description |
|:—-:|:————|
| **Grayscale** | Classic black & white dithering — clean, minimalist, timeless |
| **RGB** | Each color channel gets its own dot layer — vibrant and unique |
| **CMYK Halftone** | Authentic newspaper/comic print simulation with rotated dot angles |
—
## ⚡ Features at a Glance
| Feature | Description |
|:——–|:————|
| 🎯 **Precision Dithering** | SVD-based frequency analysis for mathematically perfect dot placement |
| 🌀 **Anti-Stretch Technology** | Anisotropic smoothing keeps dots circular even on oblique surfaces |
| 🎥 **Camera Stable** | Radial compensation prevents dot swimming during camera rotation |
| ⚙️ **Highly Configurable** | 10+ parameters to fine-tune your perfect look |
| 🚀 **Performance Optimized** | Efficient 3D texture sampling for smooth gameplay |
| 📱 **Universal Compatibility** | Works with OptiFine AND Iris on virtually any Minecraft version |
—
## 🎛️ Customization Options
Fine-tune every aspect of the dithering effect with our intuitive in-game sliders:
### 🔧 Dither Settings
| Parameter | Range | Effect |
|———–|:—–:|——–|
| **Dot Scale** | 2 – 10 | Control overall dot size (exponential) |
| **Size Variability** | 0 – 1 | 0 = Bayer pattern, 1 = Halftone style |
| **Dot Contrast** | 0 – 2 | Sharpen or soften dot edges |
| **Stretch Smooth** | 0 – 2 | Combat stretched dots on angled surfaces |
### 💡 Input Controls
| Parameter | Range | Effect |
|———–|:—–:|——–|
| **Exposure** | 0 – 5 | Brightness multiplier |
| **Offset** | -1 to 1 | Brightness offset adjustment |
### 🎮 Additional Options
– **Inverse Dots** — Flip dot colors for a negative effect
– **Radial Compensation** — Stabilize during camera rotation *(recommended!)*
– **Quantize Layers** — Prevent dot morphing for a more “classic” look
– **Debug Mode** — Visualize fractal layers for development
—
## 📦 Installation
### For OptiFine Users
1. Download and extract the shader pack
2. Place the `shaders` folder in `.minecraft/shaderpacks/`
3. Launch Minecraft → Options → Video Settings → Shaders
4. Select **Dithering3D** and enjoy!
### For Iris Users (Fabric/Quilt)
1. Install Iris Shaders mod (1.2.0+)
2. Download and extract the shader pack
3. Place the `shaders` folder in `.minecraft/shaderpacks/`
4. Press **O** in-game to open shader menu
5. Select **Dithering3D**
> 💡 **Tip:** Press `F3 + T` to quickly reload shaders after making changes!
—
## 🎨 Preset Profiles
Choose from pre-configured profiles for instant results:
| Profile | Color Mode | Dot Scale | Best For |
|:——-:|:———-:|:———:|:———|
| 🟢 **LOW** | Grayscale | 4.0 | Performance, retro feel |
| 🟡 **MEDIUM** | Grayscale | 5.0 | Balanced experience |
| 🟠 **HIGH** | RGB | 5.0 | Colorful, artistic |
| 🔴 **ULTRA** | CMYK | 6.0 | Maximum visual impact |
—
## 🌟 Perfect For
| 📸 Screenshot enthusiasts | Create unique, artistic captures |
|:————————:|:——————————–|
| 🎬 **Content creators** | Stand out with a distinctive visual style |
| 🎮 **Retro lovers** | Relive the charm of 1-bit graphics |
| 🎨 **Artists** | Manga, comic book, and newspaper aesthetics |
| 🧪 **Tech enthusiasts** | Experience cutting-edge rendering techniques |
—
## ❓ FAQ
**Q: Does this work with other shaders?**
> Dithering3D is a standalone shader pack. Combining with other shaders may cause conflicts.
**Q: Why do some surfaces look different?**
> The sky and some special effects may appear different as surface-stable dithering reveals flat geometry.
**Q: Performance impact?**
> Moderate. The 3D texture sampling is optimized but more demanding than vanilla rendering. Most GPUs handle it smoothly.
**Q: Can I use this in my modpack?**
> Yes! Under MPL-2.0 license. Credit appreciated.
—
## 🔬 The Science Behind It
Dithering3D uses **Singular Value Decomposition (SVD)** to analyze UV coordinate derivatives in real-time, determining the exact frequency and direction of surface textures. This mathematical approach enables:
“`
✅ Perfectly uniform dot density regardless of distance
✅ Seamless fractal transitions between detail levels
✅ Circular dots even on extremely angled surfaces
✅ Rotation-stable patterns that don’t “swim”
“`
—
## 📚 Credits & Resources
| Resource | Link |
|:———|:—–|
| 🔗 **Original Algorithm** | [Rune Skovbo Johansen](https://github.com/runevision/Dither3D) |
| 🎥 **Technique Explanation** | [YouTube Video](https://youtu.be/HPqGaIMVuLs) |
| 💬 **Technical Discussion** | [FAQ Thread](https://github.com/runevision/Dither3D/discussions/12) |
—
## 📄 License
“`
Mozilla Public License 2.0 (MPL-2.0)
“`
—
🎨 Transform your world. Experience Dithering3D. 🎨
If you enjoy this shader, consider leaving a ⭐ and sharing this shader page !
CME is Bad
# Abstract
Players and modpack developers sometimes find the game crashed with `ConcurrentModificationExceptions` (CME) and `IndexOutOfBoundsExceptions` (IOOBE), which only give stacktrace of current thread and are hard to trace which mod causes them. Here’s one of the crashes which is caused by SimpleReloadInstance in 1.20.1 Forge:
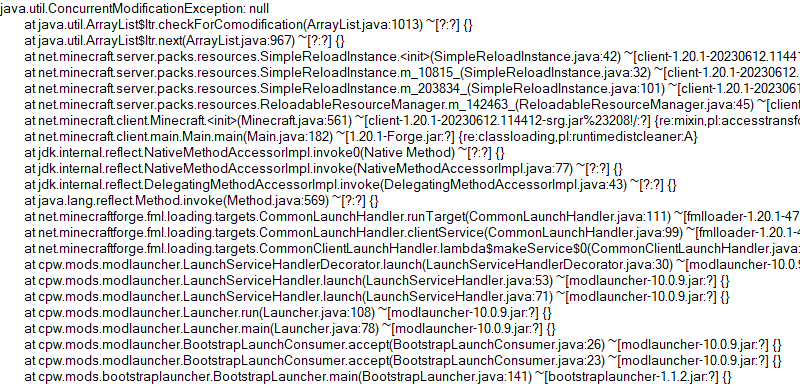
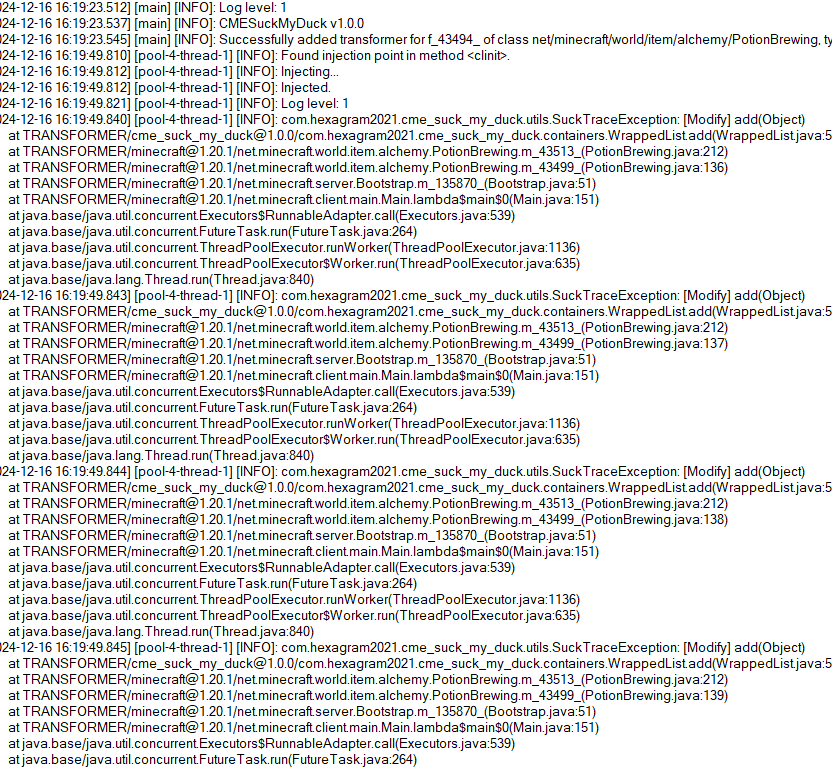
So this is what the mod is developed for. Players who install this mod and add javaagent to JVM Argument correctly will receive a full log for modification history of a certain collection:
# Usage
First, add this jar to mods folder.
Second, edit your Java Virtual Machine Argument in your launcher. Add `-javaagent:mods/CMESuckMyDuck-.jar=;;;`.
Finally, run the game, play and wait until the crash happens.
# Usage for Other Java Projects
This mod can not only be used for Minecraft debugging, but also be utilized to debug other java projects. Similar to Minecraft. The only different step is that you should add gson and asm jar to classpath (`-cp`) before javaagent, and add our `CMESuckMyDuck-.jar` to classpath after javaagent.
# Arguments
##
A full name of the class, which has a container that you would like to monitor. Use “ instead of `.` (a.k.a. the internal name of class).
##
A field name of the container in target class, which you would like to monitor. For Forge, use SRG name. For Fabric, use intermediary name. For NeoForge, use official name.
##
Currently, we only support three containers: `List`, `Set`, `Map`. This argument indicates the type of monitored container.
##
`static` or `nonstatic`. This argument indicates the container is a static field or non-static field.
# How to get and
Let’s start with an example.
First, take a look at the stacktrace of CME/IOOBE:
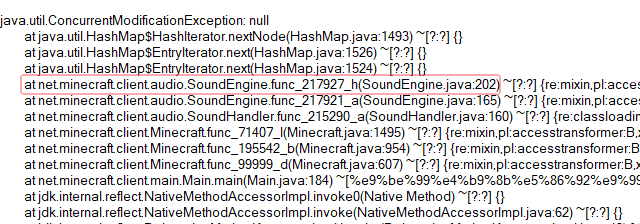
Second, read the source code of SoundEngine and confirm which container is facing this issue:
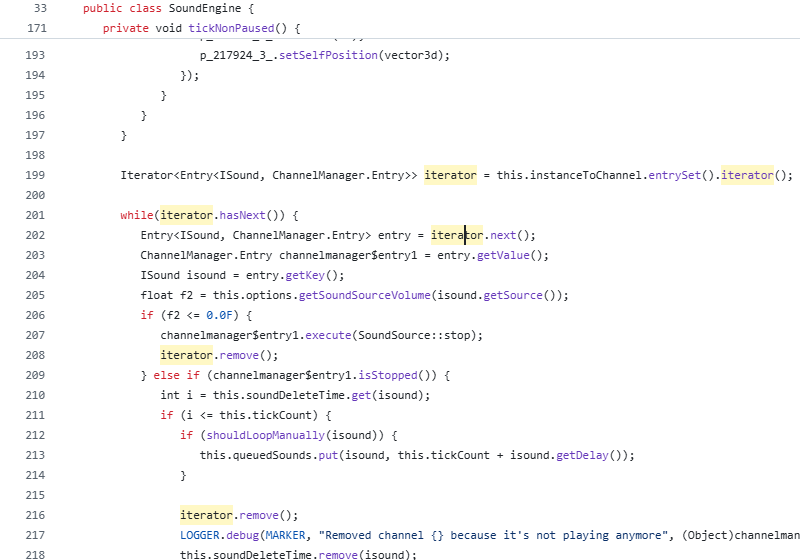
Now we know we should monitor map `field_217942_m` (`instanceToChannel` in `SoundEngine`). Keep going.
Third, install this mod, and add “`-javaagent:mods/CMESuckMyDuck-1.0.0.jar=net/minecraft/client/audio/SoundEngine;field_217942_m;Map;nonstatic`” to Java Virtual Machine Argument. Relaunch the game and wait for the next crash.
Finally, open `CMESuckMyDuck.log` file and you will see which thread and which mod has concurrently modified the container.
# Examples (JVM Arguments)
## ConcurrentModificationException from SoundEngine in Forge 1.16.5 Environment
`-javaagent:mods/CMESuckMyDuck-1.0.0.jar=net/minecraft/client/audio/SoundEngine;field_217942_m;Map;nonstatic`
## ConcurrentModificationException from PotionBrewing in Forge 1.20.1 Environment
`-javaagent:mods/CMESuckMyDuck-1.0.0.jar=net/minecraft/world/item/alchemy/PotionBrewing;f_43494_;List;static`
## ArrayIndexOutOfBoundsException from Zeta mod
`-javaagent:CMESuckMyDuck-1.0.0.jar=org/violetmoon/zetaimplforge/event/ForgeZetaEventBus;convertedHandlers;Map;nonstatic`
# Other options
## Log Level
Use system property `-Dcme_suck_my_duck.log_level=` to set custom log level.
Default 1, which means no debug message will be logged.
Users can set it to 0 to output debug message, which is not recommended – query functions like Map#get, Set#containsAll will also be logged when set to 0, and make the file very very long.
## ASM API Version (v1.0.2+)
In order to maintain compatibility with the latest version of Minecraft, this mod is compiled with asm version 9.7. For older versions of Minecraft (such as 1.12.2), API level operations such as ASM_9 cannot be applied, so players need to use `-Dcme_suck_my_duck.asm_api_version=` to modify the ASM API version compatibility. For example, game version 1.12.2: `-Dcme_suck_my_duck.asm_api_version=5`.
## File Max Entries (v1.0.3+)
Since we notice that when crash happens, the last few operations in the log are much more important than the previous ones. So our mod adopts a paging strategy after v1.0.3, and only the last two pages are retained at the end. The number of logs output on each page (that is, the number of operation call stacks) is fixed, and the default value is 500. Players can use `-Dcme_suck_my_duck.file_max_entries=` to modify the maximum number of elements on the page.
## Whitelist of Constructor (v1.0.3+)
Sometimes a container in a certain class is used in many places (eg. CompoundTag#tags). Directly using this mod will cause the log to be too long or the valid content to be replaced by subsequent operations. Therefore, players can specify an additional constructor whitelist to monitor the corresponding container in the corresponding class of a specific module. The default is empty, that is, there is no whitelist. Players can use `-Dcme_suck_my_duck.whitelist_constructor_stacktrace=` to specify it. If any line in the stack trace where the container is constructed includes the content of the whitelist string, the container will be monitored – otherwise, the container will not be monitored, which greatly simplifies the log output information.
## Transform to Thread Safe (v1.0.4+)
Use system property `-Dcme_suck_my_duck.transform_to_thread_safe=true` to transform the field into a thread-safe container.
This is NOT recommended unless you like slowness and don’t want to fix the problem.
## Inject method (v1.0.4+)
Use system property `-Dcme_suck_my_duck.inject_method=true` to switch to inject mode.
If set, you should use `-javaagent:CMESuckMyDuck-.jar=;` and whenever this method is called, you will receive a stack trace in log files.
## Ignore threads (v1.0.5+)
Use system property `-Dcme_suck_my_duck.ignore_threads=;;;…` to ignore some thread that is expected to modify the given container (or call the given method). For example, `-Dcme_suck_my_duck.ignore_threads=”Server thread”`.
## Stop logging early (v1.0.7+)
Use system property `-Dcme_suck_my_duck.stop_logging_if_exception_created=false` to stop logging if critical error occurs.
## Trace ID Updater (v1.0.8+)
Use system property `-Dcme_suck_my_duck.trace_id_updater=;` to update trace ID when calling the given method. This might be useful in inject mode.
## Monitoring Local Variables (v1.1.0+)
Use system property `-Dcme_suck_my_duck.local_var_index=` to monitor local variable at given index in the given method.
If set, you should use `-javaagent:CMESuckMyDuck-.jar=;;`. By the way, the index can be reused by different local variables. So you might have to use `-Dcme_suck_my_duck.match_local_index=` to specify the ordinal of ASTORE operation to indicate which local variable to monitor.
# Conclusion
I like eating peking duck. It’s so delicious!

Circular Logs
# Improve the look of your default Logs with… ↴

## Adds Vanilla-like circulated Logs Top | No Optifine or other Mods needed!
### It’s supports every Version of the game! (even including Legacy ones)
### And day-by-day will have more and more mods supported!
Supported Mods
• [Abundance](https://modrinth.com/mod/abundance) – by exoplanetary
• [Architect’s Palette](https://modrinth.com/mod/architects-palette) – by Jsburg
• [Biomes O’ Plenty](https://modrinth.com/mod/biomes-o-plenty) – by Forstride & Adubbz
• [The Aether](https://modrinth.com/mod/aether) – by Oz-Payn
• Vanilla Minecraft – by Mojang
• [Wilder Wild](https://modrinth.com/mod/wilder-wild) – by FrozenBlock
Block Helper
# Block Helper
A direct WAILA port for old versions of Minecraft, with almost the same API and many, many additional fixes!
## Download
[**Download on CurseForge**](https://www.curseforge.com/minecraft/mc-mods/block-helper)
[**Download on Modrinth**](https://modrinth.com/mod/block-helper) (More versions are available here)
### Fixers
Some Minecraft versions have bugs. That’s normal. In order to fix some of them, you can install the following fixers:
– [Class Loader Fixer](https://modrinth.com/mod/class-loader-fixer)
– [Font Fixer](https://modrinth.com/mod/font-fixer)
## Old source code
This repository hosts the source code for BlockHelper versions 2.x and onwards.
The source code for older versions (0.x and 1.x), has moved [here](https://github.com/ThexXTURBOXx/BlockHelper-old).
## Installation
### Forge (all versions) / ModLoaderMP (≤ 1.2.3)
#### Client
Just drop the mod into the `mods` folder. Done! 🙂
#### Server
If you are running a server on MC 1.3.x or newer, just copy the Block Helper jar file into the `mods` folder.
On older versions, you need to download the dedicated server build of the mod.
It can be found under “Additional files” both on Modrinth and CurseForge.
In MC b1.5_02 and older, you need to copy all the files from this jar into the server jar.
In all newer versions, it is sufficient to just copy the jar file into the `mods` folder.
#### MCPC+/Cauldron/Bukkit
If you are running a server on MC 1.3.x or newer, just copy the Block Helper jar file into the `mods` folder.
On older versions, you need to download the dedicated Bukkit/MCPC+ build of the mod.
It can be found under “Additional files” both on Modrinth and CurseForge.
In MC b1.7.3 and older, you need to copy all the files from this jar into the Bukkit jar.
In all newer versions, it is sufficient to just copy the jar file into the `mods` folder.
### Fabric
Drop the mod into the `mods` folder and install [Apron](https://github.com/BetterThanUpdates/Apron) or [BetaLoader](https://github.com/paulevsGitch/BetaLoader) (for b1.7.3)
or [Fabricated Forge](https://github.com/arthurbambou/Fabricated-Legacy-Forge) (for 1.3.2+).
## Features
### Mod Compatibility
Next to Vanilla blocks, integration modules for the following mods are in place (list updated only irregularly!):
– Advanced Machines
– Advanced Solar Panels
– Applied Energistics 1
– Barrels
– BuildCraft 2 and 3
– ChickenChunks
– Ender Storage
– Equivalent Exchange 1, 2 and 3
– Factorization
– Falling Meteors
– Flora & Soma / Natura
– Forestry
– Forge Multipart
– GregTech
– IC²
– Immibis’s Microblocks
– IndustrialCraft
– InfiCraft
– NEI
– Pam’s Mods
– Project Zulu
– Railcraft
– Red Power
– Thaumcraft
– Thermal Expansion
– Total Panels
– Twilight Forest
Some of these mods still host downloads to this day.
If you cannot find downloads for some of these,
chances are that they are still downloadable via [MCModArchive](https://mcmodarchive.femtopedia.de/).
### API
Block Helper features WAILA’s API (with minimal changes) from version 2.x onwards.
Since there are many resources online on how to use the API, I will keep this as simple as possible here and just list a few “good” examples:
– [Block Helper’s own plugins](https://github.com/ThexXTURBOXx/BlockHelper/tree/1.5.2/src/main/java/mcp/mobius/waila/addons)
– [BlockHelperAddons](https://github.com/VintageModsReforged/BlockHelperAddons)
Just try to follow these examples and you will succeed. To safely register your plugin, use the code snippet from the
JavaDoc of the `mod_BlockHelper#registerPlugin` function.
### Other features
Yes, Block Helper has a few additional features and integrations you probably have not seen before 🙂
On the Modrinth and CurseForge page, there are a few images of most of these features in action!
_Please note that not every feature is available for every Minecraft version due to modding limitations._
#### NEI/AMI/HMI integration
– Two new keybinds (default: NUM3 and NUM4), which show all the recipes for or using the
block currently looked at
– Show the mod an item is from in the item’s tooltip [this also works without NEI/AMI/HMI in Apron]
– Another keybind specific for NEI (default: I), which shows all the applicable enchantments for the
currently highlighted item in the inventory
#### World Overlays
Just like NEI in MC 1.4.7 and onwards, Block Helper features a light level overlay and chunk border overlay. The default
keybinds for these are F7 and F9, respectively.
## Source Code
Block Helper is being developed for:
– [a1.2.6](https://github.com/ThexXTURBOXx/BlockHelper/tree/a1.2.6)
– [b1.1_01/b1.1_02](https://github.com/ThexXTURBOXx/BlockHelper/tree/b1.1_02)
– [b1.2_02](https://github.com/ThexXTURBOXx/BlockHelper/tree/b1.2_02)
– [b1.3_01](https://github.com/ThexXTURBOXx/BlockHelper/tree/b1.3_01)
– [b1.4_01](https://github.com/ThexXTURBOXx/BlockHelper/tree/b1.4_01)
– [b1.5/b1.5_01](https://github.com/ThexXTURBOXx/BlockHelper/tree/b1.5_01)
– [b1.6.5/b1.6.6](https://github.com/ThexXTURBOXx/BlockHelper/tree/b1.6.6)
– [b1.7-b1.7.3](https://github.com/ThexXTURBOXx/BlockHelper/tree/b1.7.3)
– [b1.8/b1.8.1](https://github.com/ThexXTURBOXx/BlockHelper/tree/b1.8.1)
– [b1.9p5](https://github.com/ThexXTURBOXx/BlockHelper/tree/b1.9p5)
– [1.0/1.0.1](https://github.com/ThexXTURBOXx/BlockHelper/tree/1.0)
– [1.1](https://github.com/ThexXTURBOXx/BlockHelper/tree/1.1)
– [1.2.3](https://github.com/ThexXTURBOXx/BlockHelper/tree/1.2.3)
– [1.2.4/1.2.5](https://github.com/ThexXTURBOXx/BlockHelper/tree/1.2.5)
– [1.3.2](https://github.com/ThexXTURBOXx/BlockHelper/tree/1.3.2)
– [1.4](https://github.com/ThexXTURBOXx/BlockHelper/tree/1.4)
– [1.4.1/1.4.2](https://github.com/ThexXTURBOXx/BlockHelper/tree/1.4.2)
– [1.4.3](https://github.com/ThexXTURBOXx/BlockHelper/tree/1.4.3)
– [1.4.4/1.4.5](https://github.com/ThexXTURBOXx/BlockHelper/tree/1.4.5)
– [1.4.6/1.4.7](https://github.com/ThexXTURBOXx/BlockHelper/tree/1.4.7)
– [1.5.x](https://github.com/ThexXTURBOXx/BlockHelper/tree/1.5.2)
Beta+
A simple texture pack to enhanced your beta world.
## Features
– Outlined ores
– Dark GUI
– Old cobblestone & Old Mossy cobblestone
– Newer developer art dispenser, mob spawner and, Coco **Beans**
– Wool from 1.12
– Translucent Pumpkin (b1.8+)
and more to come in the future
Message me on discord for whatever @ Minix#4977
## What’s “New beta+?”
New beta+ was created to be used for version beta 1.8 and beta 1.9
Beta+ is for “old school” beta 1.0 – 1.7.3
Bedwars Ultimate
This Resource Pack focuses on Bedwars and PvP Textures, like tiny Swords or some simple Block Textures.
Tools and Weapons:
25
Blocks:
128
Items:
11
Armor and Equipment:
21
Coming soon: Item Textures 🙂
Bare Bones Moon Fix
it bothered me that the Bare Bones pack didnt have the same moon texture as the trailers. so I fixed that
Backport Everything

**Backport Everything** attempts to convert modern Minecraft into older versions!
If you want to see what older versions look like with new textures, _this is the pack for you_. Test them out on older versions for a laugh, play with updated textures for servers that aren’t at the latest version, or start a world in beta or alpha with a weird updated look.
Currently updated for **1.21.11 textures**, this pack aims to bring modern versions to older ones. Currently, the pack **supports versions 1.20.1 and older**, dating back to the first version in 2009 with the pre-classic build rd-132211, which features only grass and cobblestone.
There are other packs available, such as [MC New Textures](https://modrinth.com/resourcepack/mc-new-textures), [Modernity](https://modrinth.com/resourcepack/modernity) and [Modern Textures](https://modrinth.com/resourcepack/modern-textures), but I find that they either miss out some textures (e.g. leather armour, fast leaves) or don’t support the beta and alpha versions.
A couple of the things that this pack supports:
– Backported 1.21.11 textures to all versions (OptiFine, MCPatcher or equivalent required for some textures)
– New redstone repeater, comparator & torch (1.20.1 to 1.8)
– HD ghast texture from 1.21.6 (1.20.1 to 1.6.1)
– HD Minecraft logo (1.20.1 to b1.8)
– Unique spawn egg textures (1.20.1 to 1.8, OptiFine required before 1.13)
– Wolf colour variants (1.20.1 to 1.8, OptiFine/Entity Texture Features required)
– Bush texture (1.20.1 to 1.8)
– Cold & warm cow, pig & chickens (1.20.1 to 1.8, OptiFine/ETF required)
– Tall & short dry grass textures (1.20.1 to 1.8)
– [The Aether](https://modrinth.com/mod/aether) (b1.7.3 & 1.2.5) and [Aether on Station API](https://modrinth.com/mod/aether-stapi) (b1.7.3)
A few things this pack doesn’t support at the moment:
– New music released after 1.21.1, check out [Tunes : Backport](https://modrinth.com/resourcepack/tunes-backport) by wasabliss. I’d add it, but the zip file size would be huge.
– [Horse](https://modrinth.com/resourcepack/horse-backport), [vex](https://modrinth.com/resourcepack/vex-backport), [bat](https://modrinth.com/resourcepack/bat-backport) & [zombie piglin](https://modrinth.com/resourcepack/zombie-piglin-backport) model backports, see Scutoel’s packs linked. These models require OptiFine and break textures on vanilla versions. I’m not adding them because that would make OptiFine a dependency.
– Bogged models, see [Bogged Backport](https://modrinth.com/resourcepack/bogged-backport) by realllyrandommann. Not added for the same reason as above.
– [Leaf litter](https://modrinth.com/resourcepack/leaf-litter-backport) and [wildflowers](https://modrinth.com/resourcepack/wildflowers-backport), see ludo_silver_’s packs linked. Not added, as they are a little janky since they don’t work as a standalone block, but they are an alternative grass texture.
**For 1.5.2 and older, texture packs are not one-click install on Modrinth unlike resource packs, you’ll need to install them to your instance (which you may need to create), click the three dots to the right of the start button on the specific instance screen, click ‘Open folder’, and move the Backport Everything zip file from the ‘resourcepacks’ folder to the ‘texturepacks’ folder.**
**Texture packs are not supported natively before Alpha v1.2.2**, but earlier versions can have their textures swapped out using a jar mod. I don’t _really_ know why you’d want to play those versions, but it’s funny to see them working with the latest textures. **If you need help installing versions that don’t support texture packs natively, please check the bottom of this page for a guide.**
Just a note, rd-20090515 kept crashing for me on launch, and so I can’t test it. But since it’s just 13 textures, you won’t be missing much if you can’t run it yourself.
This was a fun little project, but there are **probably a few texture issues here and there** from the conversion. If you notice any problems and are willing to let me know, please email [[email protected]](mailto:[email protected]), and I’ll address the issue.
OptiFine 1.7.2 and newer [can be found here](https://optifine.net/downloads). For archived versions of OptiFine, MCPatcher, and additional files, [click here to access my GitHub archive](https://github.com/backporteverything/Backport-Everything/tree/main/Supplementary%20Files). If you have any other suggestions for mods, feel free to email me.
### License
All original content is licensed under [CC BY-SA 4.0](https://creativecommons.org/licenses/by-sa/4.0/).
Vanilla Minecraft assets are © Mojang Studios and are not included under CC BY-SA 4.0.
Select assets from Qwuiblington’s [actually correct new default texture backport](https://www.curseforge.com/minecraft/texture-packs/actually-correct-1-14-texture-backport) are included under Public Domain.
OptiFine Custom Entity Model (.jem) files sourced from the pack: [Farm Animals Backport](https://modrinth.com/resourcepack/spring-to-life-textures-backport), included with permission from SirJumpy8772.
### How to add textures to versions older than Alpha v1.2.2
To add textures to old versions that don’t support texture packs, you’ll need to add them as a jar mod using [Prism Launcher](https://prismlauncher.org/) or [MultiMC](https://multimc.org/). They’re pretty much the same, but Prism Launcher has fancy extra features.
Unfortunately, Modrinth does not currently support jar mods for older versions.
1. Download the ZIP file for the version of Minecraft you want to change. You’ll need it for later.
2. Download and install either [Prism Launcher](https://prismlauncher.org/) or [MultiMC](https://multimc.org/); take your pick.
3. Open either Prism or MultiMC, log in to your Microsoft account and then click the ‘Add Instance’ button in the top-right corner.
4. In the ‘Custom’ (Prism) or ‘Vanilla’ (MultiMC) section, on the right-hand side, tick the checkboxes for ‘Betas’ and ‘Alphas’ in the filter list.
5. Scroll down to the version you want to play, select it and click the OK button in the bottom-right.
6. Once you’ve clicked OK, an icon will appear for the version you selected. Right-click the icon, then click ‘Edit…’ (Prism) or ‘Edit Instance’ (MultiMC).
7. Go to the ‘Version’ tab if you’re on Prism Launcher.
8. Once you’re on the version tab, you should see a list of actions on the right-hand side. Click the ‘Add to Minecraft.jar’ button.
9. A new window should appear, locate the Backport Everything file, select it and open it.
10. The jar mod should now be installed. You can then launch Minecraft, and the new textures should work!
anit CHAT
# Chat anit 一个自动屏蔽《Minecraft》中文脏话,和增加IP属地的开源项目。
本插件需要装在Velocity上。前置为SignedVelocity-Proxy需要在velocity和所以1.19.1+的子服上增加
IP属地api为*xiaotuo*提供,脏话屏蔽由*Uapi提供*
使用方法
1.下载本插件,放入velocity的pluging文件夹,启动客户端
>tip
>如果你有子服的Minecraft版本在1.19.1以上需要增加[signed velocity](https://modrinth.com/plugin/signedvelocity/version/1.3.0) 插件到velocity和每个1.19.1+的子服务器。
2.将velocity配置文件“`velocity.toml“` 中“`force-key-authentication“`改为false
3.将所有子服务的配置文件“`server.properties“`中的“`enforce-secure-profile“`改为false
4.启动服务端
**更新日志**: https://github.com/cdpyx/Chatanit/commits/release
English:
# Chat Anit is an open-source project that automatically blocks Chinese profanity in Minecraft and increases IP ownership.
This plugin needs to be installed on Velocity. SignedVelocity Proxy needs to be added on velocity and all 1.19.1+sub servers
The IP locality API is provided by * xiaotuo *, and the profanity blocking is provided by * UAPI*
Usage
1. Download this plugin, place it in the velocity plugin folder, and start the client
> tip
> If you have a sub server version of Minecraft above 1.19.1, you need to add [signed velocity]( https://modrinth.com/plugin/signedvelocity/version/1.3.0 )Plug in to velocity and every 1.19.1+sub server.
2. Change the ‘force key authentication’ in the velocity configuration file ‘velocity. toml’ to false
3. Change the ‘enforce secure profile’ in the ‘server. properties’ configuration file for all sub services to false
4. Start the server
**Update log**: https://github.com/cdpyx/Chatanit/commits/release