WorldEdit CUI
A graphical user interface for [WorldEdit]. WorldEditCUI is designed
to assist in using WorldEdit, as well as preventing accidental errors.
Please note that this is not [WorldEdit], which allows you to make changes
to your world, but WorldEditCUI, a frontend for WorldEdit. You must have
WorldEdit installed on your server.
Installation
————
1. Install Fabric
2. Install this mod into Minecraft mods folder
WorldEdit selections will be shown without any configuration necessary, but the colours used are configurable when Mod Menu is installed.
Misc
—-
You can subscribe to updates either by watching this project, or by joining the EngineHub Discord guild. Support questions
belong in the `#worldedit-cui` channel.
Credits
——-
* Mumfrey, yetanotherx, mikroskeem, and zml for maintaining WorldEditCUI previously
* lahwran – Creator of the original WorldEdit CUI!
* sk89q for writing the WorldEdit plugin!
* Mojang – for making such an awesome game!
Legal stuff
———–
The code for WorldEditCUI (and therefore the compiled mod) is licensed under the [Eclipse Public License v1].
[WorldEdit]: https://enginehub.org/worldedit/
[Eclipse Public License v1]: https://www.eclipse.org/org/documents/epl-v10.php
WorldEdit

**A Minecraft Map Editor… that runs in-game!**
With selections, schematics, copy and paste, brushes, and scripting.
Use it in creative, or use it temporarily in survival.
Java Edition required.
Compatible with NeoForge, Fabric, and Bukkit-based platforms (Spigot and Paper).

🛑 Make sure that you are using the Java version of Minecraft. **WorldEdit does not support Bedrock!**
Mod version:
1. Install NeoForge or Fabric.
2. Download WorldEdit from this page (make sure you grab the mod version, not the plugin).
3. Put the WorldEdit mod file into your mods folder.
Plugin version:
1. Set up a Bukkit server such as Spigot or Paper (Paper is [recommended](https://madelin
emiller.dev/blog/paper-vs-spigot/) over Spigot).
2. Download WorldEdit from this page (make sure you grab the plugin version, not the mod).
3. Put the WorldEdit plugin file into your plugins folder.
Check YouTube for tutorials, or read the official documentation

**The most complete source of WorldEdit information is our documentation, check them out here!**
If you need further help than what the documentation can provide, you can join our Discord server.





**Do I need cheats on?**
If you’re playing on single player: Yes, cheats must be enabled for the world to use WorldEdit, but you can change this in the configuration. If you’re running a server: Only opped users can use WorldEdit, though this can be changed too.
**Can anyone use it?**
On servers, only opped users or users with permissions supplied with a permissions plugin can use WorldEdit. On LAN, anyone can use it if cheats are enabled.
**How do you use WorldEdit?**
To learn how to use WorldEdit, read the docs. Check YouTube for tutorials too!
**I need help!!**
You may visit our documentation or Discord Guild.
**I have some feature requests…**
Visit our issue tracker. However, if you just have a question, please try one of the methods above.
**Can I include WorldEdit in my modpack?**
You are free to include WorldEdit, without having to asking for explicit permission.
A link back to this page or our GitHub Sponsors would be appreciated, however.
**Can I edit the source code?**
Visit our GitHub repository. WorldEdit is licensed under GPLv3 and you can compile it with Gradle.
🎉 Support us on GitHub Sponsors!
Need a host? We recommend Apex Hosting

World Size
**World Size** is a lightweight, client-side utility mod for Minecraft Fabric that brings more transparency to your world management.
Ever wondered how much disk space your massive survival world is actually taking up? With this mod, you no longer need to dive into your file explorer to find out.
Features:
– Real-time Size Tracking: View the total disk size of every world directly on the World Selection screen. Or you can use the **/worldsize** command to show it in game.
– Automatic Formatting: Sizes are automatically converted to a readable format (Bytes, KB, MB, or GB) for at-a-glance information.
– Seamless Integration: Designed to blend perfectly with the modern Minecraft UI, featuring a clean, non-intrusive display.
– Performance Optimized: The size calculation happens efficiently in the background, ensuring your menu navigation remains smooth and lag-free.
**Why use World Size Display?**
Whether you are a modpack creator, a dedicated survivalist, or just someone looking to clean up old worlds, this mod provides the essential data you need to manage your storage effectively without ever leaving the game.
World Pregen
# 🗺️ World Pregen
**World Pregen** is a datapack that allows you to automatically pre-generates a map and prevents lag caused by generation while you are playing.
### Commands to know
– ▶️ `/function wp:[dimension]/[size]` > Start pre-generation
– Dimension name: overworld, the_end, the_nether
– Size options: 2k, 4k, 6k, 8k, 10k, 20k (2k → 1000/-1000)
– ⏸️ `/function wp:pause` > Pause pre-generatino
World Playtime
# About
This is a mod that Shows you the playtime of a World.
The play time is Shown Next to the World name.
It also works for Servers.
The time does not reset when the World or Server is renamed.
## Where is it saved?
The time is saved in a .json file in the root of your minecraft Installation.
World Editor







## 📖 Description
This datapack adds commands to make building way easier!
Explore the seamless functionality in both single-player and multiplayer modes.
## Commands
Operator permission is **required** to use this datapack/mod.
**V2.4.0+**
“`
/function we:tools/cut
/function we:tools/set {block:stone}
/function we:tools/outline {block:dirt}
/function we:tools/replace {old:dirt, new:stone}
/function we:tools/copy
/function we:tools/paste
/function we:tools/move
/function we:tools/rotate {degrees:90}
/function we:tools/undo
/function we:tools/redo
/function we:movement/up {amount:1}
/function we:movement/down {amount:1}
/function we:give/wand
/function we:give/brush
/function we:misc/outline
/function we:misc/deselect_area
/function we:misc/phasing
“`
## How to use:
Use “`/function we:give/wand“` to get the selector item.
When you have selected two positions named **#1** and **#2**, you can start using the tools.
Use “`/function we:give/brush“` to get the brush item.
Instructions are on the item description.
Use “`/function we:misc/outline“` to enable/disable the outline particles that appear when you select two positions.
Use “`/function we:misc/phasing“` to enable/disable the player being able to phase through blocks when flying.
## Copy-Paste info
You must have an area already copied to use the **paste** function.
Pasted areas will be pasted facing up and south-east. You can also use F3. Make sure that the X, Y, and Z axis lines are all facing away from you. The build is also facing that way.
World Edit Mini
You can run the command `/function editor:get_items` to get an “Open Editor” tool which, when used, will select the block you are looking at, and enter Selection Mode. (You will also get a “Teleport” tool; this is unrelated and just for utility.)
In Selection Mode (where any number of block positions can be selected), these tools are available:
1. Toggle (gold): Select the block position you are looking at, or de-select it if it is already selected.
2. Exit (wooden): De-select all selected blocks and exit the editor.
3. Convert to Cube (diamond): Find the smallest cuboid containing all selected positions. Select this cuboid (deselecting all positions), and switch to Cube Mode.
4. Set Blocks (stone): Set each selected block to the block you are currently looking at.
5. Move (iron): Move all selected positions by one block in the direction you are looking.
In Cube Mode (where a cube(oid) is selected), these tools are available:
1. Exit (wooden): De-select the cube and exit the editor.
2. Generate Structure Block (netherite): Create a structure block configured to contain the selected cube.
3. Fill (stone): Fill the cube with the block you are looking at.
4. Convert to Positions (diamond): Select one position at each corner of the selected cube. De-select the cube and switch to Selection Mode.
5. Move (iron): Move the cube _by its size_ in the direction you are looking. (For example, if the cube is 2 blocks high and you are looking up, it will move 2 blocks up. If you want to move by 1 block, convert to positions first.)
6. Copy (copper): Copy the selected region to the clipboard. You will get a new “clipboard item” representing the copied structure. Holding the clipboard item, you can right-click to paste, or left-click to discard. (Do not destroy the clipboard item through any other means, or you may experience bugs!)
Have fun! 🙂
A few notes:
– As the “fill cube” method is relatively inefficent due to command limitations, `/gamerule max_command_sequence_length` (by default set to 65536) determines (approximately) the maximum number of blocks that may be filled. You may wish to set this to a larger value (for example, `/gamerule max_command_sequence_length 16777216`).
– Similarily, `/gamerule max_block_modifications` (by default set to 32768) determines the number of blocks that may be copied or pasted. You can set this to a larger value (for example, `/gamerule max_block_modifications 2147483647`), however the server may slow down or crash if lots of blocks are being copied or pasted.
– If you find any bugs, let me know! (I’m on Discord!)
_(**Disclaimer**: I haven’t used WorldEdit and have no idea how it works, but I wasn’t really sure what else to name this datapack. I just made this because I wanted to be able to use /fill easier, and use copy-paste.)_
World Cutters
icon by Purpledragonnuke
What if stone cutters could actually cut stone?
… or wood, or dirt, or grass, or ores, or…
Really, why not just make stone cutters annihilate anything in their path? Put them on a flying machine and set them on a path of destruction…
WorldComment
## World Comment (Sub*note*ica)
Post comments associated with locations from your in-game world. An idea similar to Danmaku in videos, or Subnautica’s well-received feedback system.
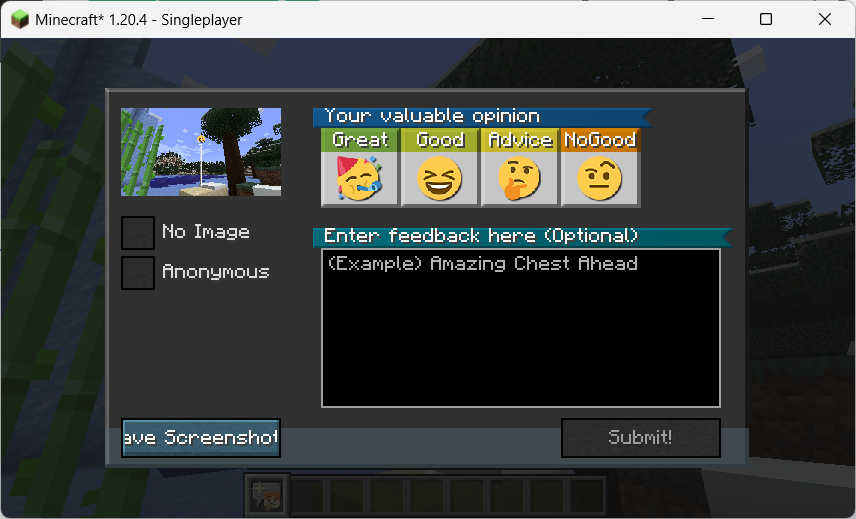
**It takes some additional configuration to be able to attach screenshots to comments – See Instructions on Configuration**.
This mod is inspired by the feedback tool in *Subnautica*. Players can take a screenshot and leave a comment to send feedback to the production team, the feedback will be sent in association with location information and the production team can see a map of the location with an overall rating. Also, the visual style of the comment “posts” is inspired by *Death Stranding*.
And it also got me thinking about the idea of Danmaku; they have the advantage over normal comments in that they relate to the content of the video at a given time, enhancing the viewing experience for the viewer. In this way, something similar could be done for Danmaku in the game world of Minecraft.
In addition, in order to ensure the normal operation under the multi-server cluster configuration of Teacon 2023, a Redis-based synchronization function has been added, so that the comments in each sub-server can be synchronized with each other and saved in a persistent manner.
—–
## 随处随笔
本模组参加了 Teacon 2023。
在游戏世界中发送评论,这些评论可以附上截图,且与特定的位置相关联。
本模组的灵感来源于《Subnautica》(《深海迷航》或《美丽水世界》)中的反馈工具。玩家可以截图留言给制作组发送反馈,反馈将关联位置信息发送,制作组可以看到一张位置与总体评价的地图。我在 YouTube 上看到了一篇介绍这一系统的影片,提到它对 Subnautica 制作组了解设计效果很有帮助。
而且这也让我想到了弹幕的概念;弹幕比起评论优点就在于它关联视频某一时间的内容,提升观者的观看体验。这样来说,类似的东西也可以作为 Minecraft 游戏世界里的弹幕。
此外,为保证随处随笔在 TeaCon 的多服务器集群配置下正常运作,增加了基于 Redis 的同步功能,使得各分服务器中的随笔可以互相同步及持久化保存。
World Colors
ENG
To add to the server you need: 1.Download zip archive 2.Open the server folder /world/datapacks 3. Drop the downloaded zip archive into the open folder and restart the server or write `/reload` to the console, if you do not have a paper or spigot server core, then write `/reload confirm`
To start using it, just turn it on and it will configure itself, 3 scoreboards will be automatically created, 1 for each world and they will tune in themselves, if you want, for example, in the ordinary world, write `scoreboard modifity overworld` and write what you want to change
Changes the color of your nickname in the tab depending on the world. For example, if one of the players is in the general world, then the nickname in the tab will be green, if it is in the lower world, then red, and if in the end, then purple. This can be seen in the screenshot: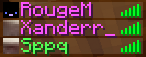
It shows that the first 2 people are in the end and the third in the ordinary world.
РУС
Что бы добавить на сервер нужно:
1.Скачать zip архив
2.Открыть папку сервера /world/datapacks
3.Перекиньте скачанный zip архив в открытую папку и перезапустите сервер или напишите в консоль `/reload` если у вас не ядро сервера paper или spigot то пишите `/reload confirm`
Что бы начать его использовать просто включите его и он сам настроится, автоматически создастся 3 таблицы счёта (scoreboard) по 1 на каждый мир и сами настроятся если вы хотите что бы например в обычном мире напишите `scoreboard modifity overworld` и пишите что вхотите изменить
Изменяет цвет вашего ника во вкладке в зависимости от мира. Например если кто-то из игроков будет в обычном мире то го никнейм в табе будет зелёным цветом , если будет в нижнем мире то красным а если в энде то пурпурным. Это видно на скриншоте:
На нём видно что первые 2 человека находятся в эндер мире а третий в обычном мире