YARMM
Another menu plugin, yaaay
# Examples
## Fully Customizable & Dynamic Items
Whether you want dynamic item names, lore, slots, damage, player head, shield color, banner pattern, potion effect, firework effect, light level, crossbow projectile… bundle inventory? You can have it all! And all are refreshed basically instantly thanks to TAB’s handling of placeholders (can be configured in its config).
You can also use TAB’s animations with the change-interval that you want to display custom data.

Menu: https://paste.helpch.at/yayeretiwa.less
TAB’s animations.yml: https://paste.helpch.at/gikidelemo.makefile
## Prompts

# Plugin Convertion
At this time, YARMM only supports converting menus from DeluxeMenus.
Almost everything is converted except for the meta action & requirement (will be added to ConditionalActions at some point)
To convert menus, simply run /yarmm convert DeluxeMenus (plugin not required on the server, only the folder) and everything in the `/plugins/DeluxeMenus/gui_menus` folder will be converted (regardless of whether they’re registered in DM’s config.yml or not)
# Dependencies
**This plugin depends on both TAB and ConditionalActions** (and by extension PAPI, yes I know that makes 3 dependencies, sorry XD)
TAB allows for instant refreshing of item properties (including material) as well as mennu title; ConditionalActions lets you execute actions on click depending on conditions.
You have access to both TAB & PlaceholderAPI placeholders.
YardWatch
# YardWatch (for server owners)
Implementation of [YardWatchAPI](https://github.com/YouHaveTrouble/YardWatchAPI) for common protection plugins. If any of supported plugins implements the API itself, then this plugin will stop providing its implementation to allow the
plugin to take over.
If you’re a developer looking for information how to implement YardWatchAPI in your plugin, see
[YardWatchAPI](https://github.com/YouHaveTrouble/YardWatchAPI)
## Requirements
– Java 17
– Minecraft 1.16+
## Implementations for:
– GriefPrevention (v16+)
– WorldGuard (7.0.0+)
– LWCX
– FactionsUUID
– SuperiorSkyBlock
– Towny
– PlotSquared (6.0.0+)
## Plugin you’re using is not implementing YardWatchAPI?
Contact the plugin developer and send them [here](https://github.com/YouHaveTrouble/YardWatchAPI/blob/master/readme.md)!
You can also request a temporary implementation within this plugin [here](https://github.com/YouHaveTrouble/YardWatch/issues/new?assignees=&labels=enhancement&projects=&template=implementation-request.yml&title=%5BNEW+IMPLEMENTATION%5D%3A+).
# YardWatchAPI (for developers)
API to unify protection plugins for minecraft bukkit servers to allow easy protection queries without having to import
10 different plugin apis with separate implementations.
Current version: [](https://jitpack.io/#YouHaveTrouble/YardWatchAPI)
If you’re looking for a plugin implementing YardWatchAPI for common protection plugins, see [YardWatch plugin](https://github.com/YouHaveTrouble/YardWatch).
# Usage
### Import the api using dependency manager
In any case of usage you will need to import the API. Replace `VERSION` with current version tag. You should also adjust your `` to `provided` if you’re not implementing the api and just querying it.
#### Maven
“`xml
jitpack.io
https://jitpack.io
com.github.YouHaveTrouble
YardWatchAPI
VERSION
compile
“`
#### Gradle
“`gradle
dependencyResolutionManagement {
repositoriesMode.set(RepositoriesMode.FAIL_ON_PROJECT_REPOS)
repositories {
mavenCentral()
maven { url ‘https://jitpack.io’ }
}
}
dependencies {
compileOnly ‘com.github.YouHaveTrouble:YardWatchAPI:VERSION’
}
“`
## For plugins wanting to see if something is protected
### Check if player can break a block
Example handling of block breaking check. There’s no need to depend on any plugins for this.
“`java
public boolean canBreakBlock(Player player, Block block) {
ServicesManager servicesManager = getServer().getServicesManager();
Collection> protections = servicesManager.getRegistrations(Protection.class);
for (RegisteredServiceProvider protection : protections) {
if (protection.getProvider().canBreakBlock(player, block.getState(true))) continue;
return false; // if any protection plugin disallowed breaking the block, return false
}
// If all protection plugins allowed breaking the block, return true
return true;
}
“`
## For protection plugins
### Depend on YardWatch plugin
You can optionally softdepend and check if YardWatch is present to add an optional integration.
“`yml
depend:
– “YardWatch”
“`
### Implement Protection interface
Implement all the methods required by the interface
“`java
public class YourPluginProtection implements Protection {}
“`
### Register your implementation as a service
“`java
@Override
public void onEnable() {
getServer().getServicesManager().register(
Protection.class,
new YourPluginProtection(),
this,
ServicePriority.Normal
);
}
“`
YAML Config
[](https://redirect.daqem.com?to=https%3A%2F%2Fbisecthosting.com%2FDAQEM%3Fr%3DYAMLConfigModrinth)
[](https://ko-fi.com/daqem)
## YAML Config: A Minecraft Configuration Mod
### Overview
YAML Config is a powerful Minecraft configuration mod that enables mod developers to create and manage configuration settings using the YAML file format. It offers a user-friendly GUI, extensive support for data types, and robust networking for client-server synchronization.
### Features
* **YAML File Format:** YAML Config utilizes the YAML file format, known for its readability and ease of use.
* **GUI Interface:** A well-designed GUI allows players to easily navigate and edit their configuration settings.
* **Extensive Data Type Support:** The mod supports a wide range of data types, including:
* **Primitive Types:** `boolean`, `int`, `float`, `double`, `String`, `ResourceLocation`, `Registry`
* **Collections:** `List`, `Map`
* **Date and Time:** `LocalDateTime`
* **Server-Client Synchronization:** Changes made to configurations on the server are automatically synchronized to clients, ensuring consistency across the gameplay experience.
* **Modpack Support:** The mod is designed to work seamlessly with existing modpacks, offering a flexible and expandable configuration system.
* **Validation and Error Handling:** The mod includes robust validation and error handling, ensuring that configurations meet the expected requirements.
### Installation and Usage
#### Installation
1. **Download the mod:** Download the latest version of YAML Config from the mod’s official website, CurseForge, or Modrinth.
2. **Place the mod file:** Move the downloaded JAR file into the “mods” folder within your Minecraft directory.
3. **Launch Minecraft:** Start Minecraft and join a world.
#### Usage
1. **Open the Configs Screen:** Press “F12” on your keyboard to open the Configs screen.
2. **Navigate to the Config:** The Configs Screen displays a list of available configurations. Select the mod whose configuration you want to modify.
3. **Edit Config Entries:** The Config Screen displays the available settings. Each entry includes:
* **Title:** The name of the setting.
* **Input Field:** A field for editing the value.
* **Reset Button:** A button for resetting the value back to its default.
4. **Save Changes:** Click the “Save Changes” button to save your modifications. The mod will automatically save the changes to the configuration file and synchronize them with other players on the server (if applicable).
### Development
#### Creating Configurations
**1. Define a Config Class:**
* Create a new Java class within your mod’s codebase that represents your mod’s configuration.
“`java
public class MyModConfig {
public static IConfig config;
public static IConfigEntry debug;
public static void init() {
ConfigBuilder builder = new ConfigBuilder(MyMod.MOD_ID, “mymod-config”, ConfigExtension.YAML, ConfigType.CLIENT);
}
}
“`
**2. Define Config Entries:**
* Use the `ConfigBuilder` class to define the settings for your configuration.
* Choose the appropriate data type for each entry using the `define*` methods.
“`java
// Example of defining a boolean entry:
debug = builder.defineBoolean(“debug”, false);
// Example of defining an integer entry with range:
intEntry = builder.defineInteger(“intEntry”, 10, 0, 100); // Min 0, Max 100
// Example of defining a string entry with pattern:
stringEntry = builder.defineString(“stringEntry”, “test”, “test\d+”);
// Example of defining a registry entry:
registryEntry = builder.defineRegistry(“registryEntry”, Blocks.GRASS_BLOCK, BuiltInRegistries.BLOCK);
// Example of defining a list:
stringListEntry = builder.defineStringList(“stringListEntry”, List.of(“test1”, “test2”, “test3”), 3, 10); // Min 3, Max 10
// Example of defining a map:
integerMapEntry = builder.defineIntegerMap(“integerMapEntry”, Map.of(“test1”, 1, “test2”, 2, “test3”, 3), 3, 10); // Min 3, Max 10
“`
**3. Build the Configuration:**
* Call the `build()` method on the `ConfigBuilder` to create your configuration.
* Store the configuration in a static field for easy access within your mod’s code.
“`java
public MyModConfig() {
ConfigBuilder builder = new ConfigBuilder(“mymod”, “mymod-config”, ConfigExtension.YAML, ConfigType.CLIENT);
// … define config entries
config = builder.build();
}
“`
**4. Access Config Values in Your Code:**
* Use the `get()` method to retrieve the current value of a config entry.
* Use the `set()` method to modify the value of a config entry.
“`java
// Example:
boolean debugEnabled = MyModConfig.debug.get(); // Retrieve the current value of the “debug” setting
if (debugEnabled) {
// Perform debug-related actions
}
MyModConfig.intEntry.set(25); // Set the value of the “intEntry” to 25
“`
#### Config Type
* **`ConfigType.CLIENT`:** Client-side configurations are specific to the client who has installed the mod. They are not shared with other players on the server.
* **`ConfigType.SERVER`:** Server-side configurations are specific to dedicated servers. They will not be used on single player worlds and are not synced to the players on the server.
* **`ConfigType.COMMON`:** Common configurations are shared between both clients and the server. They can be edited on the server by editing the config file directly and restarting the server or by editing the values using the in-game GUI and saving the changes.
#### Using Custom Data Types
* Use the `IConfigEntryType` interface to register custom data types with the YAML Config mod.
* Implement a custom serializer for handling the serialization and deserialization of your custom data type.
#### Modpack Configuration
* If you are creating a modpack, you can use YAML Config to define the configuration settings for your modpack.
* Place the configuration file for your modpack in the “config” folder within your modpack’s directory.
#### Examples
“`java
// Example: Basic client-side configuration
public class MyModConfig {
public static IConfig config;
public static IConfigEntry debug;
public static IConfigEntry testInt;
public static void init() {
ConfigBuilder builder = new ConfigBuilder(“mymod”, “mymod-config”, ConfigExtension.YAML, ConfigType.CLIENT);
debug = builder.defineBoolean(“debug”, false) // default false.
.withComments(“Whether debug mode is enabled for the mod.”);
testInt = builder.defineInteger(“testInt”, 10, 0, 100); // default 10, min 0 and max 100.
config = builder.build();
}
}
“`
Yamato Gun
Item to be added:
– Bullet
– YG-1 (Gun)
– YG-2
– YG-3
– Sakai Gun
This mod requires Fabric API (Fabric) and MCPitanLib
Adds a simple gun to kill enemies. You can kill mobs more easily.
This mod is in development and currently adds 2 guns and ammo.
Shoot on left-click.
Shooting on right-click will increase attack power.
It can be reloaded with R and cannot be refilled unless ammo is in inventory.
It supports from 1.18 to 1.20.1.
Check REI/JEI for the recipe.
We plan to add more guns in the future.
Yamashita Shimejize 🍄
## Installation
Place the ZIP file in the `shaderpacks` directory.
Do not extract the `shaders` folder from the archive.
## Description
Yamashita Shimejize is a stylized fork of [Miniature Shader](https://modrinth.com/shader/miniature-shader) that pushes the miniature look far beyond pixelated shadows. The pack extends that chunky pixel-art language across lighting, fog, water, weather, reflections, and sky effects while keeping the scene readable and atmospheric.
Features:
– Pixelated shadows, posterized lighting, fog banding, and blocky reflections
– Enhanced two-layer clouds with custom cloud shadows
– Heat haze and emissive glow from lava, fire, torches, and lanterns
– Motion blur, godrays, bloom, chromatic aberration, pixel-art lens flare, pixel-art rain-on-lens droplets with adjustable opacity, and optional depth-aware Depth of Field with adjustable strength, from a subtle miniature softness to a macro-style photo look
– Inkblot-style post-rain puddles with water-like reflections on flat terrain
– Aurora, post-rain rainbow, shooting stars
– Pixel foliage wind with 16×16, 32×32, and 64×64 texture-pack matching modes
—

Yamakashi skateboards
## For correct work you need Optifine or [CITResewn](https://modrinth.com/mod/cit-resewn)
Rename your sword “Огрызок”, “Алмаз”, “Кроссовок”, “Пивас” to make it a skateboard.
If you hold the object in your other hand, it will be behind your back.
yaay
YAAY (Yes, Another Addon for Yamipa) is a feature-rich addon for the Yamipa plugin that expands the image-claiming experience with a dedicated /imgui menu flow. Built for Paper and Folia servers, it provides a paginated inventory-based interface that makes browsing and claiming images easier and more intuitive for players.

### Key features
– **Paginated /imgui GUI** for browsing and claiming images
– **Visibility filtering** based on public and private path patterns
– **Claim cooldowns** to control how often players can claim images
– **Hourly limits** to help balance usage on busy servers
– **Anti-exploit protections** for safer image claim handling
– **Language support** with persistent per-player preferences
– **Public language sync API** for integration with other plugins
– **Per-file display overrides** through `display.yml`
– **Item overrides** for more flexible presentation
– **Multiple configuration files** for easy customization
### Configuration files
YAAY includes separate files for customizing:
– GUI behavior
– Claim limits
– Messages and translations
– Display settings
– Player locale options
### Compatibility
– **Java 8+**
– **Paper/Folia compatible**
– **Requires YamipaPlugin**
YAAY is designed to extend Yamipa with a cleaner, more configurable, and more user-friendly image management experience.
XXL Packets
**[](https://www.curseforge.com/minecraft/mc-mods/xxl-packets “Click here to download on curseforge!. “)**
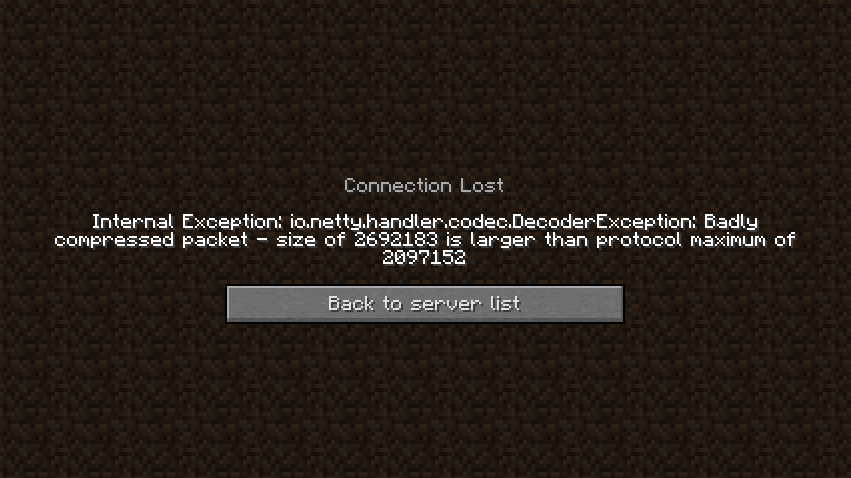
DISCLAIMER: This is a fork of the original XL Packets mod, This fork extends the packet limit to the Java Integer limit
Fixes https://bugs.mojang.com/browse/MC-185901 by raising the packet size limit from 2MB to 2.14GB (2147483647), so that servers with large datapacks, packets, etc don’t kick the client.
This mod is needed clientside for any connecting clients.
**[](https://bh.lazuline.xyz “Click here for 25% off a minecraft server by BisectHosting. (if you use code ‘Ultimate’). “)**
XTransfer
# XTransfer
## Features
– Developer API
– Whitelist of Player UUID’s
– Token Whitelist via Paper’s Cookie System.
– Customizable and developer-friendly
## Commands
– `/xtransfer` (or your custom Option) – Permission: `transferpacket.command.`
## Permissions
– `xtransfer.command..transfer`
– `xtransfer.command..whitelist`
– `xtransfer.command..whitelist.list`
– `xtransfer.command..whitelist.player`
– `xtransfer.command..whitelist.player.add`
– `xtransfer.command..whitelist.player.remove`
– `xtransfer.command..whitelist.token`
– `xtransfer.command..whitelist.token.add`
– `xtransfer.command..whitelist.token.remove`
## Developer API
**Use our repo to Download the API**
– [https://repo.jespersen.zip/#/releases/dev/xyzjesper/xtransfer](https://repo.jespersen.zip/#/releases/dev/xyzjesper/xtransfer)
### Project Setup
To access the API use the `XTransferAPI` Menthods and interact with the plugin.
__Note: Please add the Plugin TransferPacket as depend! And check the enabled status.__
“`kts
repositories {
mavenCentral()
maven(“https://repo.jespersen.zip/releases”)
}
dependencies {
compileOnly(“zip.jespersen:xtransfer:“)
}
“`
Xtra Nether Fungi
A simple Vanilla friendly addition to Minecraft that adds some variation to your nether fungi

This Project was Inspired by [daggsy](https://modrinth.com/user/_daggsy_)’s [More Nether Fungi](https://modrinth.com/resourcepack/more-nether-fungi), this pack however in my opinion is more fitting with Minecraft’s general style