Wildborne – Worldgen & Data Tweaks

**Designed for the Wildborne Modpack (Coming soon) – This Modded Datapack implements various custom JSON files, functions and other code to change world generation, tags, structures and other various features to enhance the realism, support, or immersion of various vanilla mechanics, as well as modded mechanics!**
## IMPORTANT NOTES – READ FOR AN IDEAL EXPERIENCE:
**This Data Pack is currently a work in progress! Expect new files to be added to the project, & changes to existing ones until the project is fully finished!**
**This pack IS NO LONGER COMPATIBLE WITH JUST VANILLA ALONE!**
**THE EPIC TERRAIN COMPATIBLE MOD IS NOW REQUIRED FOR THIS DATAPACK TO WORK!**
**FEATURE RECYCLER, WORLDGEN FEATURE FIX & LAKE FEATURE FIX MODS ARE ALSO NOW REQUIRED FOR THIS DATAPACK TO WORK!**
**I tried my best to get my custom biomes, features/structures and data to load in vanilla regardless of mods, but due to the MAJOR bug in vanilla Minecraft that causes “minecraft:lake” features and “minecraft:freeze_top_layer” features to crash when dealing with water, it was simply not possible to do this & keep using Epic Terrain Compatible :(**
**Maybe in a future version of the datapack I can delve deep into the nightmarish mess of density function and noise settings to add my own custom epic looking terrain when I have time, but for now, this is the best solution**
**For MODDED use, I HIGHLY recommend the Global Packs mod, so that this datapack can apply to EACH new world you create when placed in global_packs -> required_data!**
**Use this pack in combination with the Wildborne – Photorealistic VANILLA Resource Pack (Currently in BETA) for full immersion/realism! Link here:**
[https://modrinth.com/resourcepack/wildborne-photorealistic-vanilla-resource-pack](https://modrinth.com/resourcepack/wildborne-photorealistic-vanilla-resource-pack)
### CURRENTLY IMPLEMENTED FEATURES:
– TASTEFULLY increased Grass, Tall Grass, Fern, Large Fern & Cactus in all world generation in all biomes for increased realism/immersion
– Tags that attempt to add Ocean Ruins to Ocean Explorer Maps (WIP, still iffy at times)
– Tags that add more items to the Lit On Fire mod so that more fire ignition sources can light torches/campfires
– CUSTOM VILLAGER TRADES when combined with the Villager Config mod (WIP, more to be added/implemented – _**NOTE => SOME TRADES MAY BREAK DUE TO MISSING ITEMS FROM OTHER MODS/KUBEJS SCRIPTS DESIGNED FOR THE UPCOMING WILDBORNE MODPACK – USE AT YOUR OWN RISK**_)
– 5 NEW EPIC WILDBORNE BIOMES ADDED TO THE OVERWORLD! – The Sinkhole Biomes! – Based off a bug that was previously patched out of Minecraft 1.19.3 world generation – I’ve now added 5 different biomes with the chance of generating full fledged MASSIVE sinkholes! – The Desert Sinkhole, Badlands Sinkhole, Temperate Sinkhole, Icy Sinkhole and Jungle Sinkhole biomes! (See more in the image gallery)

– Compatibility for Epic Terrain Compatible mod/datapack in a way that smoothly tranistions biomes based on temperature, humidity/vegetation, erosion, continents, and size, while the world also generates 400 block tall mountains with 450 block deep sinkholes that just add a breathtaking sense of wonder and adventure to any world!
– IMPROVED/NEW FOSSIL STRUCTURES! – These can generate on BOTH the surface of the overworld, AND underground in caves/Sinkhole biomes, with 4 variations of each part of the fossil (Skull, Spine, Tail) – support for modded biomes from Biomes O’ Plenty, YUNG’s Cave Biomes, Regions Unexplored, & Biomes We’ve Gone included! (See more in the image gallery)

### WIP/PLANNED FEATURES:
– Increased/decreased foliage placed features for Vanilla/other mods featured in the upcoming Wildborne Modpack as needed (ie, Biomes O’ Plenty, Regions Unexplored etc)
– MORE Custom Villager Trades using the Villager Config mod for the modpack as needed
– More tag additions/removals as needed for fine tuning items/blocks/mechanics in the upcoming modpack as well
– Minor tweaks to improve vanilla structure generation for compatibility with the new Sinkhole Biomes
KawaMood’s Waystones
# **KawaMood’s Waystones**
**Avoid unnecessary long journeys!**
Craft and place Waystones on your points of interest.
A survival-friendly and multiplayer-friendly way to quickly travel in your world!
# 🪄Introduction
## What is Waystones?
KawaMood’s Waystones is a data pack inspired by [BlayTheNinth’s famous Waystones mod](https://www.curseforge.com/minecraft/mc-mods/waystones).
Waystones allow you to travel quickly from one point to another in your world, and within any dimension (including custom ones). Unlike the mod, waystones do not appear naturally within the world, they require to be crafted.
## How to craft and use a waystone?
Waystones can be crafted using:
– 1x **Lodestone**
– 2x **Amethyst Shards**
– 1x **Eye of Ender**
– and 3x base blocks
Base blocks to use depend on the desired variant of waystone to get:
– **Andesite** for Andesite Waystone
– **Sandstone** for Sand Waystone
– **Nether Bricks** for Nether Waystone
– **Mossy Stone Bricks** for Mossy Waystone
– **Cobbled Deepslate** for Deepslate Waystone
– **Copper Block** for Copper Waystone
– **Prismarine Bricks** for Prismarine Waystone
– **Tuff** for Tuff Waystone
– **Red Sandstone** for Red Sand Waystone
– **Quartz Block** for Quartz Waystone

Before placing your waystone, it is recommended to rename it within an **Anvil**. This will allow you to retrieve your points correspondance more easily within the waystones list.
Waystones icons in the list depends on the block they have been placed on, so you can also chose identifiable ones. These icons also handle NBT (meaning you can place a waystone on a custom player head to have custom icons).
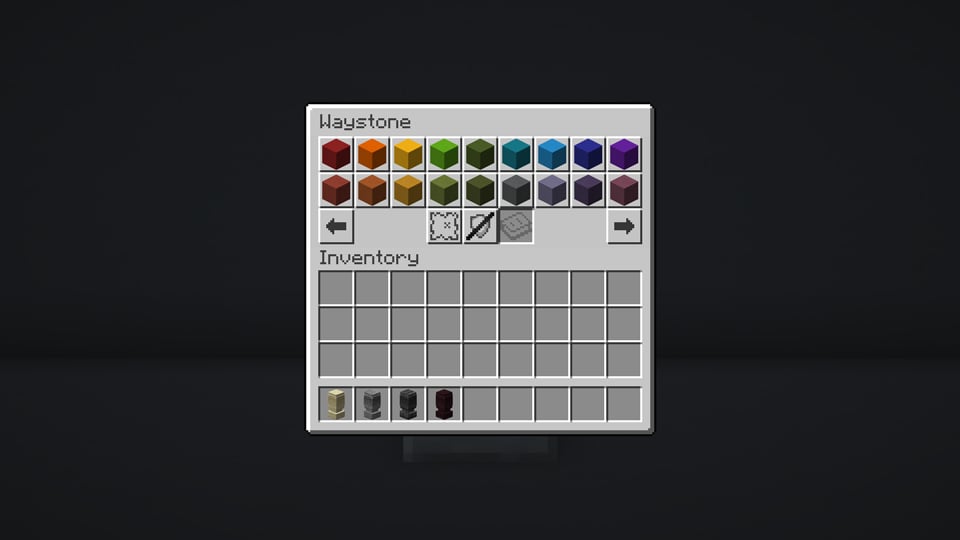
Right-clicking the top part of a waystone will open it. The GUI shows you the list of other waystones that are visible to you on the two first lines, and a toolbar to edit the waystones attributes or navigate within pages in the bottom line.
By left-clicking on a waystone from the list, you will be teleported to it. Note that you will also take with you your vehicle (horse, boat…) and the mobs you currently have on leash. So wasytones also allow you to transport mobs within several locations more fastly.
I recommend you to [watch the featured video](https://youtu.be/QDvdj5lfnIY) for better explanations and examples.
# 🔖Attributes
In the toolbar of the waystones GUI, you can see three buttons in the middle. If you’re a waystone manager or the owner of the current waystone, these buttons will allow you to edit their attributes. Other players won’t of course be able to edit its attributes.
Other buttons may appear on the bottom-left and bottom-right corners if you have placed many waystones in your world. They are the pagination buttons.
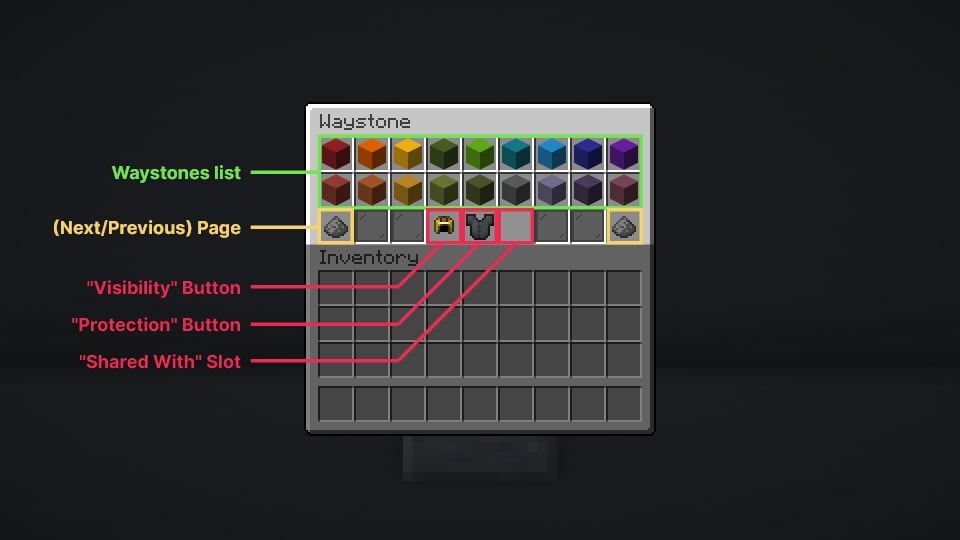
You can discover below the influence of each attributes.
## Visibility
The first button concerns the waystone’s visibility. There are three available values:
– If set on **discoverable**, other players won’t see it until they interact with it at least once, meaning they need to discover the waystone’s location first.
– If set on **private**, other player won’t be able to see this waystone from the list. Only you (the owner), waystones managers, and players you share this waystones with (see “Shared With” below) will be able to see it.
If set on **public**, every players will be able to see it from the list.
## Protection
The second button concerns the waystone’s protection. There are two available values:
– By default, the **protection** is **disabled**. In this mode, the waystone can be destroyed by anyone, including natural events, like explosions from creepers or TNT.
– If **enabled**, only the owner of the waystone and waystones managers will be able to remove it.
## Shared With
Finally, the third button concerns the waystone’s “**Shared With**” list.
It allows you to set a list of players with whom to share this waystone if its visibility is set on **private**.
To do this, you need to place in the slot a **Writable Book** containing your friends’ nicknames. Unfortunately, due to technical constraints from the game, you will need to write a single nickname per page in the book. But you can add as many players as you want.
Be careful, too, with case. For example, “kawamood” does not equal “KawaMood”. Be also sure to not inadvertently add extra spaces or line break at the end or the beggining of the page.
Once you’ve made your list, you can place it in the slot, and the waystone will save it
You can remove or edit it at any time by clicking on it!
# 💼 Manager Role
The **manager** role allows you to bypass most of restrictive rules introduced by waystones mechanics or settings.
It also allows you to see and edit every waystones, even private ones that you don’t own.
The role can **be given** or **removed** from any player using these commands respectively:
“`
/tag add pk.waystones.manager
/tag remove pk.waystones.manager
“`
Example – Granting the manager role to the player named “Bob”
“`
/tag Bob add pk.waystones.manager
“`
# ⚙️Settings
XP Consumption
If enabled, players will need to consume levels to travel from waystone to waystone. The cost can either be fixed, or calculated according to the distance between the used and targeted waystones. The setting can be enabled using the following command:
“`
/function pk_waystones:settings/xp_consumption/set {value:, mode:}
“`
This command use two parameters:
– **mode** waits for either “fixed”, “manhattan” or “euclidian”. Both last are method used to calculate the distance between waystones.
– [“manhattan”](https://en.wikipedia.org/wiki/Taxicab_geometry) relies on the game’s grid, meaning if a waystone is located at 0, 64, 0 and the other at 1000, 64, 1000, the setting will consider both waystone are separated by 2000 blocks.
– [“euclidian”](https://en.wikipedia.org/wiki/Euclidean_distance) refers to the distance in flight. Meaning if we took this same example above, the process will draw a vector between both waystones and calculate its length. The distance will then be around 1414 blocks.
– **value** depends on the mode.
– With the “fixed” mode, it waits for the amount of level the player would consume to teleport from a waystone to any other ones.
– With “euclidian” or “manhattan” mode, it waits as value the count of blocks you want the player to consume a level for in order to teleport. Meaning for example, if two waystones are separated by 5000 blocks, and I set a value of 1000, it will require 5 levels to teleport to it.
– In any case, if this value is set to 0 or a negative value, it will disable the setting.
_Example – Make teleportation require 5 levels no matter the targeted waystone:_
“`
/function pk_waystones:settings/xp_consumption/set {mode:”fixed”, value:5}
“`
_Example – Consume 1 level for 1000 blocks, with the euclidian calculation method:_
“`
/function pk_waystones:settings/xp_consumption/set {mode:”euclidian”, value:1000}
“`
_Example – Disable the setting completely:_
“`
/function pk_waystones:settings/xp_consumption/set {mode:”euclidian”, value:0}
“`
If needed, you can also be informed of the current mode and value using the following command:
“`
/function pk_waystones:settings/xp_consumption/get
“`
Blacklisted Dimensions
This setting lets you manage **dimensions** from the **blacklist**. The blacklist handles vanilla dimensions, but it also works with custom dimensions from data packs or [Multiverse](https://dev.bukkit.org/projects/multiverse-core) worlds.
In a blacklisted dimension, only managers will be able to place waystones, regular players will not be able to.
You can **add**, **remove** dimensions to the blacklist or get the **list** of currently blacklisted dimensions using the following commands respectively:
“`
/function pk_waystones:settings/blacklist_dimensions/add {dimension:}
/function pk_waystones:settings/blacklist_dimensions/remove {dimension:}
/function pk_waystones:settings/blacklist_dimensions/list
“`
Example – Disallow waystones placement in the Nether
“`
/function pk_waystones:settings/blacklist_dimensions/add {dimension:”minecraft:the_nether”}
“`
📜 Note: in order to see the dimension id you’re currently in, you can open the [debug screen (F3)](https://minecraft.wiki/w/Debug_screen), the dimension id is shown below the coordinates on the left side.
Display Waystones Nameplates
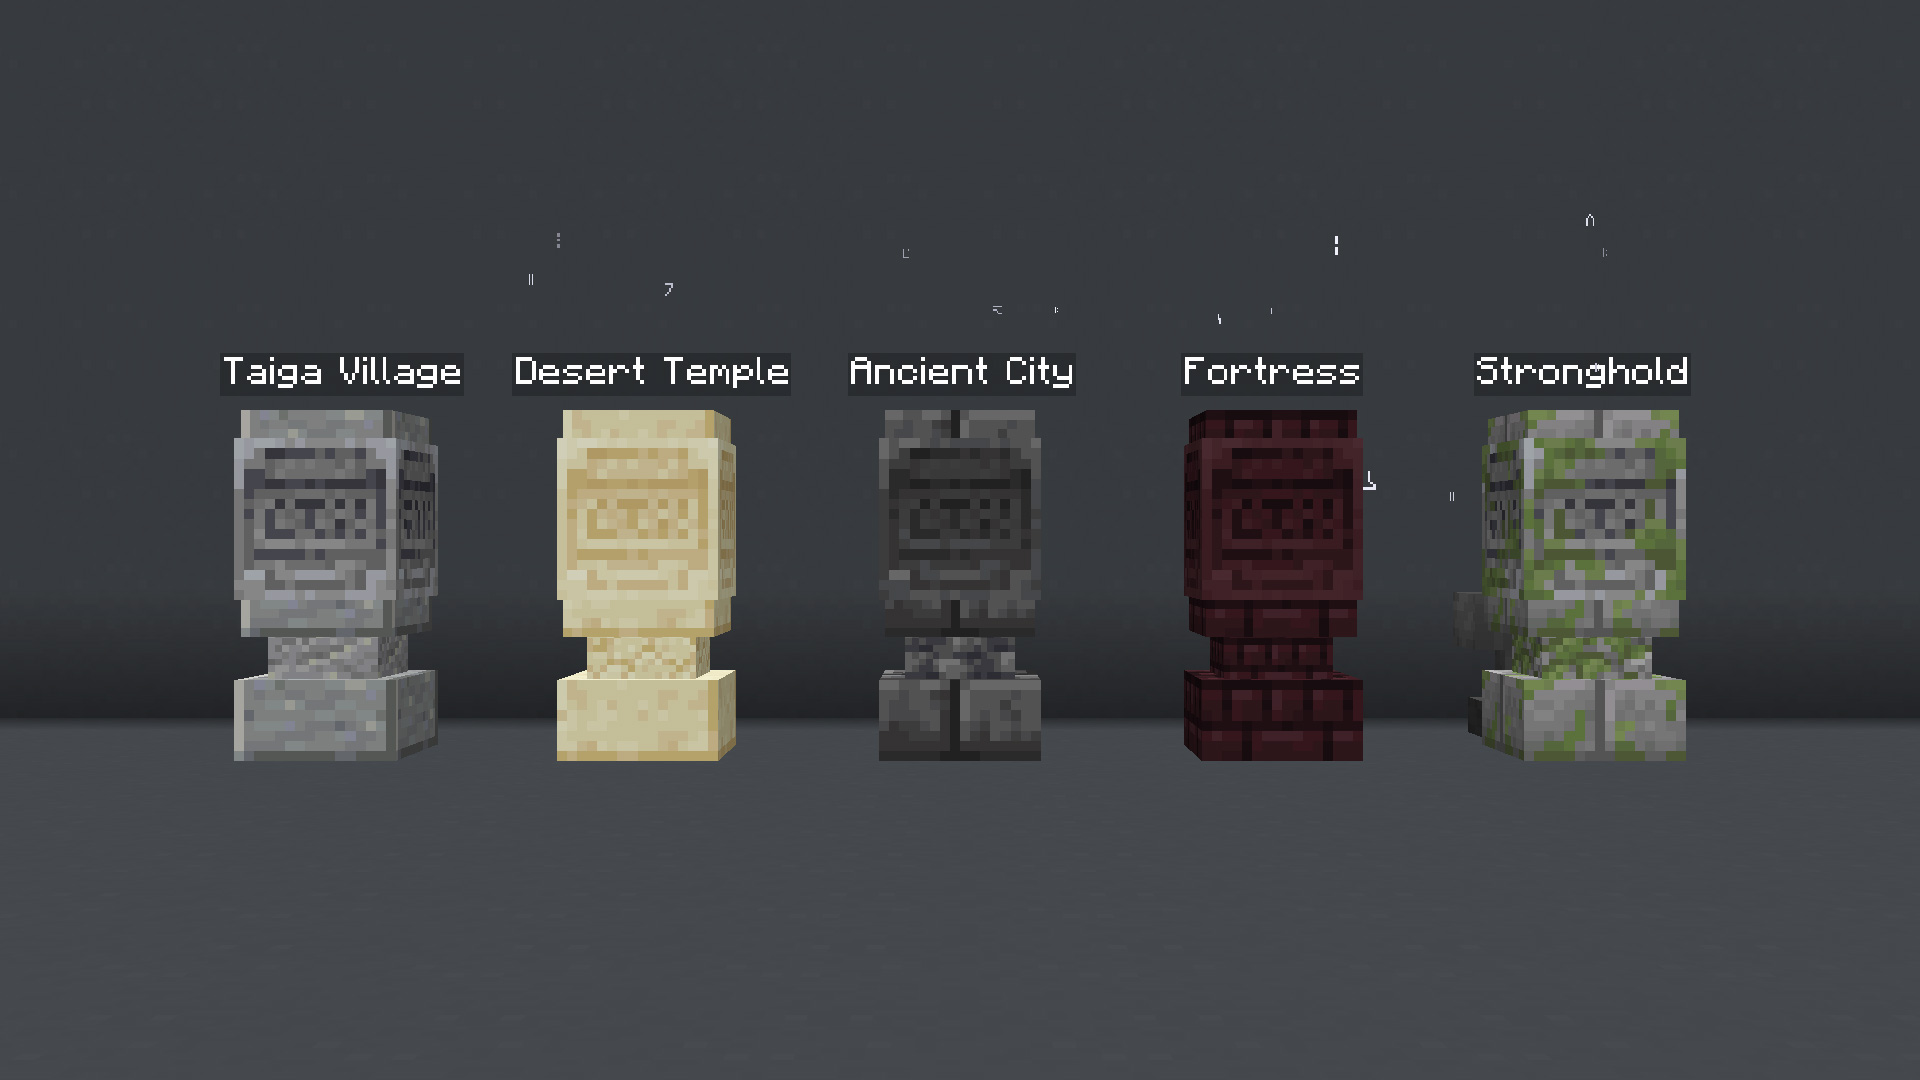
If enabled, floating nameplates will appear above waystones, allowing you to identify them more easily. You can **enable**, **disable** or **get** the current state of the setting using these following commands respectively:
“`
/function pk_waystones:settings/display_nameplates/true
/function pk_waystones:settings/display_nameplates/false
/function pk_waystones:settings/display_nameplates/get
“`
Render of nameplates in game:
Ignore Monsters Nearby
If enabled, it **ignores** monsters being around the waystones. If disabled, it prevents players to use a waystone if there are monsters nearby. It is the same principle as the beds use-prevention system. Note that this setting is **enabled** by default (monsters are ignored).
You can **enable**, **disable** or **get** the current state of the setting using these following commands respectively:
“`
/function pk_waystones:settings/ignore_monsters/true
/function pk_waystones:settings/ignore_monsters/false
/function pk_waystones:settings/ignore_monsters/get
“`
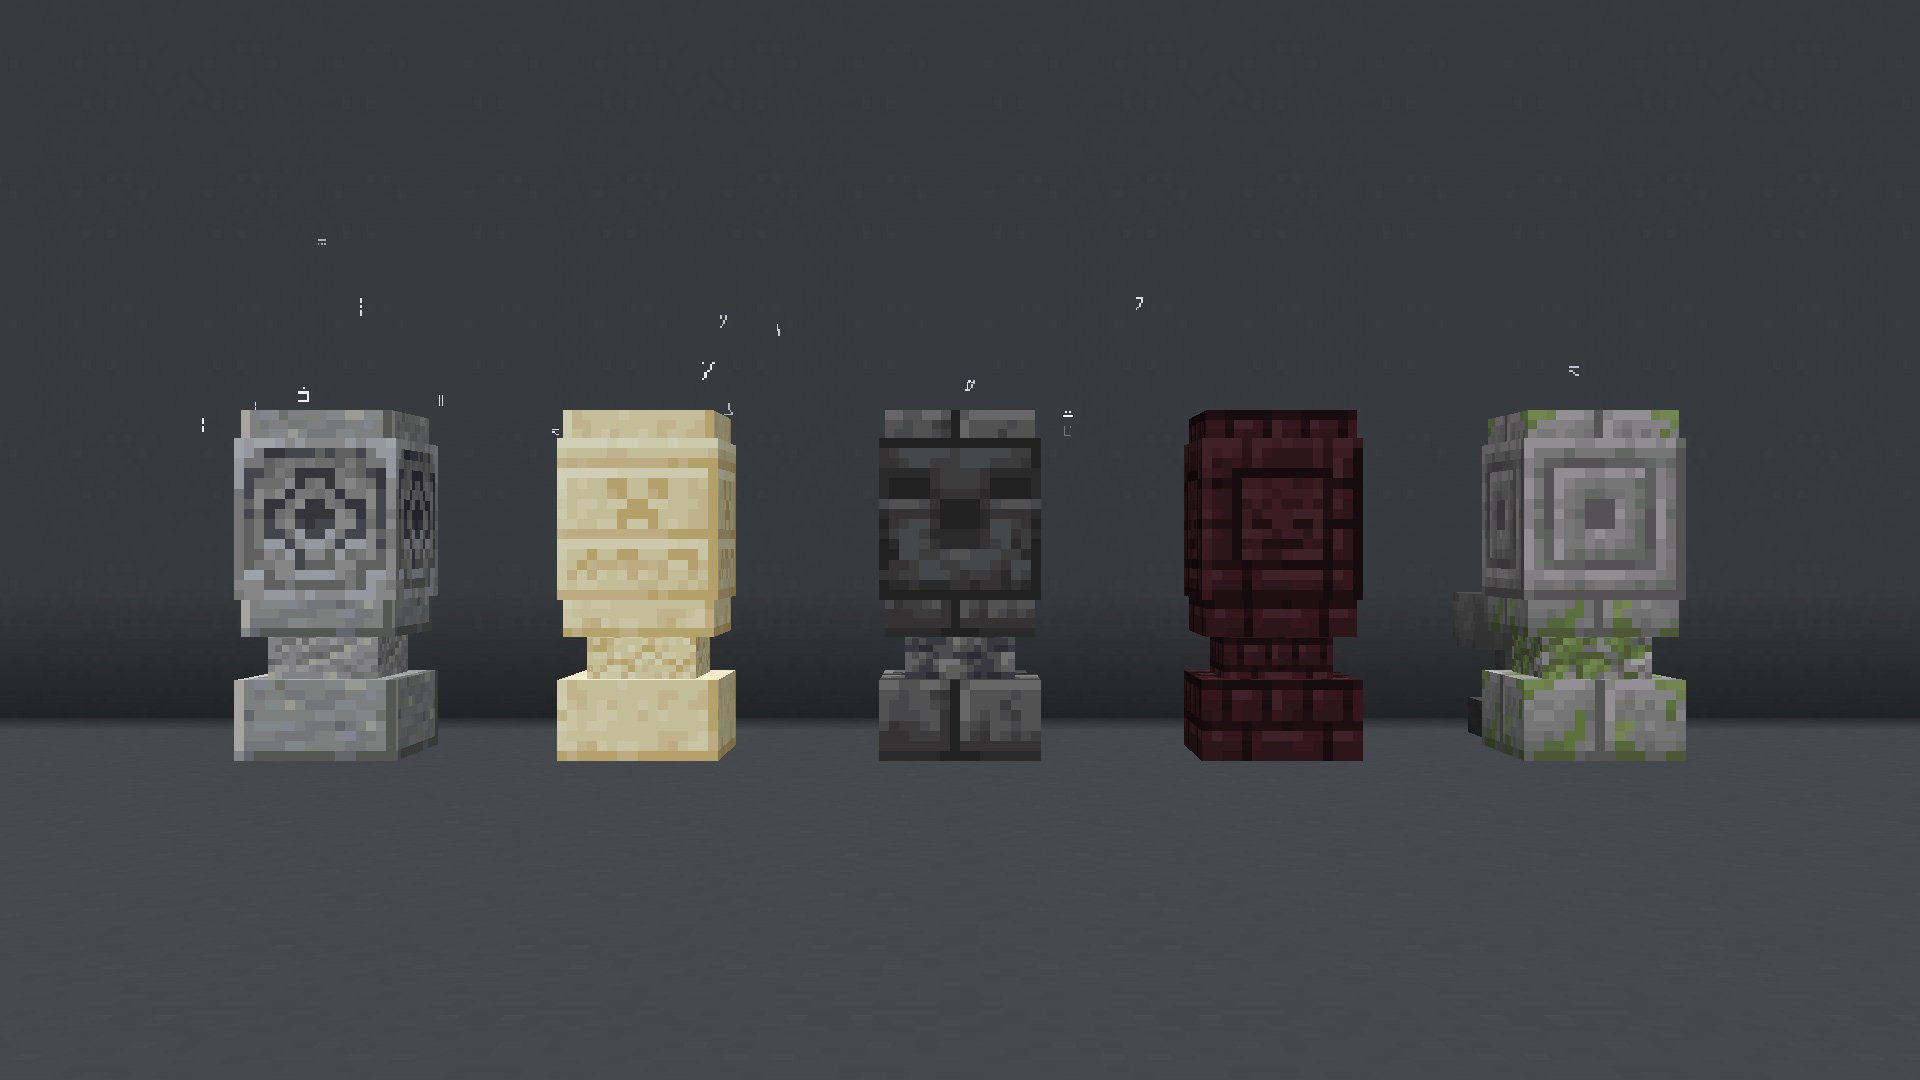
Legacy Textures
If enabled, the data pack will use regular **blocks textures** for waystones instead of the custom ones.
It can be useful if you’re using high-resolution resources packs. You can **enable**, **disable** or **get** the current state of the setting using these following commands respectively:
“`
/function pk_waystones:settings/legacy_textures/true
/function pk_waystones:settings/legacy_textures/false
/function pk_waystones:settings/legacy_textures/get
“`
Render of textures in game:
Default visibility
This setting lets you change the default visibility of a waystone on placement.
Initially, the default visibility mode is “discoverable”. You can set another visibility using the following command, where visibility can be either “discoverable”, “private” or “public”:
“`
/function pk_waystones:settings/default_visibility/set {visibility:}
“`
Example – Set the default waystones visibility on “private”
“`
/function pk_waystones:settings/default_visibility/set {visibility:”private”}
“`
If needed, you can also be informed of the current default visibility using the following command:
“`
/pk_waystones:settings/default_visibility/get
“`
Default protection
This setting lets you change the default protection of a waystone on placement.
Initially, the default protection mode is “disabled”. You can change it using the following command, where the `protection` value can be either “disabled” or “enabled”.
To enabled the protection by default:
“`
/function pk_waystones:settings/default_protection/set {protection:”enabled”}
“`
Or to disable it back:
“`
/function pk_waystones:settings/default_protection/set {protection:”disabled”}
“`
If needed, you can also be informed of the current default protection using the following command:
“`
/pk_waystones:settings/default_protection/get
“`
Limit Waystones Per Player/Server
You can chose how many waystones **players** can own at most. This amount is relative to each player, meaning if you set it to 5, every players will be able to place 5 waystones each. It can be done using the following command, where “**count**” waits for the desired amount of waystones:
“`
/function pk_waystones:settings/limit_per_player/set {count:}
“`
_Example – Allow players to own a maximal amount of 5 waystones each_
“`
/function pk_waystones:settings/limit_per_player/set {count:5}
“`
You can also **disable** this setting using a **count** of -1 or less, meaning players will be able to place as many waystones as they want:
“`
/function pk_waystones:settings/limit_per_player/set {count:-1}
“`
Or **get** the current limit using the following command:
“`
/function pk_waystones:settings/limit_per_player/get
“`
Additionnally, you can also limit the amount of waystone your **server** can contain. This is the exact same principle as above, but instead of being a limit per player, it is a global limit. The commands follow the same scheme to **set**, **disable** or **get** this amount respectively:
“`
/function pk_waystones:settings/limit_per_server/set {count:}
/function pk_waystones:settings/limit_per_server/set -1
/function pk_waystones:settings/limit_per_server/get
“`
You can also combine both settings if you want to set a limit per player but also a global limit on the server.
Hide coordinates in the waystones GUI
If enabled, no player will be able to see waystones location from the GUI, unless they have the manager role. You can **enable**, **disable** or **get** the current state of the setting using these following commands respectively:
“`
/function pk_waystones:settings/hide_coordinates/true
/function pk_waystones:settings/hide_coordinates/false
/function pk_waystones:settings/hide_coordinates/get
“`
Note that another command is usable by non-op players and allow them to hide coordinates of waystones for their own character only. _Refer to the “Other commands” section below._
List public waystones first in the waystones GUI
If enabled, public waystones will be listed first in waystones GUI. By default, public waystones display after discovered and private waystones. You can **enable**, **disable** or **get** the current state of the setting using these following commands respectively:
“`
/function pk_waystones:settings/list_public_waystones_first/true
/function pk_waystones:settings/list_public_waystones_first/false
/function pk_waystones:settings/list_public_waystones_first/get
“`
Lootable Delay (for Worldguard and WG-like plugins compatiblity)
This setting allows you to adjust the minimal delay before a waystone can drop itself when broken. It is useful if you use a plugin that provides an area protection system.
For example with WorldGuard, the plugin will store and give back the last item the player tried to place. But if the player try to place a waystone, it will still exist for a single tick and drop itself while being removed by the plugin. In order to avoid that, you can set a lootable delay of 2 ticks.
By default, no delay is checked. You can **set** a delay (in ticks) with the following command:
“`
/function pk_waystones:settings/lootable_delay/set {delay:}
“`
_Example – Set a delay of 2 ticks:_
“`
/function pk_waystones:settings/lootable_delay/set {delay:2}
“`
Or **get** the current delay using the following command:
“`
/function pk_waystones:settings/lootable_delay/get
“`
Tick GUI items clear (security for non-vanilla servers)
External versions such as Paper sometimes involve weird behavior with containers.
In order to avoid potential items dupe issues with them, you can tick the system that clear items players may have managed to take from a waystone’s GUI using this setting.
You can **enable**, **disable** or **get** the current state of this setting using these following commands respectively:
“`
/function pk_waystones:settings/tick_clear_gui_items/true
/function pk_waystones:settings/tick_clear_gui_items/false
/function pk_waystones:settings/tick_clear_gui_items/get
“`
Permission: Change “Visibility” Attribute
These permissions allows you to restrict players from using specific visibility values. Note that managers are immune to this effect and will always be able to change any attributes from any waystone. By default, players are allowed to set any visibility to their waystone.
In order to **allow**, **disallow** players to set the **public visibility** on their waystones, or if you want to **get** the current state of this permission, you can use the following commands respectively:
“`
/function pk_waystones:settings/permissions/change/visibility/public/true
/function pk_waystones:settings/permissions/change/visibility/public/false
/function pk_waystones:settings/permissions/change/visibility/public/get
“`
Same as above but for the **private visibility**:
“`
/function pk_waystones:settings/permissions/change/visibility/private/true
/function pk_waystones:settings/permissions/change/visibility/private/false
/function pk_waystones:settings/permissions/change/visibility/private/get
“`
Same as above again, but for the **discover visibility**:
“`
/function pk_waystones:settings/permissions/change/visibility/private/true
/function pk_waystones:settings/permissions/change/visibility/private/false
/function pk_waystones:settings/permissions/change/visibility/private/get
“`
Finally you can also directly toggle or get all visibilily-based permissions at once:
“`
/function pk_waystones:settings/permissions/change/visibility/all/true
/function pk_waystones:settings/permissions/change/visibility/all/false
/function pk_waystones:settings/permissions/change/visibility/all/get
“`
Permission: Change “Protection” Attribute
This permission allows you to restrict players from changing the **protection** attribute of their own waystones. Note that managers are immune to this effect and will always be able to change any attributes from any waystone. By default, players are allowed to change the protection of their waystone.
In order to **allow**, **disallow** players to change their waystones **protection** attribute, or if you want to **get** the current state of this permission, you can use the following commands respectively:
“`
/function pk_waystones:settings/permissions/change/protection/true
/function pk_waystones:settings/permissions/change/protection/false
/function pk_waystones:settings/permissions/change/protection/get
“`
Permission: Change “Shared With” Attribute
This permission allows you to restrict players from changing the **shared with** attribute of their own waystones. Note that managers are immune to this effect and will always be able to change any attributes from any waystone. By default, players are allowed to change the “shared with” list of their waystones.
In order to **allow**, **disallow** players to change their waystones **shared with** attribute, or if you want to **get** the current state of this permission, you can use the following commands respectively:
“`
/function pk_waystones:settings/permissions/change/shared_with/true
/function pk_waystones:settings/permissions/change/shared_with/false
/function pk_waystones:settings/permissions/change/shared_with/get
“`
Permission: Tp In Other Dimensions
If disabled, this permission force players to only see waystones being in the same dimension as themselves from a waystone’s GUI. It can be useful if you don’t want players to be able to teleport between different [Multiverse](https://dev.bukkit.org/projects/multiverse-core) worlds.
This permission is enabled by default, meaning players can teleport in any dimensions.
You can **enable**, **disable** or **get** the current state of the permission using these following commands respectively:
“`
/function pk_waystones:settings/permissions/tp/in_other_dimensions/true
/function pk_waystones:settings/permissions/tp/in_other_dimensions/false
/function pk_waystones:settings/permissions/tp/in_other_dimensions/get
“`
Permission: Tp In Fight
If disabled, this permission prevents players to teleport if they took a damage from a living entity (as source) in the last 15 seconds. It can be useful if you don’t want players to escape a fight by using a waystone on PvP servers.
This permission is enabled by default, meaning players can teleport at any moment.
You can **enable**, **disable** or **get** the current state of the permission using these following commands respectively:
“`
/function pk_waystones:settings/permissions/tp/in_fight/true
/function pk_waystones:settings/permissions/tp/in_fight/false
/function pk_waystones:settings/permissions/tp/in_fight/get
“`
# 🧰 Other Commands
The data pack also provides some handy commands. Some of them are usable by both operators and regular players.
Give yourself a waystone
If you are an operator of your server or if cheats are enabled in your single-player world, you can give yourself a waystone of any variant using these following commands:
“`
/function pk_waystones:cmd/give/waystone/andesite
/function pk_waystones:cmd/give/waystone/sand
/function pk_waystones:cmd/give/waystone/deepslate
/function pk_waystones:cmd/give/waystone/nether
/function pk_waystones:cmd/give/waystone/mossy
“`
Place a waystone
This command allows you to directly place a waystone with a specific set of attributes.
Placing a waystone directly can be useful for data packs developers who want for example to implement natural waystones generation within their own structures.
The function waits for a `waystone` entry containing the waystone’s data.
All properties can be omitted, as they would simply get their default values if they are missing. But there are two particular contexts you need to know:
– If you don’t specify an `owner`, it will be considered as “unclaimed”. Unclaimed waystones will automatically be owned by the first player who uses it.
– Coordinates will be defined from the context of location of the command. **However**: if you don’t specify a `location` > `dimension`, the waystone will be registered in the overworld. This is due to the fact we unfortunately can’t dynamically detect in what potential custom dimension a command is ran if the executor isn’t a player.
This command must always use an already **loaded area** as context of location. You can forceload the relative chunk upstream and unload it afterwards if you want to set it at a hard location.
Here are several examples of commands:
Set a waystone with all default properties values at the current location:
“`
/function pk_waystones:cmd/setblock/waystone {waystone:{}}
“`
Set a deepslate unclaimed waystone at the current location:
“`
/function pk_waystones:cmd/setblock/waystone {waystone:{variant:”deepslate”}}
“`
Set an unclaimed, protected and public waystone at 0 80 0 in the End:
“`
/execute in minecraft:the_end positioned 0 80 0 run forceload add ~ ~
/execute in minecraft:the_end positioned 0 80 0 run function pk_waystones:cmd/setblock/waystone {waystone:{location:{dimension:”minecraft:the_end”},protected:true,visibility:”public”}}
/execute in minecraft:the_end positioned 0 80 0 run forceload remove ~ ~
“`
And here is the data structure for the `waystone` parameter:
“`
waystone (compound)
├─ id (int): The id of the Waystone
├─ variant (string): The variant of the Waystone (regular, sand, deepslate, nether…)
├─ name (text component): The name of the Waystone
├─ owner (4 int array): The UUID of the owner
├─ location (compound): Location of the Waystone.
│ └─ dimension (string): dimension id, “minecraft:overworld” by default.
├─ discovered_by (array): list of players having interacted with this Waystone
│ └─ (compound)
│ └─ uuid (4 int array): UUID of a player
├─ shared_with (array): list of players the waystone is shared with
│ └─ (compound)
│ ├─ uuid (4 int array): UUID of a player
│ └─ name (string): If the player isn’t in the database yet, store its name instead
├─ protected (boolean): Weather the waystone is protected (true) or not (false)
├─ visibility (string): Can be “public”, “private” or “discover”
└─ render_item (compound):
└─ id (string): id of item to render the Waystone in the Waystones list
└─ tag (compound) [1.20.4 or less]: optional tags of the item
└─ components (compound) [1.20.5 or more]: optional components of the item
“`
Reorder waystones in the list
This command can be used to reorganise the waystones in the list by providing a list of ids as parameter:
“`
/function pk_waystones:cmd/database/waystones/reorder {ids:}
“`
Where `` is a list of ids ordered in the new expected order.
You’re not forced to add all waystones ids in the new list: missing ones will be automatically added at the end of the list, in the order they previously were (_so you don’t need to include private and discoverable waystones of your players)_.
For example if I currently have waystones with the ids 1-2-3-4-5-6-7-8, and I want to make them appear in the order 4-2-1-3-5-6-7-8, I can use this following command:
“`
/function pk_waystones:cmd/database/waystones/reorder {ids:[4,2,1,3]}
“`
Note that regular players will still see their private waystones first, then discovered waystones, then the public ones. Players with the `pk.waystones.manager` tag will see all waystones in the order they have been created/reorder.
You can find the ids of waystones by granting yourself the manager role (using `/tag @s add pk.waystones.manager`) and hovering them in a waystone’s GUI. They will be displayed in their tooltip.
## Usable by any (non-op) player
Hide locations from the waystones list
It allows you to hide coordinates of waystones from waystones’ GUI. It can be useful if you’re a video maker who plays on a PvP server, and don’t want to leak your waystones’ location.
Of course, this setting is player-specific. Meaning by changing it, it will only apply for yourself (not for other players).
Using these following commands, if the value is set on **1**, waystones’ location will be hidden, if set on **2**, waystones’ location will show:
“`
/trigger pk.waystones.trigger.hide_coordinates set 1
/trigger pk.waystones.trigger.hide_coordinates set 2
“`
Forget a discovered or private waystone
It allows you to forget about a waystone you have discovered or a private one you have been registered on, so this same waystone won’t appear in the list anymore, until you discover it you or you are registered back in the “shared with” list.
It can be used when you want to clean your waystones list.
“`
/trigger pk.waystones.trigger.forget_waystone set
“`
Where `` expects the id of a waystone.
For example, trying to forget about the waystone with id `100`:
“`
/trigger pk.waystones.trigger.forget_waystone set 100
“`
You can see waytones id by using one to open the GUI, then hovering the waystone to forgot, the id will be shown in the tooltip. If you want to forget about the currently used waystone, its id is shown after the waystone name on the top of the GUI.
## Troubleshooting
Recreate all waystones from the database
If ever waystones have been broken accidentally (using a `kill @e` command for example) you can run the following command to recreate all waystones from the database:
“`
/function pk_waystones:cmd/debug/recreate_all_waystones
“`
The process will automatically remove all remaining entities and blocks of broken waystones before placing fresh ones. All data (id, owner, type, attributes…) will be preserved.
It may take some time for it to complete, so be sure to get the message telling the process ended successfully before interacting with or placing a waystone.
Force waystones to unlock
On server that use external tools like Paper, Spigot… some desynch can happen, and block may not update their blockstates correctly. If ever you get the message “This waystone is currently used by someone else” when no-body is actually using it, you can unlock the loaded waystones using the following command:
“`
/function pk_waystones:cmd/debug/force_waystones_to_unlock
“`
## Features for other data packs
Public hooks
Public hooks are [function tags](https://minecraft.wiki/w/Function_tag_(Java_Edition)) which allow you to run your own functions before or after a specific event happen from the waystones data pack by adding them in the corresponding tag.
They have been added to help people wanting to introduce their own features without altering the original code, so the waystones data pack can be safely updated without the need of editing it back to introduce your own features every time you install another version.
Public hooks can be found in `data/pk_waystones/tags/function/public` and follow a `_` name pattern. They must be added following these same paths (including the `pk_waystone` namespace) and names within your data pack.
Here are listed public hooks:
—
**gui_action_**:
Triggers after/before an action is performed by clicking an item from a Waystones GUI.
– Context: Current controller (waystone marker entity), at itself.
– The user has the `pk.current.player` tag.
—
**gui_button_build_**:
Triggers after/before a button (item data) is built to populate the Waystones GUI.
– Context: Current controller (waystone marker entity), at itself.
– The user has the `pk.current.player` tag.
—
**waystone_close_**:
Triggers after/before a player closes a waystones GUI.
– Context: Current controller (waystone marker entity), at itself.
– The user has the `pk.current.player` tag.
—
**waystone_open_**:
Triggers after/before a player opens a waystones GUI.
– Context: The user who oppened the waystone (also have the `pk.current.player` tag), at the waystone’s location aligned xyz.
– The marker of the opened waystone can be found using `@e[type=marker,tag=pk.waystones.waystone.controller,dx=0,limit=1]`.
—
**waystone_place_**:
Triggers after/before a waystone is placed.
– Context: Any, at the waystone’s location aligned xyz.
– In the case the waystone is placed by a player, the context is this player.
– In the “after” hook, the controlle of the placed waystone can be found using `@e[type=marker,tag=pk.waystones.waystone.controller,dx=0,limit=1]`.
—
**waystone_remove_**:
Triggers after/before a waystone is removed.
– Context: Current controller (waystone marker entity), at itself.
—
**waystone_replace_**:
Triggers after/before a waystone is replaced (with the “recreating” feature).
– Context: Any, at the waystone’s location aligned xyz.
# 🔧 Update from V.2
Since **V.3.2.5** (MC 1.20.3) and **V.3.3.2** (MC 1.20.5), the data pack provides a process to convert all existing waystones from **V.2** to **V.3**.
In order to do so, follow the steps written below. _I would also advice you to create a backup of your world using V.2, in case another data pack / plugin / mod accidentally breaks the updating process._
1. Remove the waystones V.2 data pack from the `/datapacks/` folder of your world, **don’t** uninstall V.2 upstream with the uninstall function, as you should keep its database.
2. Upgrade your world to the desired version of Minecraft if needed, if it isn’t already done.
3. Install Waystones V.3 by placing it in the `/datapacks/` forlder, then using `/reload` in game.
4. Use this following command: `/function pk_waystones:cmd/database/update_from_v2` and wait for the updating process to end. If it managed to do so, you should get a message “Updated all Waystones from Waystones (V.2) successfully”.
**Note**: On 1.20.3 to 1.20.4, this process can’t unfortunatelly resolve owners name from the waystones owners to set them in the V.3 database. So you would need to wait for them to join back your world to see them as owner in the waystones tooltip from the GUI.
On 1.20.5 or more, players names will be automatically added to the V.3 database.
# 💄 Optional Resources Pack
In order to embellish your experience, a **resources pack** providing models for Waystones items and GUI has been made by our graphist-artist contributor, **Lordphiphi**. You can download it from here: [Waystones Resources (for Waystones V.3) – by Lordphiphi](https://modrinth.com/resourcepack/waystones-rp).
See render
# 🧹 Uninstall
Waystones comes with an automatic uninstallation process. Running it will:
– Remove all waystones that have been placed in your world, in every dimensions
– Remove all scores and storage specific to the Waystones data pack
– If there is no more KawaMood data packs installed, also remove all common scores and storages
The uninstalling process may take some seconds to complete. Be sure to wait for the message telling you that you can safely remove the data pack from your world’s folder before doing it.
The command to start the uninstalling process is the following one:
“`
/function pk_waystones:cmd/uninstall
“`
# ❓ F.A.Q
Do I need to install a resources pack?
No, this data pack doesn’t strictly require a resources pack. It provides a rather-intuitive GUI by itself, and use players heads to render custom textures.
However, a **resources pack** providing models for Waystones items and GUI has been made by our graphist-artist contributor, **Lordphiphi**. You can download it from here: [Waystones Resources (for Waystones V.3) – by Lordphiphi](https://modrinth.com/resourcepack/waystones-rp).
The texture of the block shows regular player heads, how can I fix that?
You need to be connected to the internet the first time you use a new type of waystone. The textures of the player heads that are used to create their looks are indeed loaded and cached on the client-side, from (old or current) players skins that are stored on a Mojang server.
If you accidentally used a content that required to be online the first time you use it, and now see regular players heads instead of the expected texture, you can still go in the “.minecraft/assets/skins/” folder, then sort the sub-folders by date, and delete some recent folders. Once that is done, if your game was already started, you will need to restart it to update the cached content.
⚠️ **Exceptional issue on 1.20.2**: Players heads can sometimes show default player skins (Steve & co.) rather than its actual texture although the whole cache folder are cleared. This is actually an [known issue](https://bugs.mojang.com/browse/MC-264966) from the game itself that struggle to load a texture depending on the signature’s value. This issue has been fixed on 1.20.3.
Waystones said they are already used, how to fix it?
Waystones can stay locked if their block container didn’t update their blockstate correctly when players closed them. Such issues can happen sometimes, especially on modified versions such as Paper or Spigot. In order to force waystones to unlock, there is a debug command:
“`
/function pk_waystones:cmd/debug/force_waystones_to_unlock
“`
# 🪠 Report an issue
If you encountered an issue with this data pack, preferably join the [Discord server](https://discord.com/invite/w8s9XWgN6v), and open a post in the dedicated **#data-pack-issues** channel to describe your problem. Please, don’t forget to provide all necessary informations including:
– The Minecraft version you’re using.
– The version of the concerned data pack you’re using.
– If you’re using any modified version like Forge, Paper or Spigot.
– If you do, the plugins or mods you’re using that may alter the functioning of data packs.
– The list of other data packs you’re using, if you have others.
– A clear description of your issue, and a way to reproduce it.
– If necessary, a video or a screenshot of the issue in game.
Before doing that, please read the F.A.Q. section just above. The issue you’re facing may be a common one, and a way to fix it may already have been provided in it.
# 📌 Other links
Thank you for using Waystones! It makes me happy to know people are enjoying it.
If you want to support its development and the development of other data packs, you can support me on my other social networks:
– [Youtube](https://www.youtube.com/@KawaMood/)
– [Planet Minecraft](https://www.planetminecraft.com/member/kawamood/)
– Or if you’re in a generous mood, I accept donation on [paypal](https://paypal.me/KawaMood) or [buy me a kawa](https://www.buymeacoffee.com/kawamood) (slang term for “coffee”)!