Bedwars Ultimate
This Resource Pack focuses on Bedwars and PvP Textures, like tiny Swords or some simple Block Textures.
Tools and Weapons:
25
Blocks:
128
Items:
11
Armor and Equipment:
21
Coming soon: Item Textures 🙂
This Resource Pack focuses on Bedwars and PvP Textures, like tiny Swords or some simple Block Textures.
Tools and Weapons:
25
Blocks:
128
Items:
11
Armor and Equipment:
21
Coming soon: Item Textures 🙂

## Description
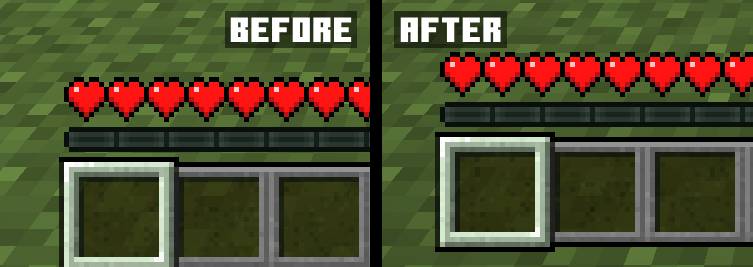
The mod makes the hotbar offset in Java Edition the same as in Bedrock Edition with the ability to customize its offset
## Usage
The mod currently has a settings menu that can be used if you install Cloth Config and ModMenu for Fabric. In the settings window, you can change the hotbar offset, and this can also be done by changing the value in the config file. Since version 1.1, the mod renders the bottom of the texture of the selected item (missing since Minecraft version 1.20.2), which allows it to be used with resource packs that change the hotbar
## Compatibility
[AppleSkin](https://modrinth.com/project/EsAfCjCV): Health and saturation HUD linked to the hotbar
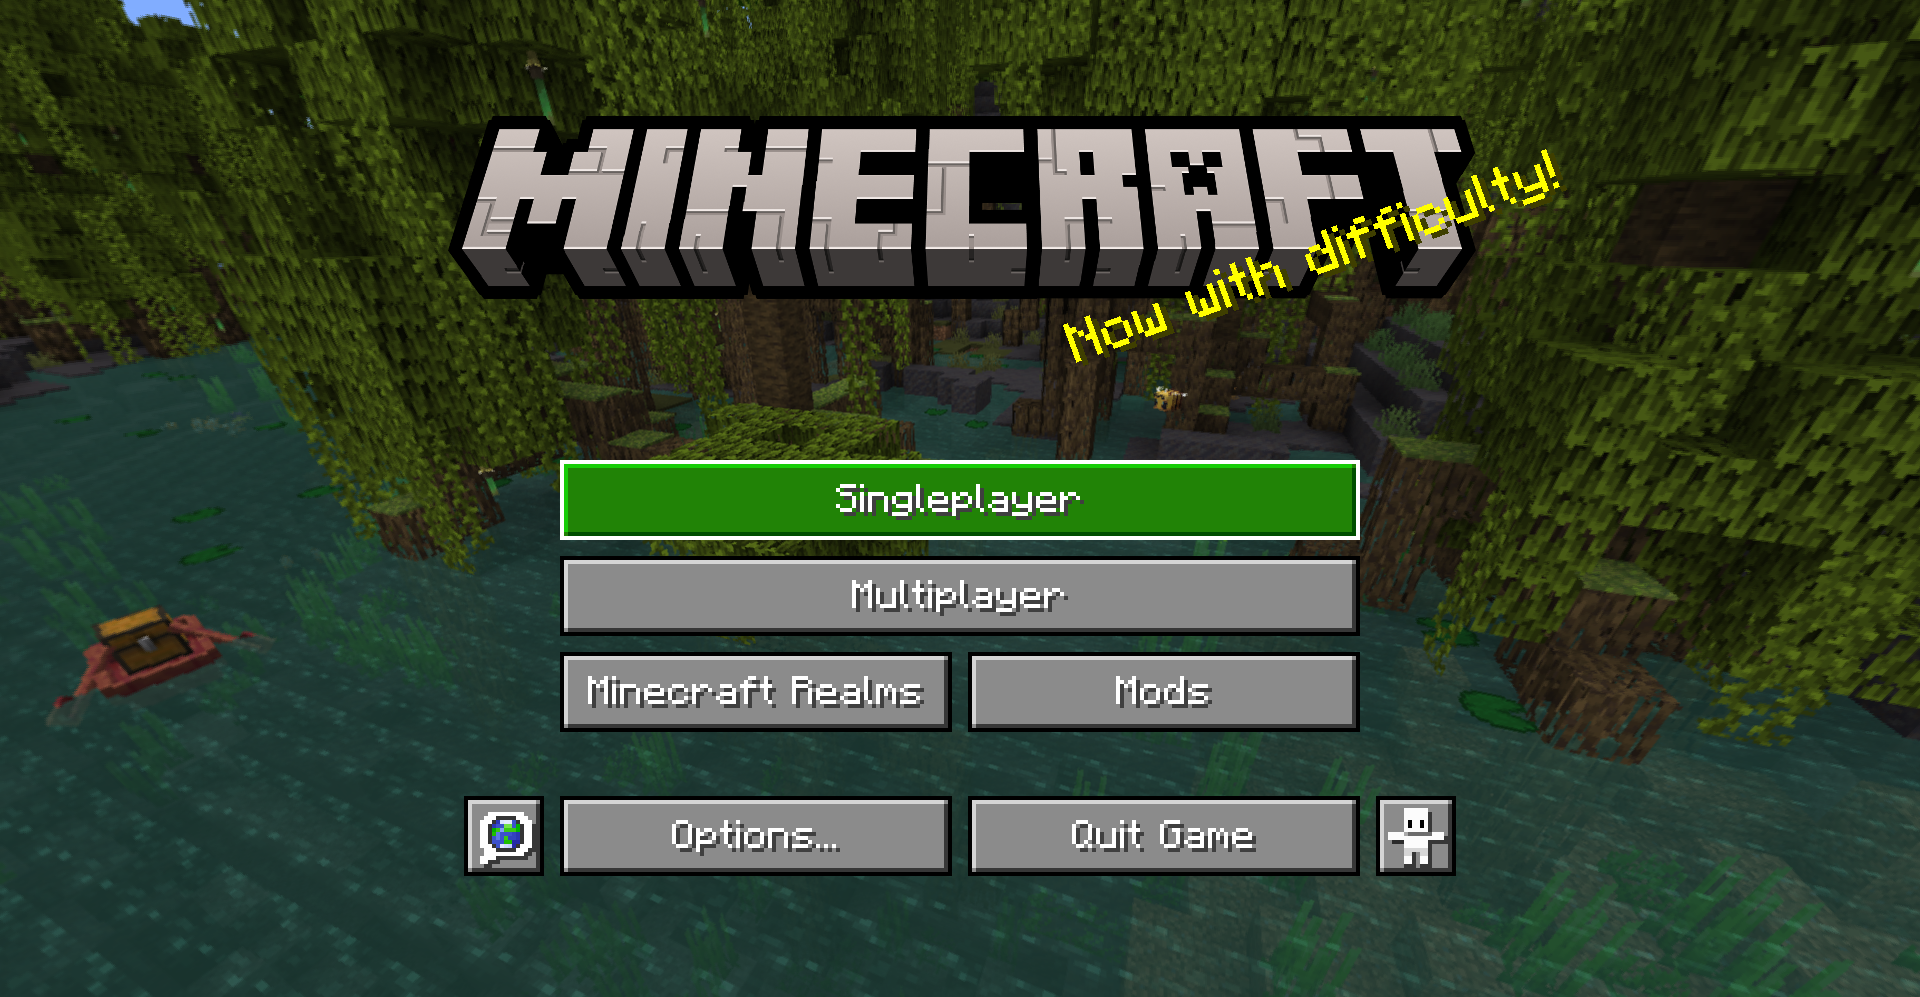
> A gui style for menus based on Bedrock Edition
## About
This pack changes the style of most menu buttons (even some modded ones!) to look more like Bedrock Edition’s gui. It also replaces the vanilla title with the Bedrock one.
Supported mods:
– [Mod Menu](https://modrinth.com/mod/modmenu)
– [Capes](https://modrinth.com/mod/capes)
– [Malilib](https://www.curseforge.com/minecraft/mc-mods/malilib)
– [Litematica](https://www.curseforge.com/minecraft/mc-mods/litematica)
This pack also supports [Respackops!](https://modrinth.com/mod/respackopts) If you have it installed, you’ll be able to disable certain features or even try out alternate styles!
## Install
For loading the pack in-game, check out the official Minecraft wiki page on [how to install resourcepacks](https://minecraft.fandom.com/wiki/Tutorials/Loading_a_resource_pack).
## Usage
You can use these assets however you want and post projects that include them as long as any of the following pages are linked to as credit: [Github](https://github.com/Xetheon/bedrock-gui) | [Modrinth](https://modrinth.com/resourcepack/bedrock-gui) | [Curseforge](https://www.curseforge.com/minecraft/texture-packs/bedrock-gui)
Please do not rehost this pack directly. If you want to make releases on other platforms, redirect downloads to any of the above links.
**OPTIFINE/EMF REQUIRED.**
________________________________________________________________________________________
Quite literally ONLY remodels and retextures the bat to be more like it’s original brown look but pixel consistent.
Said look being from any point before 1.21.3, where they didn’t bother keeping it…
Bare Bones Borders adds borders to important blonks like ores and powdered snow in the style of [Bare Bones](https://modrinth.com/resourcepack/bare-bones).
Also supports emissive textures with the use of [Continuity](https://modrinth.com/mod/continuity) or ~~Optifine~~.
I’m open to suggestions for more blocks or mod support.
# Back to the PIT
### formerly known as LRRgh
This resource pack replaces the default Minecraft bell sound with “Back to the PIT”
This can be useful if, for example, you wanted to dig a 16×16 hole down to bedrock, and ring a bell each time you intend to return to that hole.
## CREDITS
“Back to the PIT” sound voiced by the late Wayne June for Darkest Dungeon by Red Hook Studios
— https://www.darkestdungeon.com/darkest-dungeon/
resource pack icon taken from famous youtuber James Turner’s jlrrPit emote
— https://twitch.tv/James_LRR
art made by Taylor “TQ” Quinn
— https://linktr.ee/WitchyTQ
resource pack haphazardly hacked together by MungoDude
— https://kind.social/@mungodude
— https://bsky.app/profile/mungodude.bsky.social

[](https://modrinth.com/mod/fabric-api “Download Fabric API”)
# AutoSwitch
**AutoSwitch** is a Minecraft mod (for Fabric / NeoForge) that automatically swaps the held item based on what you’re
about to do – mining, attacking, interacting, or when specific stats change and what is available on your hotbar
(i.e. you hit a stone block with your fist, it will switch to a pickaxe).
It’s rule-driven and highly configurable via a HOCON config file `autoswitch.conf`,
located in the `config` folder which is next to the resource pack folder.
A quick way to navigate there is by going to `Options > Resource Packs > navigate up one folder`.
The mod can be toggled on/off dynamically in game by pressing `R`.
—
## Configuration
> This section only applies to AutoSwitch 12+. Earlier versions used a different config format.
There are four sections in the config file – three for defining selectors and targets when various actions occur,
and one for general feature configuration:
* `attack-action` – rules used when **attacking** (entities or blocks).
* `interact-action` – rules used when **interacting** (right-click-like actions).
* `stat-change-action` – rules triggered by stat events (e.g., using a totem of undying).
* `feature-config` – Controls the overall behaviour of the mod.
Each rule contains:
* `priority` – integer; higher values are given precedence what multiple targets match.
* `target` – what this rule matches (types: `BLOCK`, `ENTITY`, `STAT`, or an `EXPRESSION` allowing the combination of other targets).
Targets can reference tags or specific explicit IDs (`minecraft:ender_chest`, `sugar_cane`).
* `tools` – ordered array of candidates to switch to. Each must be an `ITEM` or an `EXPRESSION` of `ITEM`s,
or be an empty list (to disable switching for that target).
`EXPRESSION`s can have as many elements or as much depth as you wish, allowing for a great deal of control.
The default config covers a wide range of cases and should serve as a great basis for expanding.
Tools and targets can have an optional `data` field to control things like enchantments or blockstates that should be matched.
### Live edits
Simply resave the config file when ingame for it to be automatically reloaded.
### The Gritty Details
#### Expressions
Expressions can be nested to any depth you desire.
Expressions support the following operations:
* `OR` – Match any one of its children
* `AND` – Match all of its children
* `NOT` – Match none of its children
* `XOR` – Match only one of its children
#### Data
Currently, the following data types are supported:
* `BlockState` – The block state to match
* `Component` – Currently only supports `POTION_CONTENTS` on items
* `Enchantment` – The enchantments an item has
* `EntityEquipment` – The equipment an entity is wearing, such as a pig with a saddle
#### Selection Priority
**Decision order (first thing that differs wins):**
1. **Target Priority** – rules with higher priority are preferred.
2. **Target Rating (multi-level)** – compare rating level 0 – n up to the configured maximum.
At each level compare, in order:
* `isGroup` (prefer non-groups)
* `hasData` (prefer those with data)
* `typeRating` (higher preferred, e.g. weapon DPS or mining level)
* `dataRating` (higher preferred, e.g. normalized enchantment level)
3. **Tool Priority** – prefer tools that are intrinsically prioritized higher.
4. **Tool Rating (multi-level)** – same multi-level comparison logic as Target Rating (isGroup → hasData → typeRating → dataRating).
5. **Is the slot currently selected?** – prefer the currently held slot if tied so far.
6. **Smallest slot index** – final tie-breaker: lowest (leftmost) inventory slot wins.
##### Text-based Flowchart
“`
START: candidate inventory slots (all slots that matched a selector)
|
v
Compare Target Priority
|– if different –> choose highest Target Priority –> END
|
v (same)
Compare Target Rating (levels 0..N)
For each level:
– compare: isGroup? (non-group preferred)
– compare: hasData? (with data preferred)
– compare: typeRating (higher wins)
– compare: dataRating (higher wins)
|– if difference found –> choose winner –> END
|
v (no difference)
Compare Tool Priority
|– if different –> choose highest Tool Priority –> END
|
v (same)
Compare Tool Rating (levels 0..N)
(same per-level rules as Target Rating)
|– if difference found –> choose winner –> END
|
v (still tied)
Prefer currently selected slot?
|– Yes –> choose currently selected –> END
|– No –> choose smallest (leftmost) slot –> END
“`
# AquaHUD/Flat
A simplistic, modern UI resource pack designed to match Sodium’s UI.
## What makes AquaHUD/Flat different from normal AquaHUD?
AquaHUD Flat is AquaHUD but with:
* no grids
* no hard exterior outlines
* more seperation between elements
## About
Upon installing sodium, I immediately found it rather annoying that it’s user interface was completely different from the rest of Minecraft’s. So, I took it upon myself to create a resource pack that attempts to complement Sodium’s user interface in a way that makes every screen feel consistent and like it was meant to look that way. This has been in development for quite a while, so there may be some inconsistencies with some UIs.
## Permissions
do whatever, i dont care
## Requirements
The only requirement is [my TranslucencyFix mod](https://modrinth.com/mod/translucencyfix).
## Recommendations
Ready for the cool stuff? Me too.
* Sodium: https://modrinth.com/mod/sodium
* Sodium Extra: https://modrinth.com/mod/sodium-extra
* Blur: https://modrinth.com/mod/blur-fabric
* ‘Slight’ Gui Modifications: https://modrinth.com/mod/slight-gui-modifications
* OneBar: https://modrinth.com/mod/onebar
* Using Optifabric? Custom Background Color instead of Blur: https://modrinth.com/mod/r1ifqLkv/version/XQhFC2Zk
Special instructions:
* Blur
* set Fade Time to 0
* set Blur Radius to 32
* set Gradient Start Color to 75999999
* set Gradient End Color to 75555555
* ‘Slight Gui Modifications
* Enable Tooltip Modifications
* set Background color to A0000000
* set Outline Top Color to 00000000
* set Outline Bottom Color to 00000000
* LibGUI (Open Mods menu -> Filter -> Libraries -> Shown)
* Enable Dark mode.
* Why? Because LibGUI hardcodes damn near half of it’s GUIs and I can’t do anything about it.
* OneBar
* Set background color to A0000000
* Custom Background Color
* Alpha on both start and end: 117
* Red, Green, and Blue on start: 153
* Red, Green, and Blue on end: 85
# AquaHUD
A simplistic, modern UI resource pack designed to complement Sodium’s UI.
## About
Upon installing sodium, I immediately found it rather annoying that it’s user interface was completely different from the rest of Minecraft’s. So, I took it upon myself to create a resource pack that attempts to complement Sodium’s user interface in a way that makes every screen feel consistent and like it was meant to look that way. This has been in development for quite a while, so there may be some inconsistencies with some UIs.
## Want something more faithful to sodium’s style?
[AquaHUD Flat](https://modrinth.com/resourcepack/aquahud-flat) is AquaHUD but with:
* no grids
* no hard exterior outlines
* more seperation between elements
## Permissions
do whatever, i dont care
## Requirements
The only requirement is my [TranslucencyFix](https://modrinth.com/mod/translucencyfix) mod.
## Recommendations
Ready for the cool stuff? Me too.
* Sodium: https://modrinth.com/mod/sodium
* Sodium Extra: https://modrinth.com/mod/sodium-extra
* Blur: https://modrinth.com/mod/blur-fabric
* ‘Slight’ Gui Modifications: https://modrinth.com/mod/slight-gui-modifications
* OneBar: https://modrinth.com/mod/onebar
* Using Optifabric? Custom Background Color instead of Blur: https://modrinth.com/mod/r1ifqLkv/version/XQhFC2Zk
Special instructions:
* Blur
* set Fade Time to 0
* set Blur Radius to 32
* set Gradient Start Color to 75999999
* set Gradient End Color to 75555555
* ‘Slight Gui Modifications
* Enable Tooltip Modifications
* set Background color to A0000000
* set Outline Top Color to 00000000
* set Outline Bottom Color to 00000000
* LibGUI (Open Mods menu -> Filter -> Libraries -> Shown)
* Enable Dark mode.
* Why? Because LibGUI hardcodes damn near half of it’s GUIs and I can’t do anything about it.
* OneBar
* Set background color to A0000000
* Custom Background Color
* Alpha on both start and end: 117
* Red, Green, and Blue on start: 153
* Red, Green, and Blue on end: 85
Change the main menu background to Maomao from The Apothecary Diaries.