Craftable Uncraftable Objects [CUO]
A Minecraft Project that adds crafting recipes for normally uncraftable items in Survival mode, along with custom advancements for a more rewarding experience.
**✨ Features**
* **New Crafting Recipes**: Craft items like the Enchanted Golden Apple, Totem of Undying, Trident, Horse Armors, Chainmail Armors, and more.
* **Custom Advancements**: Unique rewards for crafting special items.
* **Wide Compatibility**: Supports Minecraft Java Edition from version 1.13.x up to the latest snapshots.
**🏆 Advancements** & **📜 Recipes**
Advancements
Not Enough Recycling!

You will get this Advancement when you craft all **Recycling** recipes.
Who Enchanting Armor Those Days?

You will get this Advancement when you craft or have an **Enchanted Golden Apple**.
Forget Die.

You will get this Advancement when you craft or have a **Totem of Undying**.
Water Weapon.

You will get this Advancement when you craft or have a **Trident**.
It’s Time to Take a Horse.

You will get this Advancement when you craft or have a **Saddle**.
WoW!

You will get this Advancement when you craft or have an **Experience Bottle**.
Recipes
Bell

Chainmail Armors
Chainmail Helmet

Chainmail Chestplate

Chainmail Leggings

Chainmail Boots

Cobweb

Crying Obsidian (1.17 or newer)

Debug Stick

Recommended to Use **[Tweaker Stick Data Pack](https://modrinth.com/datapack/tweaker-stick)** to able to use it with full functionality or instead use Creative mode to able to use it until I add an update that fix this problem.
Elytra

Enchanted Golden Apple

Experience Bottle

Gunpowder


It will take 30 seconds to give you 1 **Gunpowder**.
(Only works on Furnace)
Horse Armors
Diamond Horse Armor

Golden Horse Armor

Iron Horse Armor

Copper Horse Armor (1.21.9 or newer)

Leather Horse Armor

(Only works on Furnace)
Leather

It will take 10 seconds to give you 1 **Leather**.
(Only works on Furnace)
Name Tag (1.21.11 or older)

Nautilus Armors (1.21.11 or newer)
Diamond Nautilus Armor

Golden Nautilus Armor

Iron Nautilus Armor

Copper Nautilus Armor

Nautilus Shell

Recycling Recipes
Recycling Amethyst Block (1.17 or newer)

Recycling Chainmail Boots

Recycling Chainmail Chestplate

Recycling Chainmail Helmet

Recycling Chainmail Leggings

Recycling Cobweb

Recycling Crying Obsidian

Recycling Packed Ice

Recycling Quartz Block

Saddle

Totem of Undying
~~~~
Trident
**Trident (1.21 or newer)**

**Trident (1.20.6 or older)**

**🗒️ News & Updates**
To see the latest News about my Projects:
[Telegram Channel](https://t.me/iAhmedMinecraft)
[Patreon](https://www.patreon.com/c/iahmedminecraft/posts)
Discord: (Coming Soon..)
**📂 Source Code & Issues**
To see the Source Code of the Project:
[GitLab](https://gitlab.com/iahmed_7024-group/craftable-uncraftable-objects)
Report about a problem or tell a suggestion:
[GitLab](https://gitlab.com/iahmed_7024-group/craftable-uncraftable-objects/-/issues)
**🗂️ Installation**
Linux:
World that already exists:
1. Go to this location “~/.minecraft/saves/” (Make sure you are showing the Hidden Folders and Files by pressing Left Ctrl + H).
2. Choose the world folder you want to put the Data Pack in it.
3. Open datapacks folder, then put the data pack.zip in the datapacks folder.
4. Reload the world by /reload command or by Quit the world and rejoin it.
New World:
1. Open Minecraft, then click on “Singleplayer”.
2. Click on “Create New World”, then click “More World Options…”.
3. Click on “Data Packs” button, then drag the data pack file into Minecraft.
4. Click “Done” and “Create New World”.
———————————————-
MacOS:
World that already exists:
1. Go to this location “~/Library/Application Support/minecraft”.
2. Choose the world folder you want to put the Data Pack in it.
3. Open datapacks folder, then put the data pack.zip in the datapacks folder.
4. Reload the world by /reload command or by Quit the world and rejoin it.
New World:
1. Open Minecraft, then click on “Singleplayer”.
2. Click on “Create New World”, then click “More World Options…”.
3. Click on “Data Packs” button, then drag the data pack file into Minecraft.
4. Click “Done” and “Create New World”.
———————————————-
Windows:
World that already exists:
1. Press Win + R, then type %appdata%, then press Enter.
2. Open “Roaming” folder, then “.minecraft” folder, then open “saves” (Make sure you are showing the Hidden Folders and Files by pressing Left Ctrl + Left Shift + . (period)).
4. Choose the world folder you want to put the Data Pack in it.
5. Open datapacks folder, then put the data pack.zip in the datapacks folder.
6. Reload the world by /reload command or by Quit the world and rejoin it.
New World:
1. Open Minecraft, then click on “Singleplayer”.
2. Click on “Create New World”, then click “More World Options…”.
3. Click on “Data Packs” button, then drag the data pack file into Minecraft.
4. Click “Done” and “Create New World”.
Enjoy.
# Important Thing!
I know this is a Minecraft Project and this project has Minecraft things but because my project is an open source, I will talk about this.
Starting September 2026, a silent update, nonconsensually pushed by Google, will block every Android app whose developer hasn’t registered with Google, signed their contract, paid up, and handed over government ID.
For more information: https://keepandroidopen.org/.
CME is Bad
# Abstract
Players and modpack developers sometimes find the game crashed with `ConcurrentModificationExceptions` (CME) and `IndexOutOfBoundsExceptions` (IOOBE), which only give stacktrace of current thread and are hard to trace which mod causes them. Here’s one of the crashes which is caused by SimpleReloadInstance in 1.20.1 Forge:
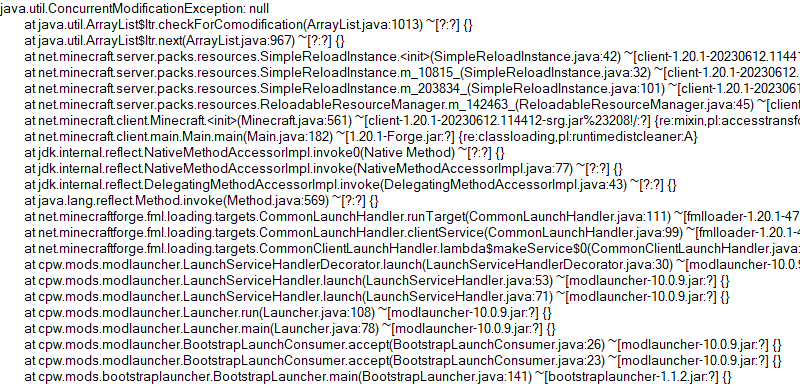
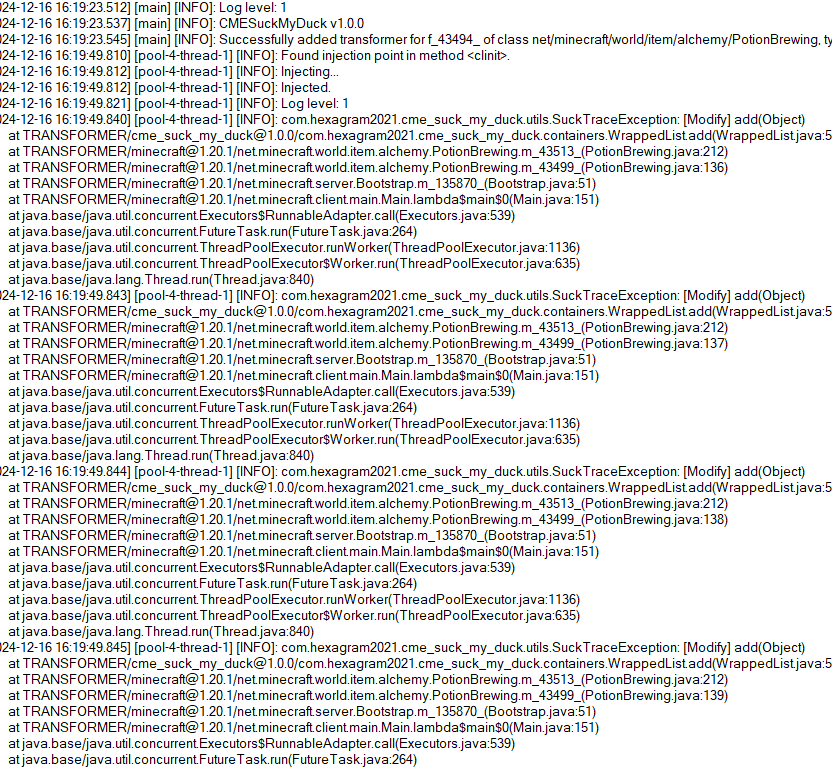
So this is what the mod is developed for. Players who install this mod and add javaagent to JVM Argument correctly will receive a full log for modification history of a certain collection:
# Usage
First, add this jar to mods folder.
Second, edit your Java Virtual Machine Argument in your launcher. Add `-javaagent:mods/CMESuckMyDuck-.jar=;;;`.
Finally, run the game, play and wait until the crash happens.
# Usage for Other Java Projects
This mod can not only be used for Minecraft debugging, but also be utilized to debug other java projects. Similar to Minecraft. The only different step is that you should add gson and asm jar to classpath (`-cp`) before javaagent, and add our `CMESuckMyDuck-.jar` to classpath after javaagent.
# Arguments
##
A full name of the class, which has a container that you would like to monitor. Use “ instead of `.` (a.k.a. the internal name of class).
##
A field name of the container in target class, which you would like to monitor. For Forge, use SRG name. For Fabric, use intermediary name. For NeoForge, use official name.
##
Currently, we only support three containers: `List`, `Set`, `Map`. This argument indicates the type of monitored container.
##
`static` or `nonstatic`. This argument indicates the container is a static field or non-static field.
# How to get and
Let’s start with an example.
First, take a look at the stacktrace of CME/IOOBE:
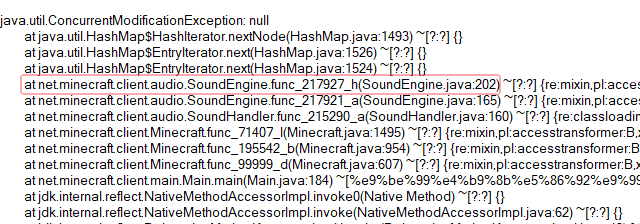
Second, read the source code of SoundEngine and confirm which container is facing this issue:
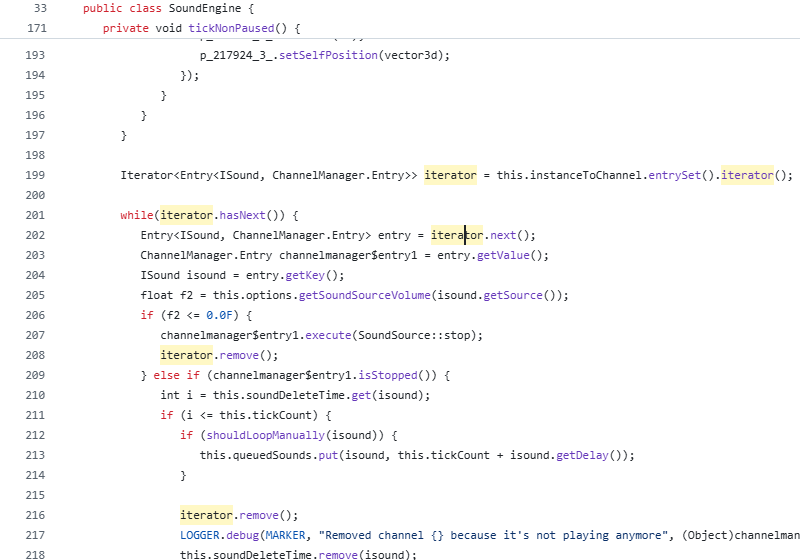
Now we know we should monitor map `field_217942_m` (`instanceToChannel` in `SoundEngine`). Keep going.
Third, install this mod, and add “`-javaagent:mods/CMESuckMyDuck-1.0.0.jar=net/minecraft/client/audio/SoundEngine;field_217942_m;Map;nonstatic`” to Java Virtual Machine Argument. Relaunch the game and wait for the next crash.
Finally, open `CMESuckMyDuck.log` file and you will see which thread and which mod has concurrently modified the container.
# Examples (JVM Arguments)
## ConcurrentModificationException from SoundEngine in Forge 1.16.5 Environment
`-javaagent:mods/CMESuckMyDuck-1.0.0.jar=net/minecraft/client/audio/SoundEngine;field_217942_m;Map;nonstatic`
## ConcurrentModificationException from PotionBrewing in Forge 1.20.1 Environment
`-javaagent:mods/CMESuckMyDuck-1.0.0.jar=net/minecraft/world/item/alchemy/PotionBrewing;f_43494_;List;static`
## ArrayIndexOutOfBoundsException from Zeta mod
`-javaagent:CMESuckMyDuck-1.0.0.jar=org/violetmoon/zetaimplforge/event/ForgeZetaEventBus;convertedHandlers;Map;nonstatic`
# Other options
## Log Level
Use system property `-Dcme_suck_my_duck.log_level=` to set custom log level.
Default 1, which means no debug message will be logged.
Users can set it to 0 to output debug message, which is not recommended – query functions like Map#get, Set#containsAll will also be logged when set to 0, and make the file very very long.
## ASM API Version (v1.0.2+)
In order to maintain compatibility with the latest version of Minecraft, this mod is compiled with asm version 9.7. For older versions of Minecraft (such as 1.12.2), API level operations such as ASM_9 cannot be applied, so players need to use `-Dcme_suck_my_duck.asm_api_version=` to modify the ASM API version compatibility. For example, game version 1.12.2: `-Dcme_suck_my_duck.asm_api_version=5`.
## File Max Entries (v1.0.3+)
Since we notice that when crash happens, the last few operations in the log are much more important than the previous ones. So our mod adopts a paging strategy after v1.0.3, and only the last two pages are retained at the end. The number of logs output on each page (that is, the number of operation call stacks) is fixed, and the default value is 500. Players can use `-Dcme_suck_my_duck.file_max_entries=` to modify the maximum number of elements on the page.
## Whitelist of Constructor (v1.0.3+)
Sometimes a container in a certain class is used in many places (eg. CompoundTag#tags). Directly using this mod will cause the log to be too long or the valid content to be replaced by subsequent operations. Therefore, players can specify an additional constructor whitelist to monitor the corresponding container in the corresponding class of a specific module. The default is empty, that is, there is no whitelist. Players can use `-Dcme_suck_my_duck.whitelist_constructor_stacktrace=` to specify it. If any line in the stack trace where the container is constructed includes the content of the whitelist string, the container will be monitored – otherwise, the container will not be monitored, which greatly simplifies the log output information.
## Transform to Thread Safe (v1.0.4+)
Use system property `-Dcme_suck_my_duck.transform_to_thread_safe=true` to transform the field into a thread-safe container.
This is NOT recommended unless you like slowness and don’t want to fix the problem.
## Inject method (v1.0.4+)
Use system property `-Dcme_suck_my_duck.inject_method=true` to switch to inject mode.
If set, you should use `-javaagent:CMESuckMyDuck-.jar=;` and whenever this method is called, you will receive a stack trace in log files.
## Ignore threads (v1.0.5+)
Use system property `-Dcme_suck_my_duck.ignore_threads=;;;…` to ignore some thread that is expected to modify the given container (or call the given method). For example, `-Dcme_suck_my_duck.ignore_threads=”Server thread”`.
## Stop logging early (v1.0.7+)
Use system property `-Dcme_suck_my_duck.stop_logging_if_exception_created=false` to stop logging if critical error occurs.
## Trace ID Updater (v1.0.8+)
Use system property `-Dcme_suck_my_duck.trace_id_updater=;` to update trace ID when calling the given method. This might be useful in inject mode.
## Monitoring Local Variables (v1.1.0+)
Use system property `-Dcme_suck_my_duck.local_var_index=` to monitor local variable at given index in the given method.
If set, you should use `-javaagent:CMESuckMyDuck-.jar=;;`. By the way, the index can be reused by different local variables. So you might have to use `-Dcme_suck_my_duck.match_local_index=` to specify the ordinal of ASTORE operation to indicate which local variable to monitor.
# Conclusion
I like eating peking duck. It’s so delicious!