Velocity/hub
# Velocity/hub
This plugin, written for networks running velocity, adds the ability for users, to use the /hub command, to return to the lobby.
The available servers for lobbies are configurable, and the first available server on the list will be used to transfer players to it.
With additional permissions, it is possible, to transfer other players to the lobby, using the /hub command.
# Permissions
To protect the unappropriated use of the /hub command, we have set some permissions.
### vhub.command.hub
This permission protects the whole base of the /hub command.
### vhub.command.hub.others
This permission protects the /hub command.
For the use to send other players to the hub, both, this and the base permission are required at the same time.
# Configuration
This plugin provides a configuration file in the json format.
The content is the list of server names, which are your lobby.
On trying to connect to the lobby, the plugin picks the first available server and sends the target player to it.
# Dependencies
This plugin requires the availability of the Kotlin 1.8.21 library, we recommend using the [MCKotlin](https://modrinth.com/plugin/mckotlin) because it supports Velocity as well.
But you are free to use any other platform supported Kotlin library provider as well!
# Have fun
You are welcome to use the plugin on your velocity server!
Velocity-CommandLimiter
# What Is This
Powerful Plugin that manipulates all commands under proxy or proxies to control display and execution!
limit and disable command!
# How To Use
### Before Installation
Basically, it is recommended to use with permission management plug-ins such as LuckPerms.
## How To Setup
Put the downloaded plugin into the Velocity plugin folder and run it once.
Then the default config will be generated.
### Config
The settings described in `[[permissions]]` in config will be applied to players who have the permissions described in `[[permissions]]`.
If a player has multiple permissions due to group inheritance in LuckPerms, etc., all settings will be activated, so the settings with the most restrictions will be given priority.
For example, if `default` is set to `commands = [“help”, “list”]` and `guest` inherits the default permissions, then even if `guest` is set to `commands = [“list”]`, `help `is not available!
“`toml
# Permission to view and execute all commands `commandlimiter.admin` for the following
allAllowed = “admin”
# Restrict the display and execution of all commands by players who do not have any privileges, or
limitNoPermissionsPlayer = true
# Configuration of commands available for each permission node
[[permissions]]
# Value of permission node `commandlimiter.default` for the following
nodeName = “default”
# Enable whitelist or not?
# If false, it will be in blacklist format
whiteList = true
# For whitelist, only the commands described below can be displayed and executed
# If blacklisted, only the commands described below will be restricted
# Commands containing subcommands can be filtered by wildcards or regular expressions
commands = [“help”, “list”, “me*”, “msg*”, “teammsg*”, “tell*”, “tm*”, “trigger*”, “w*”, “random*”]
“`
### Permission Node
The root of the permission node for this plugin is `commandlimiter`.
If you want to set it up with LuckPerms etc., you need to set it up as follows
> Example of LuckPerms settings saved in yaml
“`yaml
name: default
permissions:
– commandlimiter.default:
value: true
“`
## Command
The following commands are available
| Command |Alias | Description | Required Permission Nodes |
|—————————|————-|————————————————-|———————–|
| `/commandlimiter-reload` | `/cl-reload` | Reload the plugin config to reflect the settings | `commandlimiter.admin`|
> ⚠️Attention⚠️
Even if you reload the configuration with the command, the client will display the commands as they were before they were configured** until you reconnect to the server.
This is due to the fact that the client gets the commands that are available when connecting to the server.
# Support SNS
SNSList: [https://kuwa.dev/](https://kuwa.dev/)
Twitter(x): [https://x.com/kuwamain](https://x.com/kuwamain)
Discord Support Server: [https://kuwa.app/discord/support](https://kuwa.app/discord/support)
> Japanese
# What Is This
プロキシやプロキシ下にある全てのコマンドを操作して表示と実行を制御する強力なPlugin
# How To Use
### 導入前に
基本的にはLuckPerms等の権限管理プラグインと利用することをお勧めいたします
## 設定方法
ダウンロードしたプラグイン本体を、Velocityのプラグインフォルダに入れ、一度起動します
そうすることでデフォルトのconfigが生成されます
### Configの説明
config内の`[[permissions]]`に記述した権限を持つプレイヤーに記述した設定が反映されるようになります
LuckPermsのグループ継承等で複数の権限を持つプレイヤーの場合、すべての設定が有効化されるため、制限が多い設定が優先されます
例を言うと、`default`に`commands = [“help”, “list”]`が設定されていて、`guest`がデフォルトの権限を継承するようになっている場合、たとえ`guest`が`commands = [“list”]`のように設定されていても`help`を利用することはできません
“`toml
# 全てのコマンドの表示と実行を許可する権限 以下の場合`commandlimiter.admin`
allAllowed = “admin”
# 権限を何も持っていないプレイヤーのすべてのコマンドの表示と実行を制限するか
limitNoPermissionsPlayer = true
# 各 permission node で利用できるコマンドの設定
[[permissions]]
# permission node の値 以下の場合`commandlimiter.default`
nodeName = “default”
# ホワイトリストを有効にするか
# falseの場合はブラックリスト形式になる
whiteList = true
# ホワイトリストの場合は、以下に記述したコマンドのみ表示と実行が可能になる
# ブラックリストの場合は記述したコマンドのみ制限される~~~~
# サブコマンドを含むコマンドの場合、ワイルドカードや正規表現でフィルタ可能
commands = [“help”, “list”, “me*”, “msg*”, “teammsg*”, “tell*”, “tm*”, “trigger*”, “w*”, “random*”]
“`
### Permission Node
このプラグインの permission node の root は `commandlimiter` になっています
LuckPerms等で設定する場合は以下のように設定する必要があります
> LuckPermsの設定をyamlで保存するようにしている場合の例
“`yaml
name: default
permissions:
– commandlimiter.default:
value: true
“`
## Command
以下のコマンドが利用可能なコマンドです
| コマンド |エイリアス | 説明 | 必要なPermissionノード |
|—————————|————-|————————————————-|———————–|
| `/commandlimiter-reload` | `/cl-reload` | プラグインのconfigを再読み込みして設定を反映します | `commandlimiter.admin`|
> ⚠️注意⚠️
コマンドで設定を再読み込みしたとしても、コマンドの表示に関しては**サーバーに再接続するまでクライアントでは設定前の表示**になります
これはクライアントがサーバー接続時に利用できるコマンドを取得する仕様のためです
Velocity Carbon Discord
# Velocity Carbon Discord
Bridging [Carbon](https://modrinth.com/plugin/carbon) chat channels to Discord.
Carbon must be installed on the proxy to use this plugin. If you use Carbon on your backend servers, please use their DiscordSRV compatibility.
## Features
– Highly configurable
– Webhooks or bot messages for chat
– Display player count in bot status
– Ping discord users from in-game
– Reply to in-game messages from Discord
– Handle separate chat channel mappings (E.g. one channel for global chat, one channel for staff chat)
– Customisable Minecraft Avatar display
– Link discord attachments in-game
– Status messages on server start and shutdown, as well as player join, leave or change server
– Formats Xaero’s Minimap shared waypoints in Discord
## Installation
1. Create a discord bot application [here](https://discordapp.com/developers/applications/)
– Click `Add application` and then go to the `Bot` tab
2. Enable the `SERVER MEMBERS INTENT` and `MESSAGE CONTENT INTENT` under `Privileged Gateway Intents`
3. Go to the `OAuth2` tab and copy the `CLIENT ID`
4. Create an invite link for your new bot [here](https://discordapi.com/permissions.html)
– Enable permissions: `View Channels`, `Send Messages` and `Read Message History`
– Paste the copied `CLIENT ID` into the field on the page
– Click the generated link to invite your bot to your discord server
3. Go to the `Bot` tab and copy the bot token, you may need to click `Reset Token` first
4. Install the plugin on your server, start the server once to generate the config and stop the server again.
5. Open the plugin config files at `plugins/velocitycarbondiscord/config.yaml`
6. Replace where it says `TOKEN` with the bot token you copied previously
7. Edit the channel mapping to include the carbon channels and discord channels IDs you want to link
8. Set any additional config options you want
9. Start the server
## Support
Support for Carbon and Velocity Carbon Discord can be obtained in the [Carbon discord server](https://discord.gg/S8s75Yf). For Velocity Carbon Discord issues, please ping `@Jarva`
## Configuration
Default config generated on startup:
“`yaml
discord:
token: ‘TOKEN’
# Available placeholders:
messages:
# Additional placeholders:
chat_message: ‘: ‘
# Additional placeholders:
join_message: ‘** joined **’
leave_message: ‘** left **’
# Additional placeholders: N/A
disconnect_message: ‘** was disconnected**’
# Additional placeholders:
disconnect_server_message: ‘** was disconnected from **’
# Additional placeholders:
server_switch_message: ‘** moved from to **’
# Available placeholders: N/A
shutdown_message: ‘**Proxy shutting down**’
start_message: ‘**Ready for connections**’
# Additional placeholders: <description><br />
advancement_default_message: “**<username>** has just earned the achievement [<title>]** _(<description>)_”<br />
advancement_challenge_message: “**<username>** has completed the challenge [<title>]** _(<description>)_”<br />
advancement_goal_message: “**<username>** has reached the goal [<title>]** _(<description>)_”<br />
advancement_task_message: “**<username>** has made the advancement [<title>]** _(<description>)_”<br />
# Additional placeholders: <displayname> <message><br />
death_message: “**<message>**”<br />
webhook:<br />
# Available placeholders: <displayname> <username> <uuid><br />
avatar_url: ‘https://crafatar.com/renders/head/<uuid>?overlay’<br />
username: ‘<username>‘<br />
# Available placeholders: <message><br />
message: ‘<message>‘<br />
show_bot_messages: false<br />
show_attachments_ingame: true<br />
show_activity: true<br />
# Available placeholders: <amount><br />
activity_text: ‘with <amount> players online’<br />
enable_mentions: true<br />
enable_everyone_and_here: false<br />
prefer_webhook: true<br />
# Available placeholders: <message> <nickname> <role_color> <username><br />
minecraft:<br />
# Additional placeholders: <attachments> <discord_format> <reply_format> <username_format><br />
format: ‘<discord_format> <reply_format><username_format> <dark_gray>» <reset><message><attachments>‘<br />
discord_format: ‘<dark_gray>(<color:#7289da>discord<dark_gray>)<reset>‘<br />
username_format: ‘<color:<role_color>><hover:show_text:<username>><nickname></hover><reset>‘<br />
mention_format: ‘<color:<role_color>><underlined>@<nickname></underlined></color>‘<br />
# Additional placeholders: <reply_message> <reply_nickname> <reply_role_color> <reply_url> <reply_username><br />
reply_format: ‘<dark_gray><click:open_url:<reply_url>>[<color:#4abdff>←<color:<reply_role_color>><hover:show_text:<reply_username>><reply_nickname></hover><dark_gray>]</click><reset> ‘<br />
# Additional placeholders: <attachment_url><br />
attachment_format: ‘<dark_gray><click:open_url:<attachment_url>>[<color:#4abdff>Attachment<dark_gray>]</click><reset>‘<br />
channels:<br />
– name: ‘carbon:global’<br />
enabled: true<br />
broadcast_events: true<br />
discord:<br />
webhook:<br />
url: ‘WEBHOOK_URL’<br />
channel_id: ‘CHANNEL_ID’<br />
– name: ‘carbon:staff’<br />
enabled: true<br />
minecraft:<br />
format: ‘<discord_format> <gray>✦</gray> <username_format> <dark_gray>» <aqua><message><attachments>‘<br />
discord:<br />
webhook:<br />
url: ‘WEBHOOK_URL’<br />
channel_id: ‘CHANNEL_ID’<br />
“`</p>
<p>## Credits<br />
– fooooooooooooooo: Creation of [Velocity Discord](https://modrinth.com/plugin/velocitydiscord/) which heavily inspired the features, and this README<br />
– Draycia: Creator of [Carbon](https://modrinth.com/plugin/carbon), as well as provided lots of help figuring out implementation details</p>
</article>
<article>
<h1>Velocity – Auto Reconnect</h1>
<p>VelocityReconnect keeps players online while a backend server restarts and reconnects them automatically when it comes back.</p>
<p>Instead of kicking players out during a restart, VelocityReconnect keeps retrying in the background and can hold players inside the proxy while they wait. This makes restarts, crashes, and maintenance feel much smoother for players.</p>
<p>By default, VelocityReconnect uses its built-in no-limbo mode, so no extra backend or limbo server is required. If you prefer, it can also work with a real holding server.</p>
<p>Features:</p>
<p>Native Velocity reconnect handling<br />
No limbo server required<br />
Built-in no-limbo mode enabled by default<br />
Optional support for a real holding server<br />
Automatic reconnect attempts while the backend is offline<br />
Custom reconnect titles, subtitles, and actionbar messages<br />
Animation support in reconnect messages<br />
Configurable reconnect timing and retry behavior<br />
Fallback server support<br />
Per-server permission support<br />
Simple Voice Chat compatibility for built-in holding mode<br />
Setup:</p>
<p>1. Drop the plugin into your proxy’s plugins folder.<br />
2. Restart your Velocity proxy.<br />
3. Open the config and set the reconnect timing to match how long your server usually takes to start.<br />
4. Check that the shutdown text or regex matches the message your backend sends when it restarts.<br />
5. If needed, edit the config and reload the plugin.<br />
Test it and enjoy.</p>
<p>Credits:<br />
VelocityReconnect is based on and ported from tau’s BungeeReconnect, with additional Velocity-specific changes and built-in proxy holding support for single-backend setups.</p>
<p>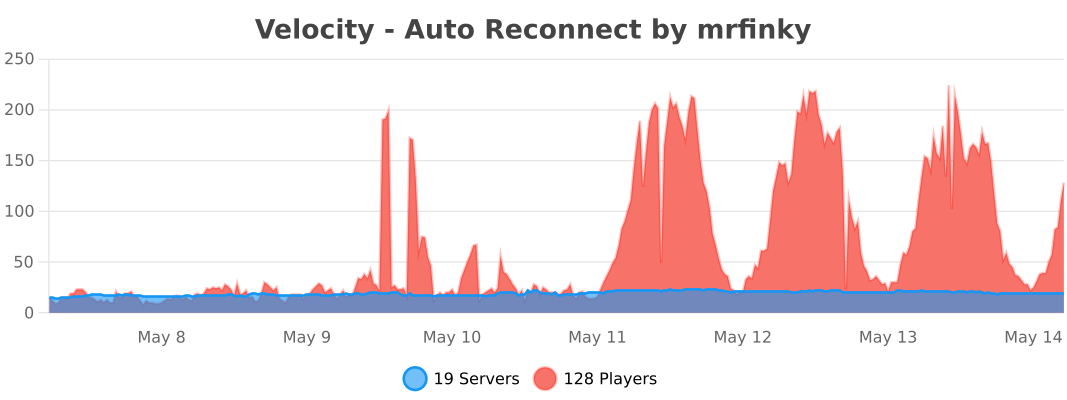</p>
</article>
<article>
<h1>Velocity Alert</h1>
<p><br />
<br />
# Velocity Alert Plugin<br />
## Overview<br />
A simple Velocity plugin that alerts/announces players in your entire server network. You can use this feature to warn players about an upcoming server/proxy restart, or announce any other important message you want to mention.</p>
<p>## Features<br />
* `/alert (message)`<br />
* Permission node is `alert.command.permission` (recommended for staff only; you can setup the permissions in your permission plugin)<br />
* Colored messages with HEX color support<br />
* Config file where you can customise the alert message prefixes and colors.</p>
<p>### Supported Formats<br />
A list of supported formats with links on how to use them.<br />
– [Legacy](https://www.digminecraft.com/lists/color_list_pc.php)<br />
– [JSON](https://minecraft.wiki/w/Raw_JSON_text_format)<br />
– [XML (MiniMessages)](https://docs.advntr.dev/minimessage/format.html#minimessage-format)</p>
<p>### Format Examples<br />
Here are some basic examples of those 3 different formats: (<span style="color:red">[ALERT] Warning!</span>)<br />
– Legacy: `/alertlegacy &cWarning!`<br />
– JSON: `/alertjson {“text”:”Warning!”,”color”:”red”}`<br />
– XML (MiniMessage): `/alertxml <red>Warning!`</p>
<p>Or you can use `/alert` by changing the format in the config file. The defaults format is lagacy.</p>
<p>## Installation and Setup<br />
1. Download the latest Alert plugin [here](https://modrinth.com/plugin/velocity-alert/version/1.8).<br />
2. Place the plugin in the plugins folder of your proxy server.<br />
3. Restart your proxy and that’s it! The plugin should be loaded.</p>
<hr>
<p>If you have any questions or have found a problem, please report it to [https://github.com/Anwenden001/Velocity-Alert-Plugin/issues](https://github.com/Anwenden001/Velocity-Alert-Plugin/issues)</p>
</article>
<article>
<h1>velocit</h1>
<p># velocit<br />
A [playit.gg](https://playit.gg) plugin for [Velocity](https://github.com/PaperMC/Velocity) servers</p>
<p># Getting Started</p>
<p>1. [Setup a Velocity Server](https://docs.papermc.io/velocity/getting-started)<br />
2. Install the plugin’s [latest release](https://github.com/200Tigersbloxed/velocit/releases/latest)<br />
3. Click the link in the console window to link your playit account to the server<br />
4. Done!</p>
<p># What’s supported?</p>
<p>Pretty much anything that’s TCP will work right now.</p>
<p>Feature | Description | Supported<br />
— | — | —<br />
Minecraft TCP | The TCP port for Velocity | ✔️<br />
UDP Ports | UDP Ports (for things like Geyser) | ❌<br />
Extra TCP Ports | Any extra TCP ports to expose | ✔️<br />
IP Forwarding | The actual IP address of the client | ❌</p>
<p>*any feature listed is planned*</p>
<p># How to Build?</p>
<p>1. Pull the repo<br />
2. Open with your favorite Java IDE<br />
3. Refresh maven packages<br />
4. `mvn install`</p>
</article>
<article>
<h1>Velocircon</h1>
<p>[](https://modrinth.com/plugin/velocircon/versions)<br />
[](https://github.com/code-lime/Velocircon/releases)<br />
[](https://modrinth.com/plugin/velocircon)<br />
[](https://hangar.papermc.io/code-lime/velocircon/versions)<br />
[](https://github.com/code-lime/Velocircon/actions)</p>
<p># Velocircon</p>
<p>**Velocircon** is a plugin for [Velocity](https://papermc.io/software/velocity) that adds RCON support, allowing you to connect to your Velocity proxy and execute commands remotely.</p>
<p>## About</p>
<p>Velocircon enables administrators and automation systems to connect to Velocity via the RCON (Remote Console) protocol and securely execute any commands supported by the proxy. This greatly improves management and automation capabilities for Minecraft servers using Velocity as their proxy.</p>
<p>## Features</p>
<p>– Standard RCON protocol support<br />
– Execute any Velocity command via RCON<br />
– Secure password authentication<br />
– Easy setup and integration</p>
<p>## Installation</p>
<p>1. Download the latest Velocircon release.<br />
2. Place the `.jar` file in the `plugins` directory of your Velocity server.<br />
3. Restart the server.</p>
<p>## Configuration</p>
<p>After the first launch, the plugin will generate a configuration file `rcon.yml` in the `plugins/velocircon` directory.<br />
**You must set a password and enable RCON (`enable: true`), otherwise the plugin will not work!**</p>
<p>Default configuration:</p>
<p>“`yaml<br />
enable: false<br />
host: 0.0.0.0<br />
port: 25575<br />
password: PASSWORD<br />
colors: true<br />
console-output: true<br />
permissions:<br />
luck-perms:<br />
enable: false<br />
group: ‘*’<br />
regex:<br />
enable: false<br />
regex: minecraft.(.*)<br />
“`</p>
<p>### Environment Variables</p>
<p>Configuration options can also be overridden using **environment variables**. This is useful when running Velocity in Docker or other container environments.</p>
<p>Environment variables use the following format:</p>
<p>“`<br />
VELOCIRCON__<CONFIG_PATH><br />
“`</p>
<p>Rules:</p>
<p>* The prefix **`VELOCIRCON__`** is required.<br />
* Use **double underscores `__`** to separate configuration levels.<br />
* Replace `-` with `_`.<br />
* Variable names are case-insensitive, but uppercase is recommended.</p>
<p>### Options</p>
<p>– `enable` (`VELOCIRCON__ENABLE`): Set to `true` to activate RCON support.<br />
– `host` (`VELOCIRCON__HOST`): Address to bind the RCON server (default: `0.0.0.0` for all interfaces).<br />
– `port` (`VELOCIRCON__PORT`): Port for RCON connections.<br />
– `password` (`VELOCIRCON__PASSWORD`): Set a strong password for authentication.<br />
– `colors` (`VELOCIRCON__COLORS`): Enables color codes in command output (recommended).<br />
– `console-output` (`VELOCIRCON__CONSOLE_OUTPUT`): Redirects RCON output to the console.<br />
– `permissions`: RCON connection permissions. If all `enable: false` – all permissions are allowed.<br />
– `luck-perms`: Use [LuckPerms](https://modrinth.com/plugin/luckperms) group to control connection permissions.<br />
– `enable` (`VELOCIRCON__PERMISSIONS__LUCK_PERMS__ENABLE`): Enable usage `LuckPerms` permissions filter.<br />
– `group` (`VELOCIRCON__PERMISSIONS__LUCK_PERMS__GROUP`): ‘`*`’ or an empty string – all permissions are allowed.<br />
– `regex`: Use [Regex](https://regex101.com) (regular expression) to control connection permissions.<br />
– `enable` (`VELOCIRCON__PERMISSIONS__REGEX__ENABLE`): Enable usage `Regex` permissions filter.<br />
– `regex` (`VELOCIRCON__PERMISSIONS__REGEX__REGEX`): `Regex` string.</p>
<p>### Examples</p>
<p>Config file:</p>
<p>“`yaml<br />
port: 25575<br />
console-output: true<br />
permissions:<br />
luck-perms:<br />
enable: false<br />
“`</p>
<p>Environment variables:</p>
<p>“`bash<br />
VELOCIRCON__PORT=25580<br />
VELOCIRCON__CONSOLE_OUTPUT=false<br />
VELOCIRCON__PERMISSIONS__LUCK_PERMS__ENABLE=true<br />
“`</p>
<p>Resulting configuration:</p>
<p>“`yaml<br />
port: 25580<br />
console-output: false<br />
permissions:<br />
luck-perms:<br />
enable: true<br />
“`</p>
<p>Environment variables **override values from `rcon.yml`**.</p>
<p>## Usage</p>
<p>To connect to Velocity via RCON, use any compatible client.<br />
We recommend [itzg/rcon-cli](https://github.com/itzg/rcon-cli) for its flexibility and ease of use.</p>
<p>Example connection command:</p>
<p>“`sh<br />
rcon-cli –host <your_host> –port 25575 –password <your_password><br />
“`</p>
<p>Once connected, you can send any Velocity command as if you were using the Velocity console.</p>
<p>## Requirements</p>
<p>– Java 21 or higher (recommended by Velocity documentation)<br />
– Velocity Proxy</p>
<p>## License</p>
<p>This project is licensed under the GNU General Public License v3.0. See the [LICENSE](https://github.com/code-lime/Velocircon/blob/master/LICENSE) file for details.</p>
<p>## Feedback & Contributions</p>
<p>Found a bug or want to suggest an improvement? Please open an issue or submit a pull request!</p>
<p>—</p>
<p>**Author:** [@code-lime](https://github.com/code-lime)<br />
[](https://bstats.org/plugin/velocity/Velocircon/26312)</p>
</article>
<article>
<h1>VeloAuth</h1>
<p align="center">
<img decoding="async" src="https://cdn.modrinth.com/data/cached_images/a31eec688d48cffe2770bd961e5d134c71b8b662.png" alt="VeloAuth">
</p>
<p># VeloAuth</p>
<p>[](https://modrinth.com/plugin/veloauth)<br />
[](https://discord.gg/e2RkPbc3ZR)<br />
[](LICENSE)<br />
[](https://bstats.org/plugin/velocity/VeloAuth)</p>
<p>**Complete Velocity authentication plugin** with intelligent nickname protection, premium auto-login, and secure offline player management.</p>
<p>## What is VeloAuth?</p>
<p>VeloAuth is a comprehensive authentication system for Velocity proxy that handles all player authorization before they reach your backend servers. It works with any limbo server to provide a smooth login experience while protecting nickname ownership through intelligent conflict resolution.</p>
<p>## Key Features</p>
<p>– 🔒 **Intelligent Nickname Protection** – Premium nicknames are reserved unless already registered by cracked players<br />
– ⚡ **Premium Auto-Login** – Mojang account owners skip authentication automatically<br />
– 🔄 **Automatic Nickname Change Detection** – Detects when a premium player renames their Mojang account and updates the database record automatically<br />
– 🛡️ **Secure Offline Auth** – BCrypt password hashing with brute-force protection<br />
– 📱 **Optional Floodgate Support** – Bedrock players can bypass the auth server when Floodgate integration is enabled<br />
– 🗺️ **Forced Hosts Support** – Players connect via custom domains (e.g., `pvp.server.com`) and are properly routed to their intended server *after* authentication<br />
– 🚫 **Smart Command Hiding** – Authentication commands (`/login`, `/register`) are completely hidden from tab-completion once the player is logged in<br />
– 🚀 **High Performance** – Three-layer premium resolution cache: in-memory → database → external API, with 24-hour premium status retention<br />
– 🔄 **Conflict Resolution** – Smart handling of premium/cracked nickname conflicts<br />
– 📊 **Admin Tools** – Complete conflict management with `/vauth conflicts`<br />
– 🗄️ **Multi-Database** – MySQL, PostgreSQL, H2, SQLite<br />
– 🌍 **17 Languages** – EN, PL, DE, FR, RU, TR, SI, FI, ZH_CN, ZH_HK, JA, HI, VI, KO, TH, ID, PT_BR<br />
– 🔄 **LimboAuth Compatible** – 100% database compatibility (no migration needed)<br />
– 📢 **Discord Alerts** – Webhook notifications for security events<br />
– 🧵 **Virtual Threads** – Built on Java 21 for maximum performance<br />
– 📈 **bStats Analytics** – Anonymous usage statistics via bStats</p>
<p>## Requirements</p>
<p>– **Java 21 or newer**<br />
– **Velocity proxy** (API 3.4.0+)<br />
– **Limbo server**: NanoLimbo, LOOHP/Limbo, LimboService, PicoLimbo, hpfxd/Limbo, or any other<br />
– **Database**: MySQL, PostgreSQL, H2, or SQLite</p>
<p>## Quick Setup</p>
<p>### Installation</p>
<p>1. Download VeloAuth from Modrinth<br />
2. Place the file in your Velocity `plugins/` folder<br />
3. Start Velocity – the plugin will create a `config.yml` file<br />
4. Stop Velocity and configure your database and auth server name in `plugins/VeloAuth/config.yml`<br />
5. Restart Velocity</p>
<p>**Note:** Floodgate support is disabled by default. Enable it only if you actually use Geyser/Floodgate.</p>
<p>### Velocity Config</p>
<p>Configure your `velocity.toml` with your limbo/auth server and backend servers:</p>
<p>“`toml<br />
[servers]<br />
limbo = “127.0.0.1:25566” # Auth/limbo server (NanoLimbo, LOOHP/Limbo, etc.)<br />
lobby = “127.0.0.1:25565” # Typical backend server<br />
survival = “127.0.0.1:25567” # Another backend server</p>
<p>try = [“lobby”, “survival”] # Order matters. Do NOT put ‘limbo’ here.</p>
<p>[forced-hosts]<br />
# VeloAuth fully respects Velocity’s forced hosts!<br />
# Players connecting via this IP will be sent to limbo to login,<br />
# and then seamlessly transferred to ‘survival’ instead of ‘lobby’.<br />
“survival.example.com” = [“survival”]<br />
“`</p>
<p>**Important:** The `try` configuration controls where authenticated players are redirected by default. VeloAuth automatically skips the `limbo` server and selects the first available backend server, **unless** the player used a `forced-host` domain, in which case they are natively routed to their intended destination!</p>
<p>### Discord Webhooks</p>
<p>VeloAuth supports Discord notifications for security events (failed login bursts, brute-force attempts, premium resolution failures). Configure the webhook URL in `config.yml` under `alerts.discord`.</p>
<p>### Database Config</p>
<p>Supported: H2 (out-of-box), MySQL, PostgreSQL, SQLite</p>
<p>## Player Commands</p>
<p>| Command | Description | Restrictions |<br />
|———|————-|————–|<br />
| `/register <password> <confirm>` | Create new account | Hidden after login. No premium nicknames |<br />
| `/login <password>` | Login to your account | Hidden after login. Works for all players |<br />
| `/changepassword <old> <new>` | Change your password | Must be logged in |</p>
<p>## Admin Commands</p>
<p>| Command | Permission | Description |<br />
|———|————|————-|<br />
| `/unregister <nickname>` | `veloauth.admin` | Remove player account (resolves conflicts) |<br />
| `/vauth reload` | `veloauth.admin` | Reload configuration |<br />
| `/vauth cache-reset [player]` | `veloauth.admin` | Clear authorization cache |<br />
| `/vauth stats` | `veloauth.admin` | Show plugin statistics |<br />
| `/vauth conflicts` | `veloauth.admin` | List nickname conflicts |</p>
<p>## How It Works</p>
<p>### Authentication Flow<br />
1. **Player connects** to Velocity<br />
2. **VeloAuth checks** in-memory authorization cache (instant, no I/O)<br />
3. If **not in memory**, checks **database premium cache** (persistent across restarts)<br />
4. If **not in DB cache**, resolves via **Mojang/Ashcon API** in parallel using virtual threads<br />
5. If **not premium**, player is sent to the **auth server** (unless Floodgate Bedrock bypass applies)<br />
6. Player types **/login** or **/register**<br />
7. **VeloAuth verifies** credentials with BCrypt<br />
8. Player is **redirected to backend server** via `try` configuration</p>
<p>### Premium Resolution (3 layers)<br />
“`<br />
Connect → [In-memory cache] → [Database cache] → [Mojang/Ashcon API]<br />
~0ms ~1ms ~200-500ms<br />
“`<br />
All API calls run in parallel on virtual threads. Results are cached in the database and survive proxy restarts.</p>
<p>### Nickname Change Detection<br />
When a premium player logs in with a different username than what is stored (Mojang account rename), VeloAuth automatically detects the mismatch and updates the database record, keeping the UUID-to-username mapping accurate without any admin intervention.</p>
<p>### Nickname Protection System<br />
– **Premium nicknames are reserved** unless already registered by cracked players<br />
– **Conflict resolution** when premium players use cracked-registered nicknames<br />
– **Admin tools** for managing nickname conflicts<br />
– **Automatic blocking** of cracked players trying premium nicknames</p>
<p>## LimboAuth Migration</p>
<p>VeloAuth is **100% compatible** with LimboAuth databases:</p>
<p>1. Stop LimboAuth on your backend servers<br />
2. Install VeloAuth on Velocity<br />
3. Configure VeloAuth to use the same database as LimboAuth<br />
4. Start Velocity – all existing accounts will work automatically</p>
<p>## Contributing</p>
<p>Contributions are welcome! Please open an issue or PR.</p>
<p>## Support</p>
<p>Need help? Found a bug? Open an issue on GitHub or join our Discord server.</p>
<p>## License</p>
<p>This project is licensed under the **MIT License**</p>
</article>
<article>
<h1>VCustomBrand</h1>
<p># VCustomBrand</p>
<p>[](https://discord.gg/5NMMzK5mAn)</p>
<p>Customize the brand to display to players on your Velocity network with [MiniPlaceholders](https://modrinth.com/plugin/miniplaceholders) support</p>
<p>[](https://www.bisecthosting.com/4drian3d?r=ModVCustomBrand)</p>
<p>## Installation<br />
– Download VCustomBrand from [Modrinth](https://modrinth.com/plugin/vcustombrand)<br />
– Drag and drop on your Velocity plugins folder<br />
– Optionally install MiniPlaceholders together with any expansion<br />
– Start the server</p>
<p>## Command<br />
### `/vcustombrand reload`<br />
Permission: `vcustombrand.command`</p>
<p>## Demonstration</p>
<p>This video makes use of the [Expressions](https://modrinth.com/plugin/expressions-expansion) and [Player](https://modrinth.com/plugin/player-expansion) expansions of [MiniPlaceholders](https://modrinth.com/plugin/miniplaceholders)</p>
<p><iframe width="560" height="315" src="https://www.youtube-nocookie.com/embed/2Wm7sHLmpsc" title="YouTube video player" frameborder="0" allow="accelerometer; autoplay; clipboard-write; encrypted-media; gyroscope; picture-in-picture; web-share" allowfullscreen></iframe></p>
<p>## Limitations</p>
<p>The brand field in the client only supports plain text, not components, so no HEX colors or gradients can be used</p>
</article>
<article>
<h1>VConsoleLinker</h1>
<p># VConsoleLinker</p>
<p>[](https://discord.gg/5NMMzK5mAn)<br />
[](https://t.me/Adrian3dSupport)<br />
[](https://t.me/Adrian3dUpdates)</p>
<p>Link your Velocity console to a Discord channel via WebHooks</p>
<p>[](https://www.bisecthosting.com/4drian3d?r=ModVConsoleLinker)</p>
<p>## Installation<br />
– Download VConsoleLinker from Modrinth<br />
– Drag and drop on your plugins folder<br />
– Start the server<br />
– Configure the Channel ID and the WebHook token in the settings</p>
<p>*Library used for Discord webhooks* [JDWebHooks](https://github.com/4drian3d/JDWebHooks)</p>
<p>## Discord WebHook Configuration</p>
<p></p>
<p>1. Copy the URL of the WebHook.<br />
2. Extract the ID and Token from the URL as shown in the image.<br />
3. Put those fields in the specific configuration options.<br />
4. Restart your proxy</p>
</article>
</main>
<script type="speculationrules">
{"prefetch":[{"source":"document","where":{"and":[{"href_matches":"/*"},{"not":{"href_matches":["/wp-*.php","/wp-admin/*","/wp-content/uploads/*","/wp-content/*","/wp-content/plugins/*","/wp-content/themes/minecraft/*","/*\\?(.+)"]}},{"not":{"selector_matches":"a[rel~=\"nofollow\"]"}},{"not":{"selector_matches":".no-prefetch, .no-prefetch a"}}]},"eagerness":"conservative"}]}
</script>
<div class="gtranslate_wrapper" id="gt-wrapper-18964373"></div><script id="gt_widget_script_18964373-js-before">
window.gtranslateSettings = /* document.write */ window.gtranslateSettings || {};window.gtranslateSettings['18964373'] = {"default_language":"en","languages":["ar","az","bn","bg","hr","cs","da","nl","en","fi","fr","de","el","hu","id","it","ja","kk","ko","fa","pl","pt","ro","ru","sl","es","sv","th","uk","uz","vi"],"url_structure":"sub_directory","flag_style":"2d","wrapper_selector":"#gt-wrapper-18964373","alt_flags":[],"custom_domains":{"ru":"minecraft.vpesports.games"},"float_switcher_open_direction":"top","switcher_horizontal_position":"left","switcher_vertical_position":"bottom","flags_location":"\/wp-content\/plugins\/gtranslate\/flags\/"};
//# sourceURL=gt_widget_script_18964373-js-before
</script><script src="https://minecraft.vpesports.com/wp-content/plugins/gtranslate/js/float.js?ver=3.1.1" data-no-optimize="1" data-no-minify="1" data-gt-orig-url="/minecraft-version/1-9-2/page/17/" data-gt-orig-domain="minecraft.vpesports.com" data-gt-widget-id="18964373" defer></script><script id="wp-emoji-settings" type="application/json">
{"baseUrl":"https://s.w.org/images/core/emoji/17.0.2/72x72/","ext":".png","svgUrl":"https://s.w.org/images/core/emoji/17.0.2/svg/","svgExt":".svg","source":{"concatemoji":"https://minecraft.vpesports.com/wp-includes/js/wp-emoji-release.min.js?ver=7.0"}}
</script>
<script type="module">
/*! This file is auto-generated */
const a=JSON.parse(document.getElementById("wp-emoji-settings").textContent),o=(window._wpemojiSettings=a,"wpEmojiSettingsSupports"),s=["flag","emoji"];function i(e){try{var t={supportTests:e,timestamp:(new Date).valueOf()};sessionStorage.setItem(o,JSON.stringify(t))}catch(e){}}function c(e,t,n){e.clearRect(0,0,e.canvas.width,e.canvas.height),e.fillText(t,0,0);t=new Uint32Array(e.getImageData(0,0,e.canvas.width,e.canvas.height).data);e.clearRect(0,0,e.canvas.width,e.canvas.height),e.fillText(n,0,0);const a=new Uint32Array(e.getImageData(0,0,e.canvas.width,e.canvas.height).data);return t.every((e,t)=>e===a[t])}function p(e,t){e.clearRect(0,0,e.canvas.width,e.canvas.height),e.fillText(t,0,0);var n=e.getImageData(16,16,1,1);for(let e=0;e<n.data.length;e++)if(0!==n.data[e])return!1;return!0}function u(e,t,n,a){switch(t){case"flag":return n(e,"\ud83c\udff3\ufe0f\u200d\u26a7\ufe0f","\ud83c\udff3\ufe0f\u200b\u26a7\ufe0f")?!1:!n(e,"\ud83c\udde8\ud83c\uddf6","\ud83c\udde8\u200b\ud83c\uddf6")&&!n(e,"\ud83c\udff4\udb40\udc67\udb40\udc62\udb40\udc65\udb40\udc6e\udb40\udc67\udb40\udc7f","\ud83c\udff4\u200b\udb40\udc67\u200b\udb40\udc62\u200b\udb40\udc65\u200b\udb40\udc6e\u200b\udb40\udc67\u200b\udb40\udc7f");case"emoji":return!a(e,"\ud83e\u1fac8")}return!1}function f(e,t,n,a){let r;const o=(r="undefined"!=typeof WorkerGlobalScope&&self instanceof WorkerGlobalScope?new OffscreenCanvas(300,150):document.createElement("canvas")).getContext("2d",{willReadFrequently:!0}),s=(o.textBaseline="top",o.font="600 32px Arial",{});return e.forEach(e=>{s[e]=t(o,e,n,a)}),s}function r(e){var t=document.createElement("script");t.src=e,t.defer=!0,document.head.appendChild(t)}a.supports={everything:!0,everythingExceptFlag:!0},new Promise(t=>{let n=function(){try{var e=JSON.parse(sessionStorage.getItem(o));if("object"==typeof e&&"number"==typeof e.timestamp&&(new Date).valueOf()<e.timestamp+604800&&"object"==typeof e.supportTests)return e.supportTests}catch(e){}return null}();if(!n){if("undefined"!=typeof Worker&&"undefined"!=typeof OffscreenCanvas&&"undefined"!=typeof URL&&URL.createObjectURL&&"undefined"!=typeof Blob)try{var e="postMessage("+f.toString()+"("+[JSON.stringify(s),u.toString(),c.toString(),p.toString()].join(",")+"));",a=new Blob([e],{type:"text/javascript"});const r=new Worker(URL.createObjectURL(a),{name:"wpTestEmojiSupports"});return void(r.onmessage=e=>{i(n=e.data),r.terminate(),t(n)})}catch(e){}i(n=f(s,u,c,p))}t(n)}).then(e=>{for(const n in e)a.supports[n]=e[n],a.supports.everything=a.supports.everything&&a.supports[n],"flag"!==n&&(a.supports.everythingExceptFlag=a.supports.everythingExceptFlag&&a.supports[n]);var t;a.supports.everythingExceptFlag=a.supports.everythingExceptFlag&&!a.supports.flag,a.supports.everything||((t=a.source||{}).concatemoji?r(t.concatemoji):t.wpemoji&&t.twemoji&&(r(t.twemoji),r(t.wpemoji)))});
//# sourceURL=https://minecraft.vpesports.com/wp-includes/js/wp-emoji-loader.min.js
</script>
</body>
</html>