Small Caps Font
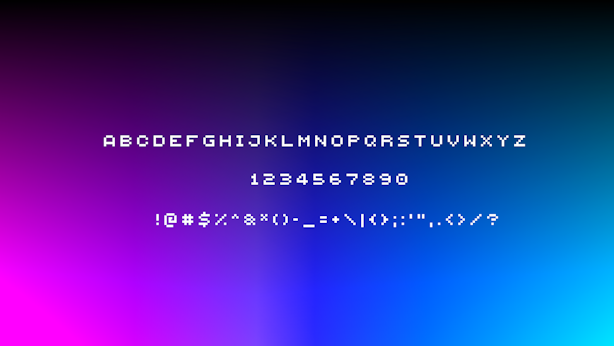
This simple texture pack replaces Minecraft’s default font with the Minecraft Five font, giving your game a clean, modern look. The Minecraft Five font is widely used across many modded servers and community projects, making your in-game text feel familiar and polished while keeping the overall vanilla style intact.
This pack is also inspired by [qrafty’s capitalized font](https://modrinth.com/resourcepack/qraftys-capitalized-font)
Zoro katanas
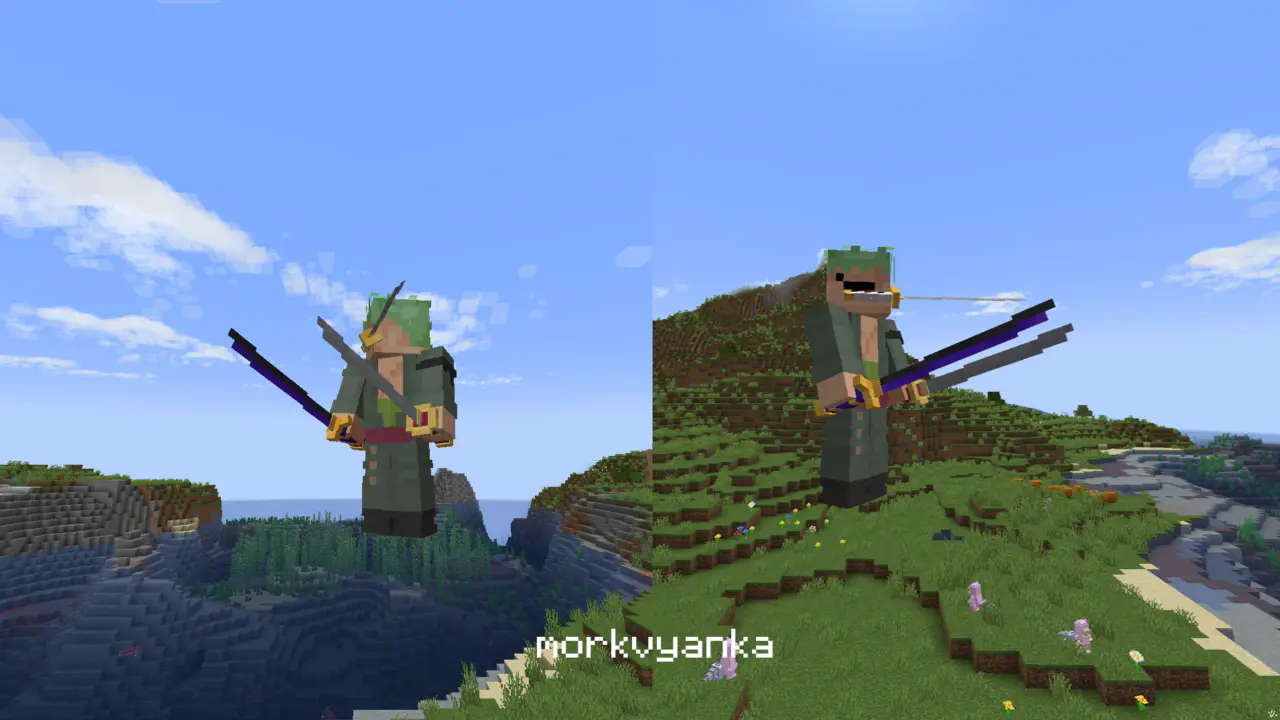
**In this resource pack I changed model of netherite sword, netherite axe and carwed pumpkin to Zoro katanas.**
[my linktree](https://linktr.ee/morkvyanka)
Fancy Hearts
**Fancy Hearts** is a texture pack that replaces the default hearts with cleaner, more detailed versions that look a lot fancier without ruining the original style. Along with the hearts, the pack also updates parts of the HUD and even tweaks the jumping bar you see when you’re riding a horse or any other mount. It’s a small visual change overall, but it makes everything feel cleaner and more polished while still fitting right into the game.

> _Zoro_
zOres
# Emissive Ores in the style of Programmer Art.
Requires [**Continuity**](https://modrinth.com/mod/continuity) or [**OptiFine**](https://optifine.net/home) to function properly.
## Ores
**Non-Emissive**
– Coal
**Emissive**
– Copper
– Diamond
– Emerald
– Gold
– Iron
– Lapis
– Redstone
– Nether Gold
– Nether Quartz
****
Join my [**Discord**](https://discord.gg/4GKytn9RRb) for Updates and Feedback!
zOptimized



## 💬 Description – *english*
Well optimized with a lot of its own chips fully client modpack. There are mods for beautiful clouds, splashes on the water, and even… for bedrock edition?
You don’t have to worry about anything, resource packs, configs and shaders are already in the file.
We update to the latest stable versions and always stay cool. Stable updates and modpack support – yes
Modpack simplifies common processes in Minecraft, such as crafting or moving items
– Item Scroller – allows you to quickly move items from inventory to another inventory
The main purpose of the modpack – is beauty, added a lot of mods that either improve the external component of Minecraft
– Better Clouds – beautiful clouds
– Subtle Effects – beautiful partials in different interactions
– And a lot of other mods for splashes on the water or shine on the armor
### 📩 How to install?
🟢 Modrinth App
One of the easiest ways to install modpack
– Open the Launcher
– Search for this modpack (Action & Stuff ON JAVA)
– Click download
– Run and play
– ✅
🌍 MultiMC / Prism Launcher and etc.
In these launchers there are 2 ways to install modpack
1:
– Click in the launcher “Add build”
– Select “Modrinth” and search this modpack (Action & Stuff ON JAVA)
– Click download (or OK)
– Run and play
– ✅
2:
– Download the modpack file [here](https://modrinth.com/modpack/actionandstuffonjava/versions)
– Click “Add build” in the launcher
– Select “Import from file”
– Import modpack file to launcher
– Run and play
– ✅
2.1:
– Download the modpack file [here](https://modrinth.com/modpack/actionandstuffonjava/versions)
– Grab the file with your mouse and move it to the launcher (modpack starts installing)
– Run and play
– ✅
🦠 TLauncher
– Download the modpack file [here](https://modrinth.com/modpack/actionandstuffonjava/versions)
– Convert the modpack from .mrpack to .zip on any website (search *mrpack to zip converter*)
– Create build in “TL Mods” (Create modpack/instance/build > Select your MC version (version of file *1.21.4/8/10*) > Select Fabric *last version* > Remove check mark from “Use skin system TL” and “Use Optifine”)
– Open the files (.minecraft) > Open “versions” folder > Open “*your name of modpack*” folder
– All files from .zip file should be moved here
– Run and play
– ✅
🟤 Official launcher or any other launcher
The hardest way
– Download the modpack file [here](https://modrinth.com/modpack/actionandstuffonjava/versions)
– Fabric Loader must be installed (you can find the tutorials on how to download it yourself)
– Convert the modpack from .mrpack to .zip on any website (search *mrpack to zip converter*)
– All files from .zip file should be moved to the folder with minecraft (*.minecraft* mostly)
– If you have done everything correctly modpack should start and work correctly
– Run and play
– ✅
—
## 💬 Описание – *русский*
Хорошо оптимизированный с кучей своих фишек полностью клиентский модпак. Есть мод на красивые облака, всплески на воде, и даже… на bedrock edition?
Вам ненадо ни о чем беспокоиться, ресурс паки, конфиги и шейдеры уже находятся в файле
Мы обновляемся на самые последние стабильные версии и всегда остаемся крутыми. Стабильные обновления и поддержка модпака присутствуют
Модпак упрощает обычные процессы в майнкрафте, такие как крафт или перемещения предметов
– Item Scroller – позволяет быстро перемещать предметы из инвентаря в другой инвентарь
Основная цель модпака – это красота, добавлено очень много модов которые как либо улучшают внешнюю состовляющую майнкрафта
– Better Clouds – красивые облака
– Subtle Effects – красивые партиклы при разных взаимодействиях
– И еще очень много других модов на вспески на воде или блеск на броне
### 📩 Как установить?
🟢 Modrinth App
Один из самых простых способов установки модпака
– Откройте лаунчер
– Найдите этот модпак (Action & Stuff ON JAVA)
– Нажмите
– Запустить и играть
– ✅
🌍 MultiMC / Prism Launcher
В этих лаунчерах есть 2 способа установить модпак
1:
– Нажмите в лаунчере “Добавить экземпляр (Add build)”
– Выберите “Modrinth” и найдите эту сборку (Action & Stuff ON JAVA)
– Нажмите скачать (или ОК)
– Запустить и играть
– ✅
2:
– Скачайте файл модпака [здесь](https://modrinth.com/modpack/actionandstuffonjava/versions)
– Нажмите в лаунчере “Добавить экземпляр (Add build)”
– Выберите “Импортировать из файла”
– Импортируйте файл модпака в лаунчер
– Запустить и играть
– ✅
2.1:
– Скачайте файл модпака [здесь](https://modrinth.com/modpack/actionandstuffonjava/versions)
– Захватите файл мышью и перенесите его в лаунчер (модпак начнет установливаться)
– Запускай и играй
– ✅
🦠 TLauncher
– Скачайте файл модпака [здесь](https://modrinth.com/modpack/actionandstuffonjava/versions)
– Конвертируйте модпак из .mrpack в .zip на любом сайте (ищите *mrpack to zip converter*)
– Создайте сборку в “TL Mods” (Создать модпак/экземпляр/сборку > Выберите вашу MC версию (версия файла сборки *1.21.4/8/10*) > Выберите Fabric *последняя версия* > Уберите галочку из “Ипользовать систему скинов TL” и “Использовать Optifine”)
– Откройте файлы (.minecraft) > Откройте папку “versions” > Откройте папку “*your name of modpack*”
– Все файлы из .zip файла необходимо переместить в эту папку
– Запускай и играй
– ✅
🟤 Официальный лаунчер или любой другой
Самый сложный способ
– Скачайте файл модпака [здесь](https://modrinth.com/modpack/actionandstuffonjava/versions)
– Fabric Loader должен быть установлен предварительно (вы можете найти руководство, как скачать его самостоятельно)
– Конвертируйте модпак из .mrpack в .zip на любом сайте (ищите *mrpack to zip converter*)
– Все файлы из .zip файла необходимо переместить в папку с майнкрафтом (*.minecraft* обычно)
– Если вы все сделали правильно, модпак должен запуститься и работать корректно
– Запускай и играй
– ✅
ZoomX
# ZoomX – A Simple & Lightweight Zoom Mod
**ZoomX** is a simple, lightweight, and performance-friendly zoom mod for **Minecraft Fabric**. It adds a zoom feature to the game without changing the vanilla feel. The mod works perfectly with **vanilla Minecraft**, **Sodium**, and other popular Fabric optimization mods.
If you are looking for a clean zoom experience without heavy features or FPS drops, ZoomX is the perfect choice.
### Want Smooth Zoom? Try ZoomX Smooth 👇
[](https://modrinth.com/mod/zoomx-smooth)
—
## What is ZoomX?
ZoomX allows players to zoom in and out while playing Minecraft. It is designed to be minimal and efficient, focusing only on zoom functionality. There are no unnecessary settings or complex menus—just install and use.
—
## Features
### ⚡ Lightweight & High Performance
ZoomX is extremely lightweight and has minimal impact on FPS, even on low-end systems.
### 🧩 Fabric Based
Built specifically for the Fabric mod loader, ensuring fast load times and modern mod compatibility. (Will add more compatible loaders in future)
### 🟩 Vanilla & Sodium Compatible
– Works with vanilla-style gameplay
– Fully compatible with Sodium
– Safe to use with other Fabric performance mods
### 🎮 Easy to Use
No complicated configuration. Install the mod and start zooming instantly.
—
Got issues? Join [Discord](https://discord.com/invite/spunky-insaan-851780887271571456)
ZoomLens
🔍 Zoomify – The Ultimate Zoom Mod for Minecraft! 🔍
Previously known as Zoomify!
🌍Experience distant structures, mesmerizing landscapes, and stunning views with exceptional clarity! Whether you’re a traveler, a creator, or a scenery enthusiast, Zoomify’s adjustable zoom feature enhances every moment!🌍
—
🖱️ Easy to Use:
Hold C + scroll the middle mouse button to adjust the zoom level.
—
🎥 Video Showcase:
—
Zoomi
Enhance your exploration and observation capabilities in Minecraft with the Zoomi Mod! This handy modification introduces a simple yet powerful zoom feature that allows you to get a closer look at distant objects and landscapes without compromising your gameplay experience.
## Features
**Easy Zoom Controls:** Activate the zoom feature effortlessly with a configurable keybind. Zoom in and out seamlessly to adjust your view as needed. (Default Keybind ‘C’)
**Scroll Zoom:** Fine-tune your zoom level with ease using your mouse scroll wheel. This feature provides more control and flexibility over your viewing experience.
## Compatibility
**Minecraft:** Works smoothly for Minecraft 1.21 and Fabric API.
**Mod Loader:** Fabric
## Requirements
**Fabric API:** Ensure you have the Fabric API installed for the Zoomi Mod to function properly.
**owo Lib**
Have fun!
Zoomglass
A Fabric mod that quickly puts a spyglass into your hand with a press of a button.
Made for people who prefer roleplaying aspects of a spyglass but don’t want to miss out on convenience!
Additionally, you can use a fake spyglass while in Spectator gamemode, or in Creative when you don’t have
it in your inventory.
The default keybind is `z`, and you can find it under the “Inventory” section in keybinding settings.
Requires Fabric API
Zones
# Zones
This plugin allows server administrators and players to create and manage protected regions within their Minecraft
world. It provides a flexible system for defining areas, setting permissions, and controlling interactions within those
areas.
## Features
* **Region Creation:** Create regions using in-game selection or manual coordinates.
* **Sub-Regions:** Create sub-regions within existing regions for more granular control.
* **Permission Management:** Set detailed permissions for players within regions, controlling actions like breaking,
placing, interacting, and more.
* **Member Management:** Add and remove members from regions with specific permissions.
* **Region Overlap Control:** Configure whether regions can overlap.
* **Bypass Permissions:** Allow specific players to bypass region restrictions.
* **Configuration:** Customize messages and region settings through configuration files.
* **Beacon Visualization:** Visualize selected regions using temporary beacons.
## Commands
The plugin provides the following commands:
* `/zone create`: Creates a new region using the currently selected locations.
* Usage: `/zone create`
* Requires two locations to be selected using left and right click, starts selection if not present.
* Prevents creation if the new region would overlap an existing region, unless the `zones.create.overlap`
permission is set.
* `/zone subcreate`: Creates a new sub-region within an existing region using the currently selected
locations.
* Usage: `/zone subcreate [regionKey]`
* `regionKey` is optional, if not provided, the region at the player’s location will be used.
* Requires two locations to be selected using left and right click, starts selection if not present.
* Player needs to be considered an admin in the region, or have the `zones.subcreate.other` permission
* `/zone delete`: Deletes an existing region.
* Usage: `/zone delete `
* Requires the `regionKey` of the region to be deleted.
* Player needs to be the owner of the region, or have the `zones.delete.other` permission
* `/zone expand`: Expands an existing region by a specified amount.
* Usage: `/zone expand [overlap]`
* Player needs to be an admin of the region, or have the `zones.expand.other` permission
* If `overlap` is set to `true` and the player has the `zones.expand.overlap` permission,
* the region will be expanded even if it overlaps with other regions.
* `/zone info`: Displays information about a region.
* Usage: `/zone info [regionKey]`
* If `regionKey` is not provided, the region at the player’s location will be used.
* To show region members, the player needs to be an admin of the region, or have the `zones.info.other` permission
* `/zone list`: Lists all regions the player is a member of.
* Usage: `/zone list`
* Only shows regions the player is a member of, unless the player has the `zones.list.other` permission
* `/zone cancel`: Cancels the current region selection.
* Usage: `/zone cancel`
* `/zone set`: Sets a permission for a member of a region.
* Usage: `/zone set `
* `` is the key of the region.
* `` who to set the permission for.
* e.g., `Player1` – to create or modify a group, use `+group-GROUPNAME`, where GROUPNAME can be any name.
* `` is the permission to set (e.g., `role`, `break`, `place`, `interact`).
* `` is the value to set for the permission (
* e.g., `owner`, `true`, `false`, `*`, `!*`, `GRASS_BLOCK`, `!GRASS_BLOCK`).
* `/zone rename`: Renames a region.
* Usage: `/zone rename `
* `` is the key of the region, `` is the new name of the region.
* Player needs to be an admin of the region, or have the `zones.rename.other` permission
* `/zone select`: Selects a region.
* Usage: `/zone select [regionKey]`
* If `regionKey` is not provided, the region at the player’s location will be used.
* Visually highlights the region in the world using particles.
* Player needs to be a member of the region, or have the `zones.select.other` permission
* `/zone mode`: Changes the selection mode.
* Usage: `/zone mode `
* `` is the new mode to set the player to.
* e.g., `3d` for 3D selection mode, `2d` for 2D selection mode.
* `/zone save`: Manually saves all regions to file.
* Usage: `/zone save`
* Admin only, requires the `zones.save` permission (not given by default)
* `/zone load`: Manually loads all regions from file.
* Usage: `/zone load`
* Admin only, requires the `zones.load` permission (not given by default)
* `/zone import`: Imports regions from another plugin.
* Usage: `/zone import `
* Currently only supports WorldGuard.
* Admin only, requires the `zones.import` permission (not given by default)
## Usage
### Creating a Region
1. Use the `/zone create` command to start the creation process.
2. Use left-click on a block to set the first corner of the region. A green beacon will appear.
3. Use right-click on a block to set the second corner of the region. A red beacon will appear.
4. Use the `/zone create` command to create the region.
### Creating a Sub-Region
1. Use the `/zone subcreate` command to start the creation process.
2. Select the two corners of the sub-region as described above.
3. Use the `/zone subcreate` command to create the sub-region within the region you are standing in or
use `/zone subcreate ` to create a sub-region within the specified region.
### Setting Permissions
1. Use the `/zone set ` command to set permissions for a member of a region.
* Example: `/zone set Player1 break true` allows “Player1” to break blocks in the specified region.
* Example: `/zone set Player2 break GRASS_BLOCK` allows “Player2” to break only `GRASS_BLOCK` blocks
in the specified region.
* Example: `/zone set Player3 interact !OAK_DOOR` denies “Player3” to interact with `OAK_DOOR`in
the specified region.
* Example: `/zone set Player4 place *` allows “Player4” to place all blocks in the specified region.
* Example: `/zone set Player5 break !*` denies “Player5” to break all blocks in the specified region.
* Groups:
* To assign a group, set the value of the permission `group` to the group name.
* e.g.: Create a group and assign permission: `/zone set +group-some-group-name break true`
* e.g. `/zone set ExamplePlayer group some-group-name`
* ExamplePlayer now inherits the permission `break` from the group `some-group-name`
### Viewing Region Information
1. Use the `/zone info` command to view information about the region you are standing in.
2. Use the `/zone info ` command to view information about a specific region.
## Integrations
### WorldGuard
Zones supports importing WorldGuard regions via the `/zone import WorldGuard` command. To use this feature,
you must have WorldGuard installed and enabled. Zones will automatically import all Cuboid regions, including
their members.
### WorldEdit
WorldEdit can only be used to modify blocks in a region if the executing player would be allowed to manually
modify the region.
### PlaceholderAPI
Zones provides multiple placeholders for use with the PlaceholderAPI plugin, displaying region information for the
region the player is standing in. It currently supports the following placeholders:
* `%zones_get_name%`
* `%zones_get_key%`
* `%zones_get_members%`
* `%zones_get_owner%`
* `%zones_get_min%`
* `%zones_get_min_x%`
* `%zones_get_min_y%`
* `%zones_get_min_z%`
* `%zones_get_max%`
* `%zones_get_max_x%`
* `%zones_get_max_y%`
* `%zones_get_max_z%`
* `%zones_is_member%`
* `%zones_can_place_hand%`
* `%zones_can_break_target%`
* `%zones_can__%`
## Design Choices
* **YAML Configuration:** The plugin uses YAML files for configuration and storage, making it easy to read and modify.
Additional storage options are planned for future releases.
* **Permission System:** The permission system is designed to be flexible and granular, allowing for fine-grained
control over player interactions.
* **Event-Driven:** The plugin uses Bukkit’s event system to handle player interactions, making it efficient and
responsive.
* **Caching:** The plugin uses a caching system to improve performance when checking permissions.
## Contributing
Contributions to the plugin are welcome! If you have any ideas for new features, bug fixes, or improvements, please feel
free to submit a pull request or open an issue.
## License
This plugin is distributed under the MIT License.