Controlify (Controller support)


![Controlify – Controller support for Minecraft Java](https://raw.githubusercontent.com/isXander/Controlify/multiversion/dev/assets/controlify-banner.png)

supports fabric loader
supports neoforge loader

![wakatime](https://wakatime.com/badge/user/75903a5e-3254-43c5-b168-b082ed4dfc1b/project/62700873-0895-4dae-8159-86692dcceb33)
![Modrinth download count](https://modrinth.com/mod/controlify)
![CurseForge download count](https://curseforge.com/minecraft/mc-mods/controlify)

![https://cdn.jsdelivr.net/npm/@intergrav/devins-badges@3/assets/compact/donate/patreon-singular_vector.svg](https://patreon.com/isxander)

A mod that adds the best **controller support** for Minecraft: Java Edition.

# SPLITSCREEN!

(Advertisement)

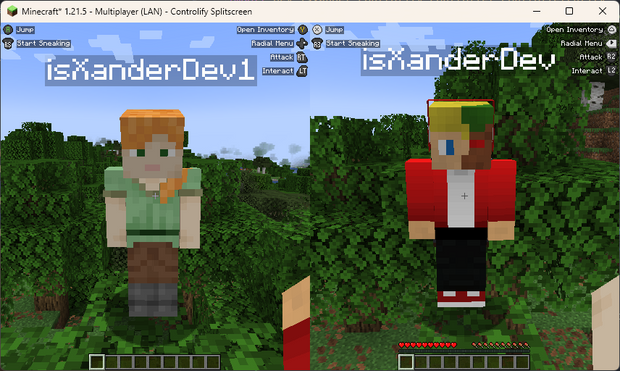
Controlify Splitscreen is a **separate mod in development** that adds splitscreen support to the game! JARs are currently only available on Patreon!

![https://cdn.jsdelivr.net/npm/@intergrav/devins-badges@3/assets/compact/donate/patreon-singular_vector.svg](https://patreon.com/isxander)

![splitscreen demo](https://cdn.modrinth.com/data/cached_images/23ac6e3fc051e7aaa473ef3af2c510399d9448cc.png)

## Wiki

Read up on the Controlify Wiki for more information on how to use Controlify, how to configure it, and how to develop for it.

## What is Controlify?

Controlify is the best controller support mod for Minecraft: Java Edition. It exceeds the first-party Bedrock Edition controller support in every way possible. It is feature-complete, with support for vibration, gyroscope, HD haptics, and more.

Controlify supports *all* controllers, thanks to its usage of the SDL3 library, which is the most advanced cross-platform input library available.

Controlify is designed to be both user-friendly and feature-rich. It has sensible defaults, with default sensitivity matched to Bedrock Edition for easy transition, and a simple yet informative settings screen that allows you to tweak your experience to your liking.

## Feature overview

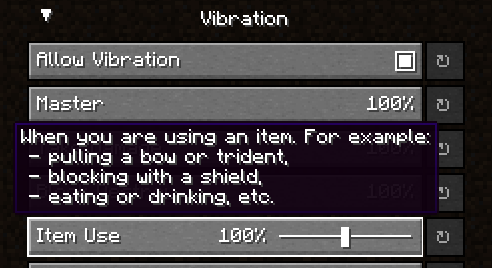
– **Vibration support**; Controlify vibrates your controller upon events such as taking damage, breaking blocks, lightning strikes.
– **Gyroscope support**; Controlify can use the gyroscope in your controller for precise aiming.
– **Vendor-specific input support**; Controlify supports reading paddles, mute buttons (and their LEDs), touchpads, and more, on some controllers including Xbox, DualSense and Steam Deck.
– **GUI operation**: Controlify allows you to navigate all Minecraft GUIs with your controller, without needing a mouse or keyboard. This includes the inventory, out-of-game menus, and modded GUIs. It features cursor snapping in inventory screens, allowing you to use your controller without needing to be precise with your cursor movements.
– **DualSense/DualShock support**; Controlify does not require any additional software for PlayStation controllers, even on Windows.
– **Controller identification**; Controlify has bespoke button glyphs for many controller models, including Xbox, Playstation, Nintendo Switch, Steam Deck, and more.
– **On-screen keyboard**; Controlify includes a fully functional on-screen keyboard that allows you to type with your controller – truly no keyboard needed!

– **Radial menu**; Controlify features a configurable menu that allows you to bind less-used actions to a radial menu, saving up buttons.
– **DualSense HD haptics** support; Controlify allows for advanced vibration effects on DualSense controllers.
– **DualSense adaptive triggers support**; Controlify allows for advanced trigger effects on DualSense controllers.
– **Data-driven design**; Controlify allows resource packs to change default bindings, theme button glyphs, on-screen button guides, on-screen keyboard layouts, add more controller models, and more.
– **Steam Deck support**
– **Mod compatibility**; Controlify has led the efforts to make controller support work seamlessly with mods like Sodium, Iris, Simple Voice Chat, Do A Barrel Roll, and more.
– **Cross-platform and multi-version**; Controlify works on Fabric and NeoForge, and actively supports and updates for Minecraft versions 1.21.1 and above.
– **Quick to update**; Controlify is updated even for Minecraft snapshots, although snapshot builds are only available to patreon members.
– **Joystick support**; Controlify supports flight sticks, racing wheels, and other non-standard joysticks. Users of such devices have the option between mapping the joystick to a standard gamepad, or creating their own custom bindings and defaults and glyphs for the joystick, allowing for a fully-featured experience.

## Who uses Controlify?

The following is actual feedback I have received from users of Controlify, and I’m very proud to have been able to help them enjoy Minecraft in a way they couldn’t before:

– Couch gamers who want to sit back and relax playing their favourite edition of Minecraft.
– First-time modded players who have previously played Minecraft on a console and don’t want to learn how to use a keyboard and mouse.
– People with accessibility requirements who cannot use a keyboard and mouse and/or requires an adaptive controller.
– Parents who want to expose their kids to modded Minecraft in an accessible manner.
– People who just prefer using a controller over a keyboard and mouse.
– People who want to play local multiplayer with their friends and family using the companion Splitscreen Mod
– Hopefully you!

## Features

### Controller vibration

Controlify supports controller vibration, which has not been seen before for PC versions of Minecraft,
including Bedrock Windows 10 Edition. Configure the intensity of each vibration source, with
complex vibration patterns for lots of aspects of the game (e.g. when you take damage).
![picture of vibration config](https://cdn.modrinth.com/data/DOUdJVEm/images/8a7809d07d9e1d9e3002007d7e5e13b73ce8fb5b.png)

### Radial menu

![radial menu showcase](https://cdn.modrinth.com/data/DOUdJVEm/images/e56d9be363b2b31440e16018cc01f197848b7ac6.webp)

To save up some buttons on your controller, dedicate some less-used actions to the radial menu.
It is fully customizable through the settings and intuitive to use. Any modded keybind is
compatible with this menu.

### Gyro support

Controlify has built-in support for controller gyroscopes, allowing you to make fine movements in-game
with your controller. This can be combined with flick stick to be able to use a controller without
the compromise.

### Container cursor

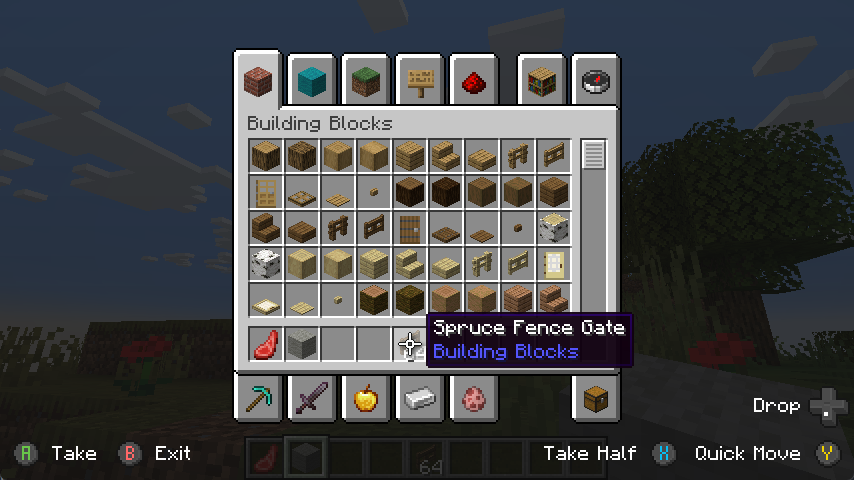
Just like in bedrock edition, you can move a cursor across your inventory, and interact
with it in a controller-friendly way. With dedicated buttons for quick move, dropping etc. Controlify also comes with cursor snapping, so you don’t need to be so precise with cursor movements.
![container cursor screenshot](https://cdn.modrinth.com/data/DOUdJVEm/images/249a2cbaea9b374b33fe67717380e732693dd37a.png)

### Controller identification

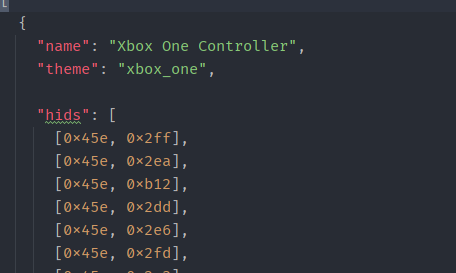
Controlify has the ability to identify the make and model of your controller automatically,
and displays relevant button textures for your controller. This is also extendable by resource packs, changing up the button textures in a different style and adding some of your own, more niche controller identifiers.
![demonstration of data-driven identification](https://cdn.modrinth.com/data/DOUdJVEm/images/ec1408d51787b87525b9fb0f2e56b54c5910d384.png)

### Joystick support

You can connect any joystick to the mod and map it with your own names and textures, with an unlimited amount of inputs per controller.

### Button guide

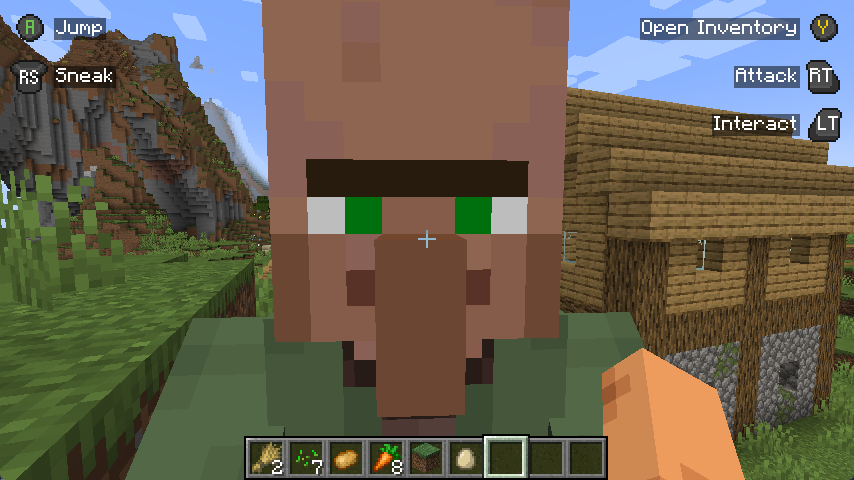
There is a simple overlay in-game that displays the buttons you can press
based on your player’s state and look direction. This is useful for new players, who
have not yet memorised the controls.
![image of in-game button guide](https://cdn.modrinth.com/data/DOUdJVEm/images/57c41cee14680c74faf947c5cff355c0af4c35b3.png)


Also, some GUIs display controller buttons on elements that have a controller shortcut, to easily navigate with a controller like you should be able to.
![image of in-screen button guide](https://cdn.modrinth.com/data/DOUdJVEm/images/511e4182137bb27bbdf95539c8265b9af2038761.webp)

### Containerised Controllers

This mod is built around the fact that each controller is completely separate, with it’s own configuration, bindings etc.
This means it will be trivial to add support for split-screen play in the future.

### Built for mod compatibility

GUI operation has been abstracted into a simple API, which allows other mods to easily add support for their own GUIs,
without convoluted support throughout the whole mod’s codebase, making it difficult for third parties to integrate.

![demonstration of dabr compat](https://cdn.modrinth.com/data/DOUdJVEm/images/8ee5ec167bc5f8be96da725b10707094559138cb.gif)

*Video recorded using do-a-barrel-roll with a Thrustmaster HOTAS flightstick*

### Automatic controller deadzone calibration

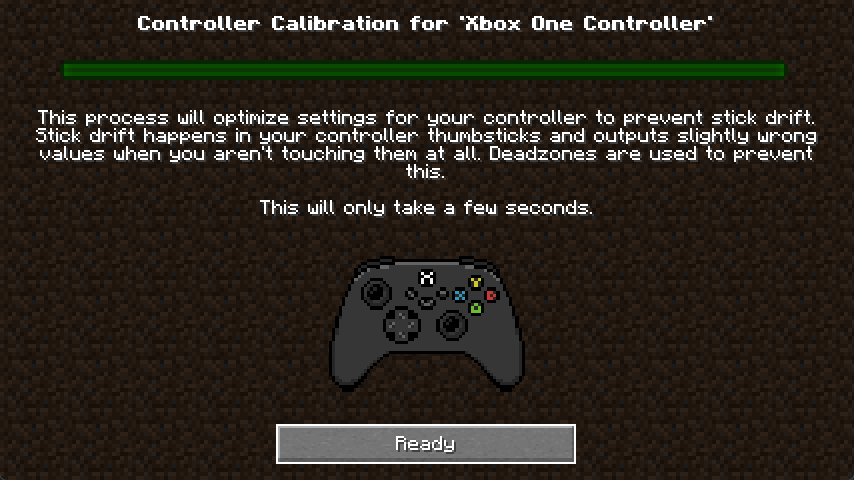
The deadzone values of your controller are automatically calibrated,
meaning you don’t have to worry about it.
![image of calibration screen](https://cdn.modrinth.com/data/DOUdJVEm/images/f5f8e2a0a05e61adb95dd919760b424165ca5d14.png)

## Backports?

This mod is only and will only be available for **1.19.4** and above, this is because in 1.19.4, Mojang
introduced arrow key navigation which was easily ported to controller, below 1.19.4, this is not possible.


Config Backuper

A simple mod for backing up all configurations at the start of Minecraft.

## Mod review with subtitles

## Features

– Backs up configurations at the start of Minecraft
– Backs up game configurations
– Backs up mod configurations
– Backs up shader configurations
– Compression of backups
– Removes old backups

## Configuration

The configuration file is located at `config/config-backuper.json`.

– `includeGameConfigs` – add game configurations to the backup
– `includeModConfigs` – add mod configurations to the backup
– `includeShaderPackConfigs` – add shader configurations to the backup
– `maxBackups` – maximum number of stored backups (`-1` disables deletion of old backups, default `10`)
– `compressionEnabled` – use compression for backups (enabling compression reduces the size of the backup, but slows down its creation a bit)
– `backupFolder` – directory for backups (`./` – current game directory)
– `backupFilePrefix` – prefix for backup file names
– `backupFileSuffix` – suffix for backup file names

## Modpacks

You can use this mod in modpacks without requesting permission.

Compost

*Create compost based on what you toss into a composter!*

### Get more than just bone meal!
Compost modifies the vanilla composter to allow you to change what compost you get out of it! With version 3.x, the composter now uses a vanilla styled loot table for generating compost, offering the vast configurability that loot tables make possible. Simply create a data pack with a `compost:composter` loot table to use your own configuration!

You can make some items renewable that should be but are not, create deep interactions with different compostables for a complex and realistic compost, or simply make the compost give a modded compost item. The choice is yours!

### Let the world change your compost!
Compost supports using origin-based conditions in your loot table. You can have compost that generates only under certain light levels, elevations, biomes, dimensions, and more! Have a mod that adds an origin-based condition such as one that checks if it is snowing? Compost can use that to determine what compost is created, allowing nature to play a distinct role the composting process.

### Grow compost based on what compostables you add to it!
Compost adds a loot condition for matching what compostables have been used on the composter, so what you put in can determine what you get out! Want a chance of getting apple seeds when you compost apples? How about modded mulch when you compost saplings? Compost gives you the ability to do such and more!

Please note that the default compost loot table is designed to showcase Compost’s compostable matching condition to make bone meal available for villager farmers. You may also find mushrooms growing in your compost when the composter is rained upon in game versions that support the necessary conditions.

### Get the goods!
You can find releases of Compost on both *[Modrinth]* and *[CurseForge]* and also access development builds on *[GitHub]*!

Compost supports Fabric 1.16+, Forge 1.16+, and NeoForge 1.20.2+.

### Figure it all out!
You can delve into the *[wiki]* for details or submit a *[bug report]* if something isn’t quite right!

Still need something? Head on over to the *[discussions]* forum for support, to read announcements, or discuss anything about the mod!

[Modrinth]: https://modrinth.com/mod/compost
[CurseForge]: https://www.curseforge.com/minecraft/mc-mods/compost
[GitHub]: https://github.com/yurisuika/compost
[wiki]: https://github.com/yurisuika/compost/wiki
[bug report]: https://github.com/yurisuika/compost/issues
[discussions]: https://github.com/yurisuika/compost/discussions
[Discord]: https://discord.gg/0zdNEkQle7Qg9C1H

Nek’s Command Maker (Server Edition)

If you were wondering, yes I did change the icon.

This is the **server edition** of Command Maker. Click here to see the Client Edition. ( visit legacy download page for CMDMaker Client Edition Download Page if you got a 404 error for the other link.)


# 📦 Nek’s Command Maker Server Edition

A lightweight Minecraft mod that lets you define custom commands using aliases—perfect for server scripting, modpacks, or ritual triggers. No external files, no dependencies beyond Fabric API.


## How to download and install

https://commandmakerwiki.lucasgeitgey.com/install-video.html


### 🔧 Features
– Add commands dynamically via in-game chat
– Reload config without restarting
– Fully JSON-driven and vanilla-compatible

### 📝 Usage

Use `/addcommand` to manage your custom commands:

“`bash
/addcommand add
“`
Adds a new alias that runs the specified command.

“`bash
/addcommand del
“`
Deletes the alias and its associated command.

“`bash
/addcommand reload
“`
Reloads the config file and updates all aliases.
Visit the **wiki** for more information.

### 📁 Config Format

Commands are stored in a simple JSON file (modid_alieses.json) like:

“`json
{
“crashme”: “kill @s”,
“greet”: “say Hello, world!”
}
“`

### 🧪 Example

“`bash
/addcommand add crashme kill @s
/addcommand add greet say Hello, world!
“`

Then just run `/crashme` or `/greet` in chat!

## Telemetry Data

Every time you start the game with the mod, a HTTP request is sent to commandmakerwiki.lucasgeitgey.com /redirects/telemetry.html. to Opt-Out, set ‘send-telementry’ to ‘false’ in telemetry.yml. The data sent is a HTTP GET request, to see how many people use the mod.
_Note: Telementry Data has been removed in 2.3.5_


## Downloading Functions

You can use /cmd downloadfunction to download functions.
You can see the function list, and request to add new ones here.

🛠️ This is my first time making a Minecraft mod, so there may be bugs or quirks. If you find any issues, feel free to report them!


**If you would like to make a feature request, please visit here.**

**If you would like to make a bug report, please visit here.**

**If you would like to otherwise make a comment please visit here**

![build](https://github.com/Diamondstar-Mods/Minecraft-Command-Maker/actions/workflows/build.yml)
![Dont ask for forge or ill steal your kneecaps](https://cdn.modrinth.com/data/cached_images/6277c08394b765898482a906b1fe6c0ca90d28be.png)

CTE – Combine The Experience

RU:
Этот датапак объединяет сферы опыта в одну, **сохраняя их ценность**. Он немного оптимизирует игру, а также не заставляет ждать впитывания всего опыта. По умолчанию объединяет опыт на растоянии 2 блоков, но с CTE v3 можно выбрать своё растояние с момощью `/function cte:menu` прямо внутри игры.

_Если я забыл обновить на последнюю версию mc, то обновлю по запросу._

EN:
This datapack combines the spheres of experience into one, **preserving their value**. It optimizes the game a bit, and also does not make you wait for the whole experience to be absorbed. By default, it combines the experience at a distance of 2 blocks, but with CTE v3, you can select your distance with the power of `/function cte:menu` right inside the game.

_If I forgot to upgrade to the latest version of the mc, I will update it on request._

Colorize

# colorize
Right click with the item on some blocks to change them!

### Supported Blocks:
– Dyes (to color them):
– Banner
– Bed
– Candle
– Carpet
– Concrete
– Concrete Powder
– Glazed Terracotta
– Shulker Box
– Stained Glass Block
– Stained Glass Pane
– Terracotta
– Wool
– Amethyst Shard:
– Glass (creates Tinted Glass)
– Vines to create Mossy variants _(with sneaking by default)_:
– Cobblestone
– Cobblestone Slab
– Cobblestone Stairs
– Cobblestone Wall
– Stone Bricks
– Stone Brick Slab
– Stone Brick Stairs
– Stone Brick Wall

### Looking for Minecraft server? Visit BedrockHost.pl and Minecraft-Servers.gg

CobbleGen

CobbleGen

CobbleGen


An MC mod that allows you to customise/randomise cobblestone (basalt and stone) generator.


![partner](https://bisecthosting.com/ziro2264)

## About

**CobbleGen** is an MC mod that allows you to customise/randomise cobblestone (basalt and stone) generator.

As of v5.0, CobbleGen is officially supported for both Fabric-like and Forge-like modloaders. Because of how the mod is designed, the mod should still work on future versions of Minecraft, just don’t expect integration (such as Create mod integration, REI/EMI/JEI integration) to work properly. Click here to see detailed version tracker.

The Fabric JAR should work on Quilt, the mod is designed to only rely on Vanilla code as much as possible.

The Forge JAR should also work on NeoForge (MC 1.20.1 only). Support for Forge will be stopped at MC 1.20.1, please consider migrating to NeoForge to use CobbleGen on Forge for MC 1.20.2 or newer!

### Features

– Supports Fabric/Quilt and NeoForge/Forge
– REI/EMI/JEI Integration
– Customisable cobblestone, stone, and basalt generator
– Randomised the generated block with a customisable weight value
– Customisable modifier to give your players more challenge
– Dimension whitelist/blacklist
– Y-level limiter
– Supports tag (put `#mod_id:tag_id` instead of putting `mod_id:block_id`)
– Supports Create mod
– Pipe/Pump support
– Porting Lib compatibility on Fabric/Quilt (Fixes Limestone and Scoria Generators)
– Advanced custom generator (custom fluid interaction)
– Fluid Interaction API for developers

More features are coming soon!

#### Planned Features
– Modifier(s) position (No longer limited to “below generated block”)
– Webapp for modpack developers to easily configure the generators
– Biome whitelist/blacklist

### Usage

This mod is mostly server-side, but it’s recommended to also have it installed in the client-side for REI/EMI/JEI support.

Out of the box the mod doesn’t do much, it will generate default config where cobblegen generates deepslate at deepslate level, random ores when there’s bedrock underneath generated block, etc. To use the mod to its full potential you need to configure it yourself.

## Configuration

If you’re not familiar with JSON you could try CobbleGen Configurator, but keep in mind that the website is still work-in-progress, so some features are still missing from the website.

The mod provide you with 3 layers of config: default, custom, and advanced.
– **Default**: The most basic modification, it lets you to replace vanilla generated block. E.g. tell the gen to generate Diamond Block instead of Cobblestone.
– **Custom**: Lets you to modify the generator’s modifier, similar to how you require to have Soul Soil to generate Basalt, but works with any type of generator. E.g. tell the gen to generate Ores when the block is generated above Bedrock.
– **Advanced**: Lets you to modify fluid interaction, you can use it to use modded fluid to generate a block. E.g. tell the gen to generate Diamond Block if Honey fluid touches Milk fluid.

The config file is located in `config/cobblegen.json5`, the format should be pretty straightforward:

Format

**Default Generators format**
“`json5
{
“id”:”mod_id:block_id”,
“weight”:95.5,
“dimensions”:[
“mod_id:dimension_id”,
“mod_id:dimension_id”
],
“excludedDimensions”:[
“mod_id:dimension_id”,
“mod_id:dimension_id”
],
“minY”:0,
“maxY”:69
}
“`

**Custom Generators format**
“`json5
{
“generatorType (cobbleGen/stoneGen/basaltGen)”:{
“mod_id:modifier_block_id”:[
{
“id”:”mod_id:block_id”,
“weight”:95.5,
“dimensions”:[
“mod_id:dimension_id”,
“mod_id:dimension_id”
],
“excludedDimensions”:[
“mod_id:dimension_id”,
“mod_id:dimension_id”
],
“minY”:0,
“maxY”:69
}
]
}
}
“`

**Explanation**
– All but `id` and `weight` are optional, you can remove them if you don’t need it, for example:
“`json
{
“id”: “minecraft:bedrock”,
“weight”: 1.0, // as you can see, there’s only id and weight here
}
“`
– Custom gen only:
– `generatorType`: **Need to be replaced** by either cobbleGen, stoneGen, or basaltGen
– `mod_id:modifier_block_id`: **Need to be replaced** by modifier block id of your choice (e.g. `minecraft:bedrock`)
– `id`: Block id of the generated block (e.g. `minecraft:iron_ore`)
– `weight`: Weight of the generated block (bigger number = more common)
– `dimensions`: Collection of dimension ids where the block can be generated (**It’s an array!**, e.g. `[“minecraft:the_end”, “minecraft:nether”]`)
– `excludedDimensions`: Collection of dimension ids where the block can **NOT** generate (**It’s an array!**, e.g. `[“minecraft:the_end”, “minecraft:nether”]`)
– `minY`: How deep can this block be generated (e.g. `0` means can only be generated from height limit to Y=0 (inclusive))
– `maxY`: How high can this block be generated (e.g. `0` means can only be generated from bedrock level to Y=0 (inclusive))

Default Generators Examples (Cobble/Stone/Basalt)

“`json5
{
// Cobblestone Generator
// { “id”: “mod_id:block_id”, “weight”: 95.5 }
“cobbleGen”: [
{
“id”: “minecraft:cobbled_deepslate”,
“weight”: 100.0,
“maxY”: 0
}
],
// Stone Generator
// { “id”: “mod_id:block_id”, “weight”: 95.5 }
“stoneGen”: [
{
“id”: “minecraft:stone”,
“weight”: 100.0
}
],
// Basalt Generator
// { “id”: “mod_id:block_id”, “weight”: 95.5 }
“basaltGen”: [
{
“id”: “minecraft:basalt”,
“weight”: 100.0
}
]
}
“`

Custom Generators Examples (with modifiers)

“`json5
{
// Custom Generator
// : { : [ { “id”: , “weight”: }, … ] }
“customGen”: {
// Cobblestone Generator
// { “id”: “mod_id:block_id”, “weight”: 95.5 }
“cobbleGen”: {
“minecraft:bedrock”: [
{
“id”: “minecraft:emerald_ore”,
“weight”: 2.0
},
{
“id”: “minecraft:diamond_ore”,
“weight”: 5.0
},
{
“id”: “minecraft:lapis_ore”,
“weight”: 8.0
},
{
“id”: “minecraft:gold_ore”,
“weight”: 10.0
},
{
“id”: “minecraft:iron_ore”,
“weight”: 15.0
},
{
“id”: “minecraft:coal_ore”,
“weight”: 20.0
},
{
“id”: “minecraft:cobblestone”,
“weight”: 40.0
}
]
},
// Stone Generator
// { “id”: “mod_id:block_id”, “weight”: 95.5 }
“stoneGen”: {
“minecraft:bedrock”: [
{
“id”: “minecraft:stone”,
“weight”: 40.0
},
{
“id”: “minecraft:diorite”,
“weight”: 20.0
},
{
“id”: “minecraft:andesite”,
“weight”: 20.0
},
{
“id”: “minecraft:granite”,
“weight”: 20.0
}
]
},
// Basalt Generator
// { “id”: “mod_id:block_id”, “weight”: 95.5 }
“basaltGen”: {
“minecraft:bedrock”: [
{
“id”: “minecraft:end_stone”,
“weight”: 100.0,
“dimensions”: [
“minecraft:the_end”
]
},
{
“id”: “minecraft:blackstone”,
“weight”: 100.0,
“excludedDimensions”: [
“minecraft:the_end”
]
}
]
}
}
}
“`

Advanced Custom Generators (Custom Fluid Interaction) Examples

“`json5
{
// Advanced Custom Generator (Custom Fluid Interaction)
// Basic format:
// “advanced”: {: { : { results: {: [ { “id”: , “weight”: }, … ] } } } }
“advanced”: {
// Make sure to use still version of the fluid for this one,
// – “minecraft:lava” not “minecraft:flowing_lava”
// – “milk:still_milk” not “milk:flowing_milk”
// How the fluid’s ID is constructed depends on how the corresponding mod creator does things.
“minecraft:lava”: {
// replicates minecraft cobblestone and stone generator
// This one can be flowing or still version of the fluid, if still doesn’t work try flowing.
“minecraft:water”: {
// stone generator
“resultsFromTop”: {
“*”: [ // wildcard, accept any block as modifier
{
“id”: “minecraft:stone”,
“weight”: 100.0,
}
]
},
// cobblestone generator
“results”: {
“*”: [ // wildcard, accept any block as modifier
{
“id”: “minecraft:cobblestone”,
“weight”: 100.0,
}
]
}
},
// replicates minecraft basalt generator
“b:minecraft:blue_ice”: {
“results”: {
“minecraft:soul_soil”: [
{
“id”: “minecraft:basalt”,
“weight”: 100.0,
}
]
}
},
// custom andesite generator with basalt generator method
“b:minecraft:water_cauldron”: {
“silent”: true, // prevent extinguish sound from playing
“results”: {
“*”: [
{
“id”: “minecraft:andesite”,
“weight”: 100.0,
}
]
}
}
},
“milk:still_milk”: {
“b:minecraft:cobblestone”: {
“results”: {
“*”: [
{
“id”: “minecraft:diorite”,
“weight”: 100.0,
}
]
}
}
}
}
}
“`

## Compatibility
~~Any mods that modify fluid interaction behaviour potentially have a conflict with CobbleGen. With the exception of Porting Lib (the Create mod).~~

**Starting from v4.0**, CobbleGen has been rewritten to reduce mod incompatibility as much as possible.

CME is Bad

# Abstract
Players and modpack developers sometimes find the game crashed with `ConcurrentModificationExceptions` (CME) and `IndexOutOfBoundsExceptions` (IOOBE), which only give stacktrace of current thread and are hard to trace which mod causes them. Here’s one of the crashes which is caused by SimpleReloadInstance in 1.20.1 Forge:

![CME from SimpleReloadInstance](https://cdn.modrinth.com/data/cached_images/877cd1d1976b1969fffb619bdbd62b13244e02c8.png)

So this is what the mod is developed for. Players who install this mod and add javaagent to JVM Argument correctly will receive a full log for modification history of a certain collection:

![log of this mod](https://cdn.modrinth.com/data/cached_images/d3d00f23694f96591fc77d8387540d7ce29c078a.png)

# Usage
First, add this jar to mods folder.

Second, edit your Java Virtual Machine Argument in your launcher. Add `-javaagent:mods/CMESuckMyDuck-.jar=;;;`.

Finally, run the game, play and wait until the crash happens.

# Usage for Other Java Projects
This mod can not only be used for Minecraft debugging, but also be utilized to debug other java projects. Similar to Minecraft. The only different step is that you should add gson and asm jar to classpath (`-cp`) before javaagent, and add our `CMESuckMyDuck-.jar` to classpath after javaagent.

# Arguments
##
A full name of the class, which has a container that you would like to monitor. Use “ instead of `.` (a.k.a. the internal name of class).

##
A field name of the container in target class, which you would like to monitor. For Forge, use SRG name. For Fabric, use intermediary name. For NeoForge, use official name.

##
Currently, we only support three containers: `List`, `Set`, `Map`. This argument indicates the type of monitored container.

## `static` or `nonstatic`. This argument indicates the container is a static field or non-static field.

# How to get and
Let’s start with an example.

First, take a look at the stacktrace of CME/IOOBE:

![Replace this with a description](https://cdn.modrinth.com/data/cached_images/f4908f0fb44bc480d0fba4a1714bf9dbca4b8043.png)

Second, read the source code of SoundEngine and confirm which container is facing this issue:

![Replace this with a description](https://cdn.modrinth.com/data/cached_images/26c2eefabbde9a9ce3aea62dbfdf1012d736c16d.png)

Now we know we should monitor map `field_217942_m` (`instanceToChannel` in `SoundEngine`). Keep going.

Third, install this mod, and add “`-javaagent:mods/CMESuckMyDuck-1.0.0.jar=net/minecraft/client/audio/SoundEngine;field_217942_m;Map;nonstatic`” to Java Virtual Machine Argument. Relaunch the game and wait for the next crash.

Finally, open `CMESuckMyDuck.log` file and you will see which thread and which mod has concurrently modified the container.

# Examples (JVM Arguments)
## ConcurrentModificationException from SoundEngine in Forge 1.16.5 Environment
`-javaagent:mods/CMESuckMyDuck-1.0.0.jar=net/minecraft/client/audio/SoundEngine;field_217942_m;Map;nonstatic`

## ConcurrentModificationException from PotionBrewing in Forge 1.20.1 Environment
`-javaagent:mods/CMESuckMyDuck-1.0.0.jar=net/minecraft/world/item/alchemy/PotionBrewing;f_43494_;List;static`

## ArrayIndexOutOfBoundsException from Zeta mod
`-javaagent:CMESuckMyDuck-1.0.0.jar=org/violetmoon/zetaimplforge/event/ForgeZetaEventBus;convertedHandlers;Map;nonstatic`

# Other options
## Log Level
Use system property `-Dcme_suck_my_duck.log_level=` to set custom log level.

Default 1, which means no debug message will be logged.

Users can set it to 0 to output debug message, which is not recommended – query functions like Map#get, Set#containsAll will also be logged when set to 0, and make the file very very long.

## ASM API Version (v1.0.2+)

In order to maintain compatibility with the latest version of Minecraft, this mod is compiled with asm version 9.7. For older versions of Minecraft (such as 1.12.2), API level operations such as ASM_9 cannot be applied, so players need to use `-Dcme_suck_my_duck.asm_api_version=` to modify the ASM API version compatibility. For example, game version 1.12.2: `-Dcme_suck_my_duck.asm_api_version=5`.

## File Max Entries (v1.0.3+)

Since we notice that when crash happens, the last few operations in the log are much more important than the previous ones. So our mod adopts a paging strategy after v1.0.3, and only the last two pages are retained at the end. The number of logs output on each page (that is, the number of operation call stacks) is fixed, and the default value is 500. Players can use `-Dcme_suck_my_duck.file_max_entries=` to modify the maximum number of elements on the page.

## Whitelist of Constructor (v1.0.3+)

Sometimes a container in a certain class is used in many places (eg. CompoundTag#tags). Directly using this mod will cause the log to be too long or the valid content to be replaced by subsequent operations. Therefore, players can specify an additional constructor whitelist to monitor the corresponding container in the corresponding class of a specific module. The default is empty, that is, there is no whitelist. Players can use `-Dcme_suck_my_duck.whitelist_constructor_stacktrace=` to specify it. If any line in the stack trace where the container is constructed includes the content of the whitelist string, the container will be monitored – otherwise, the container will not be monitored, which greatly simplifies the log output information.

## Transform to Thread Safe (v1.0.4+)
Use system property `-Dcme_suck_my_duck.transform_to_thread_safe=true` to transform the field into a thread-safe container.

This is NOT recommended unless you like slowness and don’t want to fix the problem.

## Inject method (v1.0.4+)
Use system property `-Dcme_suck_my_duck.inject_method=true` to switch to inject mode.

If set, you should use `-javaagent:CMESuckMyDuck-.jar=;` and whenever this method is called, you will receive a stack trace in log files.

## Ignore threads (v1.0.5+)
Use system property `-Dcme_suck_my_duck.ignore_threads=;;;…` to ignore some thread that is expected to modify the given container (or call the given method). For example, `-Dcme_suck_my_duck.ignore_threads=”Server thread”`.

## Stop logging early (v1.0.7+)
Use system property `-Dcme_suck_my_duck.stop_logging_if_exception_created=false` to stop logging if critical error occurs.

## Trace ID Updater (v1.0.8+)
Use system property `-Dcme_suck_my_duck.trace_id_updater=;` to update trace ID when calling the given method. This might be useful in inject mode.

## Monitoring Local Variables (v1.1.0+)
Use system property `-Dcme_suck_my_duck.local_var_index=` to monitor local variable at given index in the given method.

If set, you should use `-javaagent:CMESuckMyDuck-.jar=;;`. By the way, the index can be reused by different local variables. So you might have to use `-Dcme_suck_my_duck.match_local_index=` to specify the ordinal of ASTORE operation to indicate which local variable to monitor.

# Conclusion
I like eating peking duck. It’s so delicious!

![Photo by Polina Tankilevitch: https://www.pexels.com/photo/close-up-photo-of-savory-peking-duck-dish-on-a-ceramic-bowl-5848604/](https://cdn.modrinth.com/data/cached_images/d4ce4bba6f0bef8780cd5843390bf3358dd9b55b_0.webp)

Clear wither hearts

Makes** withered hearts clear** to see if they are there or not.

Clear Lag

This data pack uses methods from server software like Spigot and Paper to optimize performance.
You can configure many settings and even enable a small anti-crash for your server.

# How to use
Use `/function clearlag:menu` to modify settings, view clear statistics and configure which clear/warning messages are shown.
# Methods this data pack uses
– Shorter item/experience orb despawn time (valuable items and death items wont get removed through clears)
– Automatic clears which remove all items in a configurable interval
– Freezes unused entities
– Merges experience orbs
– Removes collision from farm animals

The data pack was created with the aim of being high-performing and efficient, and should not cause any lag on its own.

## Server software
Works on vanilla, bukkit, spigot, paper, all forks of paper and modded servers.

Note: You should always prefer server software such as Paper as it has a lot more customizable options and overall performance that data packs can never reach. You should only use this data pack if you have to use vanilla or you still have a lot performance issues.

## Credits
Originally made by E4ry, modified with their permission: ClearLag Datapack