Weed Eater
# Please read the “how do I install it” section! Otherwise the pack won’t work correctly.
A resource pack for use with shaders supporting PBR materials. Aims to replicate the 128x pack included with Minecraft RTX for Bedrock, as that pack is encrypted and therefore cannot be converted to Java format for use.
Several packs of this nature are already on the market. So why did I set out to make another, and why should you use it? Well, I have tried all those packs, and all of them lack consistency, correctness (specifically as outlined in this guide), or both. And I grew dissatisfied with having to give the least problematic option to people asking for recommendations. Since this is not a particularly difficult art style to replicate, I felt I could do better, and by taking advantage of batch generation techniques I was able to fully complete all blocks in well under a week.
Note: it’s been a couple years since I wrote the above. I am no longer sure of the state of other resource packs. Use whatever you like most!
## Which version do I download?
Use the LABpbr version for shaderpacks listed here, otherwise use the OLDpbr version. Both have the pack formats for 1.18, but they should work fine down to 1.13, just ignore the warning. For 1.13 you should resize (see next section) the Jappa textures from 1.14 instead of the old textures from 1.13, as they use the same format the resized pack will still load.
## How do I install it?
IMPORTANT PLEASE READ
The vanilla textures need to be upscaled to 128x for this to work. I haven’t included these, since they technically violate Mojang’s EULA. The other aforementioned packs do, so Mojang apparently doesn’t care about enforcement, but I want to err on the careful side. The recommended way to get these is to use this script which was kindly made for me by Bálint (you can find his work here, if you want you can try this pack with his shaders by running it through his converter). Unzip the download, run the bat file for Windows or sh for macOS/Linux, use 8 for the upscaling factor, and paste the resulting zip in your resourcepacks folder. You can load this pack above or below mine, it doesn’t matter.
## Why is it called Weed Eater?
It’s parodying this meme. See also my pack description, “in the future, resource packs will be automatically generated!”
WebStats

**View statistics from the scoreboard, PlaceholderAPI placeholders and other plugins in a web page!**
## Features
– **Multiple sources:** WebStats can combine statistics from these sources:
– **Scoreboard** objectives
– **Placeholders** (requires PlaceholderAPI)
– **MySQL database:** with a customisable configuration, you can gather statistics from any plugin
– **Discord integration:** You can add WebStats as a webhook to your Discord server.
– **SkinsRestorer integration:** When present, WebStats will display player heads from SkinsRestorer (also for offline-mode and bedrock players).
– **Player head display:** The plugin uses the service provided by mc-heads.net to automatically display player heads next to the names.
– **Objective sorting:** Click on the column headers to sort on that objective. Clicking again reverses the sort.
– **Automatic data updates:** By default, WebStats refreshes the data every 10 seconds, though this is configurable and can also be disabled.
– **Online / AFK status:** When EssentialsX is present, WebStats uses it to mark AFK players. Otherwise, you will still be able to see who is online.
– **Online player filter:** You can filter to only display online players for if you have many players.
– **Pagination:** For webpage performance, max 100 players are displayed by default with next/previous page controls.
– **Objective filtering:** In the config file, you can filter which scoreboard objectives should be visible on the webpage. By default, the filter only contains `’*’`, which means all objectives.
– **Custom column order:** By default, columns are displayed in alphabetical order. You can set your own order and select which columns should be shown.
– **Statistics export:** Save the statistics in a `.csv` file so you can make nice graphs.
## Installation
There are two ways to use WebStats: with your own server (more customisable) or with an integrated server (easier). The download contains the plugin jar plus a javascript file, you only need the javascript file for when you are using your own webserver.
For both methods, you need to open a port on the Minecraft server for the plugin to communicate over. Make sure to change the port number in config.yml (and in the web client initialisation when using your own server).
### Using integrated web server
Set `serve-webpage` in the config file to `true` and restart. That’s it.
### Using own web server
Copy the Javascript file from the zip file and import it as a Javascript module. You also need to initialise WebStats when the page loads, more detailed information and an example are present on Github.
Please refer to the Github wiki for more information about the configuration file. It also has pages with more detailed information for some features.
## More info
I have made a simple demo page with dummy data for you to try out: demo
For more in-depth information, please see the Github wiki.
If you need help, or for bug reports, feedback and suggestions, please open an issue on https://github.com/Dantevg/WebStats/issues, or post in the Spigotmc forum thread.
WebSenderReloaded
WebSender Reloaded, ready to help you!
Send a command to your Minecraft or Hytale server via DrawWEB or similar web scripts.
– Send command with PHP your Bungee, Velocity or Bukkit server!
– BungeeCord/Velocity and Spigot support!
– %100 Customizable config!
– Fast socket system!
– Multiple server support!
– /websender command. Perm: websender.admin
– Important: When you install the plugin, make sure to change the password, otherwise the plugin will not work. Also, if you change the websender port, enter a port that is not used elsewhere on your server.
**Important:** When you install the plugin, make sure to change the password, otherwise the plugin will not work. Also, if you change the websender port, enter a port that is not used elsewhere on your server.
**PHP EXAMPLE:**
If you downloaded version 1.0.1 or lower, the contents of the folder named “ExamplePHP” in the zip are incorrect, you can download version 1.0.2 or 1.2 to get the correct examples.
**Configuration for Plugin v1.5+ (Important)**
If you have installed version 1.5 or higher, you must configure your
“`
WebsenderAPI.php
“`
file according to your server’s Java version. Please follow the steps below.
**Step 1: Update the WebsenderAPI.php File**
1. Open the **.zip** archive you downloaded for the plugin.
1. Find the **WebsenderAPI.php** file located inside the ExamplePHP folder.
1. Replace the existing **WebsenderAPI.php** file on your website with this new one.
WebConsoleServer
# WebConsoleServer
A Minecraft plugin that exposes your server console through a WebSocket connection. Built for groupez.dev, a test server generator for paid plugins.
## Features
– Real-time console log streaming via WebSocket
– Password-protected authentication
– Log history persistence (loads previous logs on client connection)
– Support for both **Spigot/Paper** and **Velocity** platforms
– Included test web page for quick testing
## Supported Platforms
| Platform | Minecraft Version | Java Version |
|———-|——————-|————–|
| Spigot/Paper | 1.8.8+ | Java 8+ |
| Velocity | 3.3.0+ | Java 21+ |
## Test Web Page
A test web page is included in the `web/` folder. Open `web/index.html` in your browser to connect to the WebSocket server and view console logs in real-time.
## Installation
1. Download the appropriate JAR for your platform from Modrinth
2. Place the JAR in your server’s `plugins` folder
3. Restart your server
4. Configure the plugin in `plugins/WebConsoleServer/config.properties` (Velocity) or `plugins/WebConsoleServer/config.yml` (Spigot)
## Configuration
“`properties
# IP address to bind the WebSocket server (use 0.0.0.0 for all interfaces)
websocket-host=0.0.0.0
# Port for the WebSocket server
websocket-port=8765
# Password for WebSocket authentication (leave empty for no authentication)
websocket-password=changeme
# Maximum number of log lines to keep in history
max-log-history=500
“`
## WebSocket Protocol
### Authentication Flow
1. Client connects to `ws://host:port`
2. Server sends `{“type”:”auth_required”}`
3. Client sends `{“type”:”auth”,”password”:”your_password”}`
4. Server responds with `{“type”:”auth_success”}` or `{“type”:”auth_failed”}`
5. On success, server sends log history followed by `{“type”:”history_complete”}`
### Message Types
| Type | Direction | Description |
|——|———–|————-|
| `auth_required` | Server → Client | Authentication is required |
| `auth` | Client → Server | Authentication request with password |
| `auth_success` | Server → Client | Authentication successful |
| `auth_failed` | Server → Client | Authentication failed |
| `log` | Server → Client | Console log message |
| `history_complete` | Server → Client | All historical logs have been sent |
### Log Message Format
“`json
{“type”:”log”,”message”:”[12:34:56] [INFO] [ServerName]: Your log message here”}
“`
## Building from Source
“`bash
# Build all modules
./gradlew build
# Output JARs are located in target/
# – WebConsoleServer-Spigot-1.0.jar
# – WebConsoleServer-Velocity-1.0.jar
“`
On Windows, use `gradlew.bat` instead of `./gradlew`.
## License
MIT License
## Links
– groupez.dev – Test server generator for paid plugins
– Github – Source code
WeazyLink
# **WeazyLink**
WeazyLink adds **/linkaccount** to your server and connects your Minecraft server with Discord, making it easier for moderators to manage the community. With WeazyLink, players can link their Minecraft accounts to their Discord profiles, which helps prevent impersonation and makes player identification much easier.
## Features
– Easy Account Linking: Players can use the /linkaccount command in-game to generate a unique code. This code can be used in your Discord server to link their Minecraft username with their Discord ID.
– Database support: WeazyLink uses json file by default. But for larger communities, you can use databases like MongoDB and MySQL too.
– Simple Setup: WeazyLink is easy to install and configure, so you can get started quickly without any hassle.
### Thank you!
Survival Weather Control
### DESCRIPTION
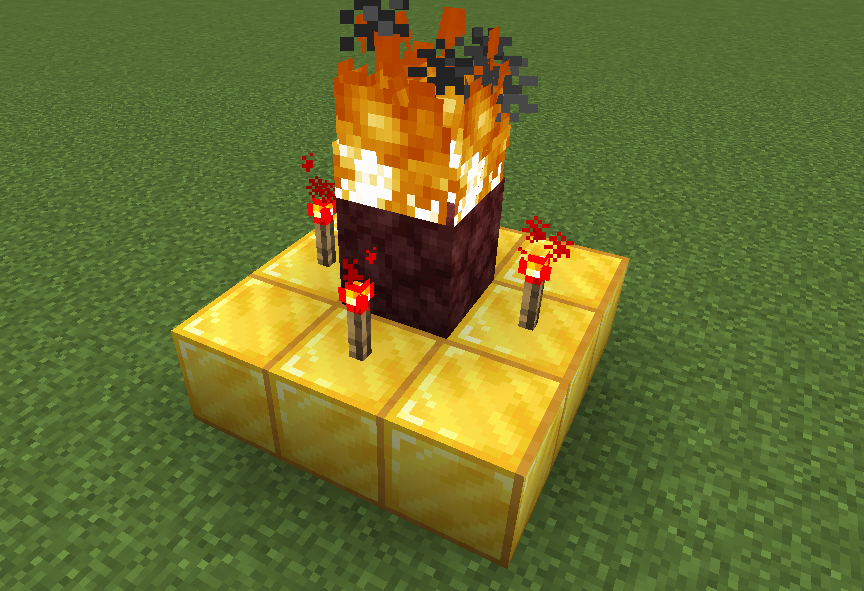
This data pack allows you to summon a thunderstorm using the classic altar used to summon herobrine! To do it, simply build the altar (place 9 gold blocks in a 3×3 arrangement with a lit netherrack block in the center surrounded by 4 redstone torches) and walk in the fire to “sacrifice” your health.
### INSTALLATION GUIDE
– go to your saves folder located here on Windows:
“`
C:Users(your name)AppDataRoaming.minecraftsaves
“`
put the zipped file in the data packs folder, and either restart your world or execute /reload
### OTHER THINGS TO NOTE
– gold blocks will turn into copper blocks upon usage
– for feedback, bug reports, or other help, join the discord server from the links section of this page!
WeaponsPlus
This mod adds 4 new swords to the game.
– Nether Star Sword
– Beacon Sword
– Blaze Sword
– Slime Sword
– The nether star sword is slightly faster than a normal sword and is pre-enchanted with a few level 5 enchantments.
– The beacon sword, while not having much durability, grants regeneration 2 when held.
– The blaze sword is pre-enchanted with fire aspect 2.
– The slime sword is pre-enchanted with knockback 4
We recommend Just Enough Items to view the recipies
Feel free to add this mod to your modrinth modpack
YDM’s Weapon Master
### Forge [1.7.10 / 1.8.9 / 1.9.4 / 1.10.2 / 1.11.2 / 1.12.2 / 1.13.2 / 1.14.4 / 1.15.2 / 1.16.2-5 / 1.17.1 / 1.18.2 / 1.19.x / 1.20.x / 1.21.x / 26.1.x]
### NeoForge [1.21.7 / 1.21.8 / 1.21.11 / 26.1.x]
### Fabric [1.20.1 -> 1.21.11 / 26.1.x]
With this Mod your Hotbar items will be visible on your Character, with a unique location for a Shield and Banner.
You can turn on or off the visibility for all of them one-by-one in the settings window (Press V to open it).
Good compatibility with other mod Items.
(With these types of Items: TieredItem (Sword), TridentItem, ShieldItem, BowItem, CrossbowItem, BannerItem, DiggerItem (Tools))
### **There are 3 versions available for this mod!**
1. A **Client-Only** where others won’t see these items on you, but you can use it on servers without any problems.
2. There is a **Multiplayer** version where others see you the same way you see yourself!
So if you hide some of your items with the toggle screen (can be opened with the V key by default)
other players won’t see those items on you.
**3. From v4.1.0+ the first 2 version in merged**
If you find any errors please let me know.
Only the latest minecraft version gets support!
Thanks for downloading my mod!
### IMPORTANT:
The Client-Only and Multiplayer version is merged from v4.1.0+
### Credits:
-russian translations: rey_zex
Weapon Pack
# Description
The “Weapon Pack” resource pack replaces the crossbow with a weapon when renaming. The resource pack contains 15 weapons, including: 4 assault rifles, 2 designated marksman rifles, 5 submachine guns, 2 sniper rifles, 1 shotgun and 1 pistol.
# List of weapons
Spoiler
### Ar
– M416
– M16a4
– Scar-l
– Akm
### Dmr
– Mini14
– Mk14
### Smg
– Tommy Gun
– Ump
– Uzi
– Vector
– P90
### Sr
– M24
– Awm
### Pistol
– P18c
### Sg
– S686
# Gallery
### M416

### Tommy gun

### Ump

### S686

More images in the Gallery tab
# Warning
Resource pack works only with Optifine.
WayMoreIcons
# WayMoreIcons
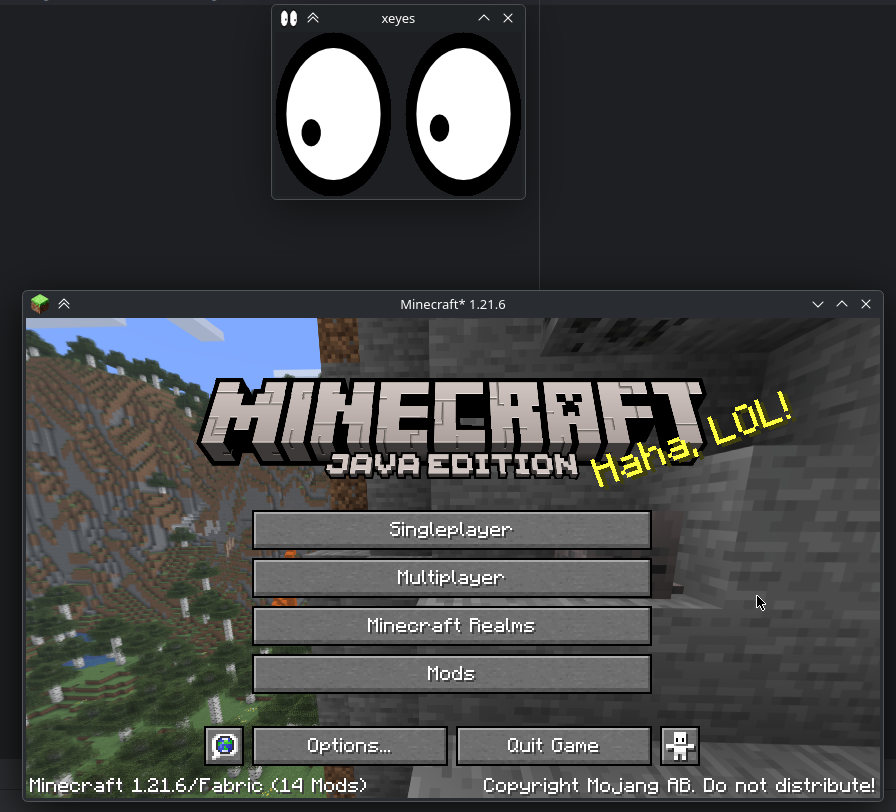
Simple mod that adds support for setting the window icon when running under Wayland.
## Note
Icon assets were retrieved from the following sources:
https://mcasset.cloud/1.21.6/assets/icons/
https://mcasset.cloud/1.17.1/assets/icons/
## License
Copyright (c) 2025 blucobalt
This program is free software: you can redistribute it and/or modify
it under the terms of the GNU Lesser General Public License as published by
the Free Software Foundation, either version 3 of the License, or
(at your option) any later version.
This program is distributed in the hope that it will be useful,
but WITHOUT ANY WARRANTY; without even the implied warranty of
MERCHANTABILITY or FITNESS FOR A PARTICULAR PURPOSE. See the
GNU General Public License for more details.
You should have received a copy of the GNU Lesser General Public License
and a copy of GNU General Public License along with this program. If not, see
http://www.gnu.org/licenses/
You should have received a copy of the GNU Lesser General Public License
along with realmsfix. If not, see http://www.gnu.org/licenses/.
## Modpacks / etc
Feel free to use this mod in any way, as long as you give credit and follow the license above. This could mean linking to the Modrinth page, or something among those lines.
Or don’t! You have free will. (But I would appreciate it if you did.)