VRealmsConnector
# VRealms Connector
This is a simple server connector I made for Velocity, because I couldn’t find one that suited my needs. Currently, you can only register and unregister Servers through a Command, later it’s also planned to do so through a Rest API.
For now, this is how to use the Commands:
– `/addserver
[port]`
– `/removeserver `
The port uses 25565 by default
## THIS PROJECTS SOURCE CODE WILL NOT BE MADE PUBLIC (FOR NOW)
If you need the Source, decompile it, or just make it yourself
VPlayerLimit
# VPlayerLimit
[](https://discord.gg/5NMMzK5mAn)
Limit how many players can join your server.
This is not a plugin to set the maximum number of players in motd, it simply limits the number of connected players.
[](https://www.bisecthosting.com/4drian3d)
## Installation
– Download VPlayerLimit from Modrinth
– Drag and drop on your plugins folder
– Start the server
– Configure the player limit and the expulsion message
VPingHost
# VPingHost
[](https://discord.gg/5NMMzK5mAn)
[](https://t.me/Adrian3dUpdates)
[](https://t.me/Adrian3dSupport)
A simple Velocity plugin that allows you to get information about other servers instantly.
This plugin was born as a test from this [Velocity pull request](https://github.com/PaperMC/Velocity/pull/1180),
but I thought to make it a public test plugin to check the proxy server or backend servers connectivity or MOTD response.
[](https://www.bisecthosting.com/4drian3d)
## Installation
– Download VPingHost from Modrinth
– Drag and drop on your plugins folder
– Start the server
## Features
– Send a ping to any Minecraft server and get its corresponding motd
– Specifies the version to ping with
– Specifies the version with which to ping the server
## Command
`/pinghost [host] (protocol version)`
Permission: `pinghost.command`
Example: `/pinghost my.server.net 765`
If you need to specify a specific port, you can add it with the syntax `host:port`.
### Differences between this plugin and VServerInfo
VServerInfo allows you to display information about your servers that you have in your own network.
VPingHost allows you to display information about the motd of any available server.
VPacketLogger
# VPacketLogger
[](https://github.com/4drian3d/VPacketLogger/actions)

[](https://discord.gg/5NMMzK5mAn)


Simple Velocity plugin to log Packet executions
[](https://www.bisecthosting.com/4drian3d?r=ModVPacketLogger)
## Installation
– Install [VPacketEvents](https://modrinth.com/plugin/vpacketevents)
– Download VPacketLogger from [Modrinth](https://modrinth.com/plugin/vpacketlogger)
– Drag and drop on your plugins folder
– Start the server
## How it works
VPacketLogger simply logs every packet sent or received between the proxy and the player.
It can only intercept packets that are handled by Velocity, whether they are native or logged by other plugins.
In the configuration you can set which placeholders to use, MiniMessage format is supported.
VPacketEvents
# VPacketEvents
[](https://discord.gg/5NMMzK5mAn)


Manage and register packets through Velocity’s native events
[](https://www.bisecthosting.com/4drian3d?r=ModVPacketEvents)
“`java
class PacketListener {
@Subscribe
public void onPacketReceive(PacketReceiveEvent event) {
final MinecraftPacket packet = event.getPacket();
if (packet instanceof KeyedPlayerCommand commandPacket) {
event.setResult(GenericResult.denied());
}
}
@Subscribe
public void onPacketSend(PacketSendEvent event) {
// some stuff
}
public void registerPacket() {
// UpdateTeamsPacket registration
PacketRegistration.of(UpdateTeamsPacket.class)
.direction(Direction.CLIENTBOUND)
.packetSupplier(UpdateTeamsPacket::new)
.stateRegistry(StateRegistry.PLAY)
.mapping(0x47, MINECRAFT_1_13, false)
.mapping(0x4B, MINECRAFT_1_14, false)
.mapping(0x4C, MINECRAFT_1_15, false)
.mapping(0x55, MINECRAFT_1_17, false)
.mapping(0x58, MINECRAFT_1_19_1, false)
.mapping(0x56, MINECRAFT_1_19_3, false)
.mapping(0x5A, MINECRAFT_1_19_4, false)
.register();
}
}
“`
## Installation
– Download VPacketEvents from Modrinth
– Drag and drop on your plugins folder
– Start the server
## Dev Setup
### Gradle
“`kotlin
repositories {
mavenCentral()
}
dependencies {
compileOnly(“io.github.4drian3d:vpacketevents-api:1.1.0”)
}
“`
## Javadocs
https://javadoc.io/doc/io.github.4drian3d/vpacketevents-api
Votiful
## A High-Performance Vote Listener for NuVotifier
This plugin is a lightweight, high-performance addon for NuVotifier, designed specifically to handle a massive number of concurrent votes without impacting your server’s performance.
## Why Choose This Plugin?
Does your server lag when many players vote at once? This plugin was built to solve that exact problem. After struggling with performance issues on our own server, we developed a robust system capable of processing votes with extreme efficiency. It’s battle-tested and stable under pressure, ensuring your server remains responsive even during peak voting hours. If you run a demanding server and need a reliable vote-processing solution, this is the plugin for you.
## Features
This plugin expands NuVotifier by adding two core, performance-focused features:
* **Vote Statistics:** Track essential voting data with provided placeholders. Easily display total votes, top voters, and more on scoreboards, in GUIs, or anywhere else PlaceholderAPI is supported.
* **Vote Event:** A dedicated system allows admins to easily and reliably hook into the voting process to create custom rewards, trigger server commands, or integrate with other systems.
## Video
VoteBan Players
# VoteBan
This plugin supports ANY ban or mute system since it uses custom commands.
Commands:
– /votemute [reason] – Start a vote mute for a player online.
– /voteban [reason] – Start a vote ban for a player online.
– /votekick [reason] – Start a vote kick for a player online.
– /addvote – Vote for a current ban/kick in progress.
Permissions:
– VOTEBAN.* – Access to all commands.
– VOTEBAN.VOTE – Use the /addvote command.
– VOTEBAN.STARTKICK – Use the /votekick command.
– VOTEBAN.STARTBAN – Use the /voteban command.
– VOTEBAN.STARTMUTE – Use the /votemute command.
– VOTEBAN.BYPASS – Not allow votes on players with this permission.
Images



VoodooDoll Wide
# VoodooDoll
A resource pack that changes the totem of undying into a plush toy version of the player’s model. No mods required!
## Comparision between versions
### Vanilla [Custom](https://modrinth.com/resourcepack/voodoodoll-custom):
**Pros:**
– all totems can be made unique (perfect for multiplayer)
– supports both the slim and wide player models
**Cons:**
– works only on Minecraft 1.21.5 and up
– a bit complicated to customize
### Vanilla Wide/[Slim](https://modrinth.com/resourcepack/voodoodoll-slim):
**Pros:**
– works with very old versions of Minecraft, from 1.11.0 and up
– easy to customize
**Cons:**
– every totem of undying will look the same (good enough on single-player)
– only supports either the slim or wide player models
You can use Vanilla Custom edition and either Vanilla Wide or Vanilla Slim edition alongside each other, if so desired.
## How to customize
By default, the resource pack only comes with a texture of Steve, so if you want to use your own skin, or someone else’s skin, you will have to follow these instructions.
1. Extract the content of the resource pack from the ZIP.
2. Go to `assets/minecraft/textures/item/totem_of_undying` folder (`assets/minecraft/textures/items/totem` for 1.11-1.12 version).
3. Copy your desired user’s skin texture into the folder and rename it to `totem_of_undying.png` (`totem.png` for 1.11-1.12 version).
4. Overwrite the original file if prompted.
5. Package the content of the resource pack back into ZIP.
6. Done. Have fun :3
VoodooDoll Slim
# VoodooDoll
A resource pack that changes the totem of undying into a plush toy version of the player’s model. No mods required!
## Comparision between versions
### Vanilla [Custom](https://modrinth.com/resourcepack/voodoodoll-custom):
**Pros:**
– all totems can be made unique (perfect for multiplayer)
– supports both the slim and wide player models
**Cons:**
– works only on Minecraft 1.21.5 and up
– a bit complicated to customize
### Vanilla [Wide](https://modrinth.com/resourcepack/voodoodoll-wide)/Slim:
**Pros:**
– works with very old versions of Minecraft, from 1.11.0 and up
– easy to customize
**Cons:**
– every totem of undying will look the same (good enough on single-player)
– only supports either the slim or wide player models
You can use Vanilla Custom edition and either Vanilla Wide or Vanilla Slim edition alongside each other, if so desired.
## How to customize
By default, the resource pack only comes with a texture of Alex, so if you want to use your own skin, or someone else’s skin, you will have to follow these instructions.
1. Extract the content of the resource pack from the ZIP.
2. Go to `assets/minecraft/textures/item/totem_of_undying` folder (`assets/minecraft/textures/items/totem` for 1.11-1.12 version).
3. Copy your desired user’s skin texture into the folder and rename it to `totem_of_undying.png` (`totem.png` for 1.11-1.12 version).
4. Overwrite the original file if prompted.
5. Package the content of the resource pack back into ZIP.
6. Done. Have fun :3
Voodoo Doll of Undying
A small pack that allows you to change the totem of undying into a smaller version of your skin
for people who want to use their own skin:
– requires ability to use image editors like paint.net or blockbench (image editor option)
– the totem texture has a template of how a “steve” texture would look like when scaled down to the doll’s dimentions
# How to Customize?
1. open the resource pack and go to “assets/minecraft/textures/item“ and extract “totem_of_undying.png“
2. open “totem_of_undeying.png“ in image editing software
“`
[left side is for base right side is for outer layer]
[both left leg and left arm are on the left side of each section, same with right side but on right]
“`
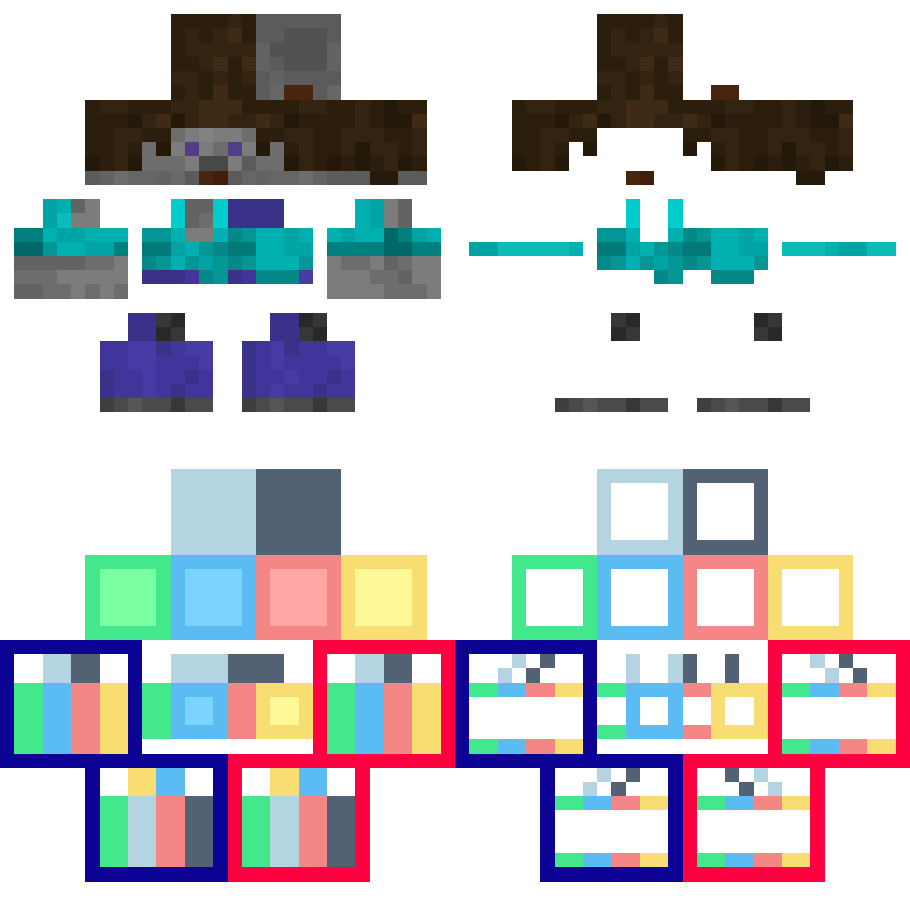
3. edited “totem_of_undying.png“ put back in “assets/minecraft/textures/item“
4. reload the resource pack using debug shortcut “[F3] + [T]“
5. done