WorldChatter

# Security Features
### Anti-Swear
This helps to prevent any sensitive or inappropriate words from your chat to help keep it clean.
It has the ability to customize words (BlackList / WhiteList).
### Anti-Repeat
This prevents players from repeating the same words or letters over and over again.
### Anti-ADs
It will block any type of IPs or URLs from the player.
### Anti-Caps
This helps to prevent the player from sending large uppercased messages in the chat!
# Configurations!
### Detection Messages!
If anyone triggers one of the security settings, you will be alerted, and they will be alerted as well.
“`yaml
DetectedMessage: “&c%player_name%’s message got detected by the following flags &e[%flags%] n———-> &6%message%” # Change how the detection message is sent
DetectedPlayerMessage: “&cYou have been detected by the following flags &e[%flags%]” # Changes how the message is sent to the player (set it to “” if you don’t want to send it)
“`
### Switch Messages (For Proxies)
This will notify everyone in the server or the previous and current server when a player switches from one server to another!
“`yaml
# This switch message is only available for both BungeeCord & Velocity
SwitchSettings:
enabled: true
global: true # false is just the current server & previous server / true all the servers
premessage: “&a%player_name% &ehas switched from &6%previous_server% &eto &f%current_server%”
comessage: “&a%player_name% &ehas arrived from &6%previous_server%”
“`
### Others
“`yaml
SpamMessage: “&cYour message is blocked by the &eAnti-Spamn&7Remaining time: %duration% seconds” # Changes how the anti-spam message is sent (set it to “” if you don’t want to send it)
ChatClearMessage: “&eThe Chat has been cleared by &a%sender%” # Changes how the cleared chat message gets sent
NoPermissionMessage: “&eYou’re not allowed to use this command!”
“`
# Utilities Features!
### Aliases
This feature enhances WorldChatter’s placeholders by allowing customization of player and place names using two new placeholders: `{player_name}` and `{player_place}`.
“`yaml
aliases:
enabled: true
place:
world: “&aOverworld&r”
player:
OmarOmar93: “OmarOmar93 &o&eTest Omar Yes”
“`
### Chat Locking
This allows staff or console to lock or unlock the chat using `wc lock`!
“`yaml
ChatLockMessage:
enabled: true
public: true # TRUE | Shows the message to everyone or FALSE | just the sender
locked: “&eThe Chat is now &cLOCKED &eby &a%sender%”
unlocked: “&eThe Chat is now &aUNLOCKED &eby &a%sender%”
currently: “&eThe Chat is Currently &clocked”
“`
### Clear Chat!
Clear the chat with `wc clear`!
### Custom Join and Quit Messages!
Customize join and quit messages with special permissions for certain players.
“`yaml
Join:
enabled: true
level: 1 # 1 is just current place / 2 the whole server
place: “world” # place to send the message
message: “&a%player_name% &fhas joined the game!”
permmode: true # Checks to use the permissions mode to send messages / disabled will use default message
permissions:
“admin”:
permissions: [ “worldchatter.control”, “*” ]
message: “&a%player_name% &fhas joined the gamen&e[Teleport to %player_name%]”
Quit:
enabled: true
level: 1 # 1 is just current place / 2 the whole server
place: “world” # place to send the message – type %place% to make it the last player’s place
message: “&a%player_name% &fhas left the game!”
permmode: false # Checks to use the permissions below to show a different message or no!
permissions:
“admin”:
permissions: [ “worldchatter.control”, “*” ]
message: “&a%player_name% &fhas left the game &8You have nothing to do to that player :P”
“`
### Notifications
Customize notification sounds for detections.
“`yaml
notification:
enabled: true
staff: # notification detection for staff
sound: “BLOCK_NOTE_BLOCK_PLING” # the sound to play as the notification you can find it here by https://helpch.at/docs/SERVER_VERSION_GOES_HERE/index.html?org/bukkit/Sound.html
volume: 1 # volume of the sound
pitch: 1 # pitch of the sound
player: # notification detection to the player
sound: “BLOCK_NOTE_BLOCK_PLING”
volume: 1
pitch: 1
“`
### Channels
Introducing the new **Channels** Feature!
Add Places or Players **or both if you would like!** Into each other and priortize them from top to bottom according to the importance of each channel!
“`yml
GlobalSending: true
channels:
admin:
players:
– “OmarOmar93”
– “HoneySalted”
– “Notch”
places:
– “World”
– “Lobby”
main:
places:
– “world”
– “world_nether”
– “world_the_end”
“`
### Debug Mode – (Implemented in Channels only Currently)
The New Debug mode is what prints out more information about WorldChatter! like, Warnings, Errors and infos for each action happening inside the plugin!
“`yml
debug:
enabled: true
info: “&7[&9WorldChatter Debugger &r| Info&7]&r ”
warning: “&7[&9WorldChatter Debugger &r| &eWarning&7]&e ”
error: “&7[&9WorldChatter Debugger &r| &4Error&7]&4 ”
“`

# WorldChatterAPI
Learn more about the API and its capabilities by [Clicking here!](https://github.com/OmarOmar93/WorldChatterAddonChecker)
# Donate!
If you’d like to support the development of WorldChatter and other projects, consider donating!
[Buy me a Coffee!](https://www.paypal.com/paypalme/omaomar93)
# Other Projects!
[WorldCaster](https://modrinth.com/plugin/worldcaster)
Standalone Broadcast Add-on
# Supported Plugins!
– PlaceholderAPI
– Multiverse-Core
– ItemsAdder (With PlaceholderAPI)
– Luckperms
– And other plug-ins that have PlaceholderAPI’s placeholder!
# Massive thank you to:
– **Abdelaziz189356** – For the help with 2.0, 2.1, and 3.0 being possible, 3.0 Tester!
– **yousife_7aloly** – The tester for 2.0!
– **FastEverlast** – The Tester for 2.4!
– **Fabrizio Santana, 4zy** – 3.0 Testers
There are lots of additional features to explore!
Thank you for taking the time to read this and use the plugin!
WingAuth

[
](https://github.com/Elytrium)
# WingAuth
WingAuth is a modern Velocity authentication plugin for offline/hybrid networks.
## How it works
It runs login/register protection before players reach backend servers, using a Limbo-based auth flow.
Designed for server admins who want strong account protection with flexible setup.
## Key features
– Velocity-only architecture (runs the login on a virtual world)
– Session handling and brute-force protection
– Premium/hybrid and Floodgate-compatible scenarios (Bedrock support)
– Configurable messages and behavior
– Database-backed account storage (legacy-compatible migration path)
WinCMD

**[PlayerCONSOLE](https://www.spigotmc.org/resources/%E2%9C%A8%E3%80%90%E2%98%85-player%E2%9C%A6console-%E2%98%85%E3%80%91%E2%9C%A8-%E2%8E%AE-remote-panel-50-off-%E2%8E%AE-auto-restart-velocity-file-db-managing-api.126241/) is REQUIRED!**
Text version
WinCMD is a lightweight PlayerCONSOLE module that brings a Windows command prompt frontend directly into your PlayerCONSOLE developer console. Run system commands, inspect processes, check network stats, and manage your machine, all without leaving the browser. Works on both Bukkit and Velocity.
WebSenderReloaded
WebSender Reloaded, ready to help you!
Send a command to your Minecraft or Hytale server via DrawWEB or similar web scripts.
– Send command with PHP your Bungee, Velocity or Bukkit server!
– BungeeCord/Velocity and Spigot support!
– %100 Customizable config!
– Fast socket system!
– Multiple server support!
– /websender command. Perm: websender.admin
– Important: When you install the plugin, make sure to change the password, otherwise the plugin will not work. Also, if you change the websender port, enter a port that is not used elsewhere on your server.
**Important:** When you install the plugin, make sure to change the password, otherwise the plugin will not work. Also, if you change the websender port, enter a port that is not used elsewhere on your server.
**PHP EXAMPLE:**
If you downloaded version 1.0.1 or lower, the contents of the folder named “ExamplePHP” in the zip are incorrect, you can download version 1.0.2 or 1.2 to get the correct examples.
**Configuration for Plugin v1.5+ (Important)**
If you have installed version 1.5 or higher, you must configure your
“`
WebsenderAPI.php
“`
file according to your server’s Java version. Please follow the steps below.
**Step 1: Update the WebsenderAPI.php File**
1. Open the **.zip** archive you downloaded for the plugin.
1. Find the **WebsenderAPI.php** file located inside the ExamplePHP folder.
1. Replace the existing **WebsenderAPI.php** file on your website with this new one.
WebCMD

**[PlayerCONSOLE](https://www.spigotmc.org/resources/%E2%9C%A8%E3%80%90%E2%98%85-player%E2%9C%A6console-%E2%98%85%E3%80%91%E2%9C%A8-%E2%8E%AE-remote-panel-50-off-%E2%8E%AE-auto-restart-velocity-file-db-managing-api.126241/) is REQUIRED!**
Text Version
WebCMD is a lightweight PlayerCONSOLE module that runs a persistent web panel on your machine.
When Minecraft goes offline the panel stays up – so you can fire a start command from any browser and bring it back.
Server went down? Open a browser on your phone or laptop, hit Run, it’s back. No one needs to be at the machine.
Controlled via PlayerCONSOLE
Turn the panel on or off from inside the game using webcmd enable and webcmd disable. No files to edit, no restarts needed.
Webcam
# Webcam
Mod and plugin that allows players to broadcast their webcams
## Downloads
– [Fabric / Quilt](https://modrinth.com/mod/webcam-mod/versions?l=fabric)
– [NeoForge](https://modrinth.com/mod/webcam-mod/versions?l=neoforge)
– [Bukkit / Spigot / Paper](https://modrinth.com/plugin/webcam-mod/versions?l=bukkit)
– [Velocity](https://modrinth.com/mod/webcam-mod/versions?l=velocity)
## ⚠️ Warning
This plugin requires special setup on server to work.
If you are a server administrator, please read the section `Setup on server` first
## Features
– High-quality webcam broadcasting
– H.264 video codec
– Video transmission via UDP using custom protocol
– AES encryption
– Bitrate control
– Video resolution control
– Different display shapes
– Display size and position configuration
– Display on player model face
– Display distance limit
– Webcam broadcast and view permissions
– Advanced client configuration ([Mod Menu](https://modrinth.com/mod/modmenu) & [Cloth Config API](https://modrinth.com/mod/cloth-config) required)
– Ability to hide selected players’ webcams
– Velocity proxy support
– Compatibility with [ReplayMod](https://modrinth.com/mod/replaymod) & [Flashback](https://modrinth.com/mod/flashback)

## Client Usage
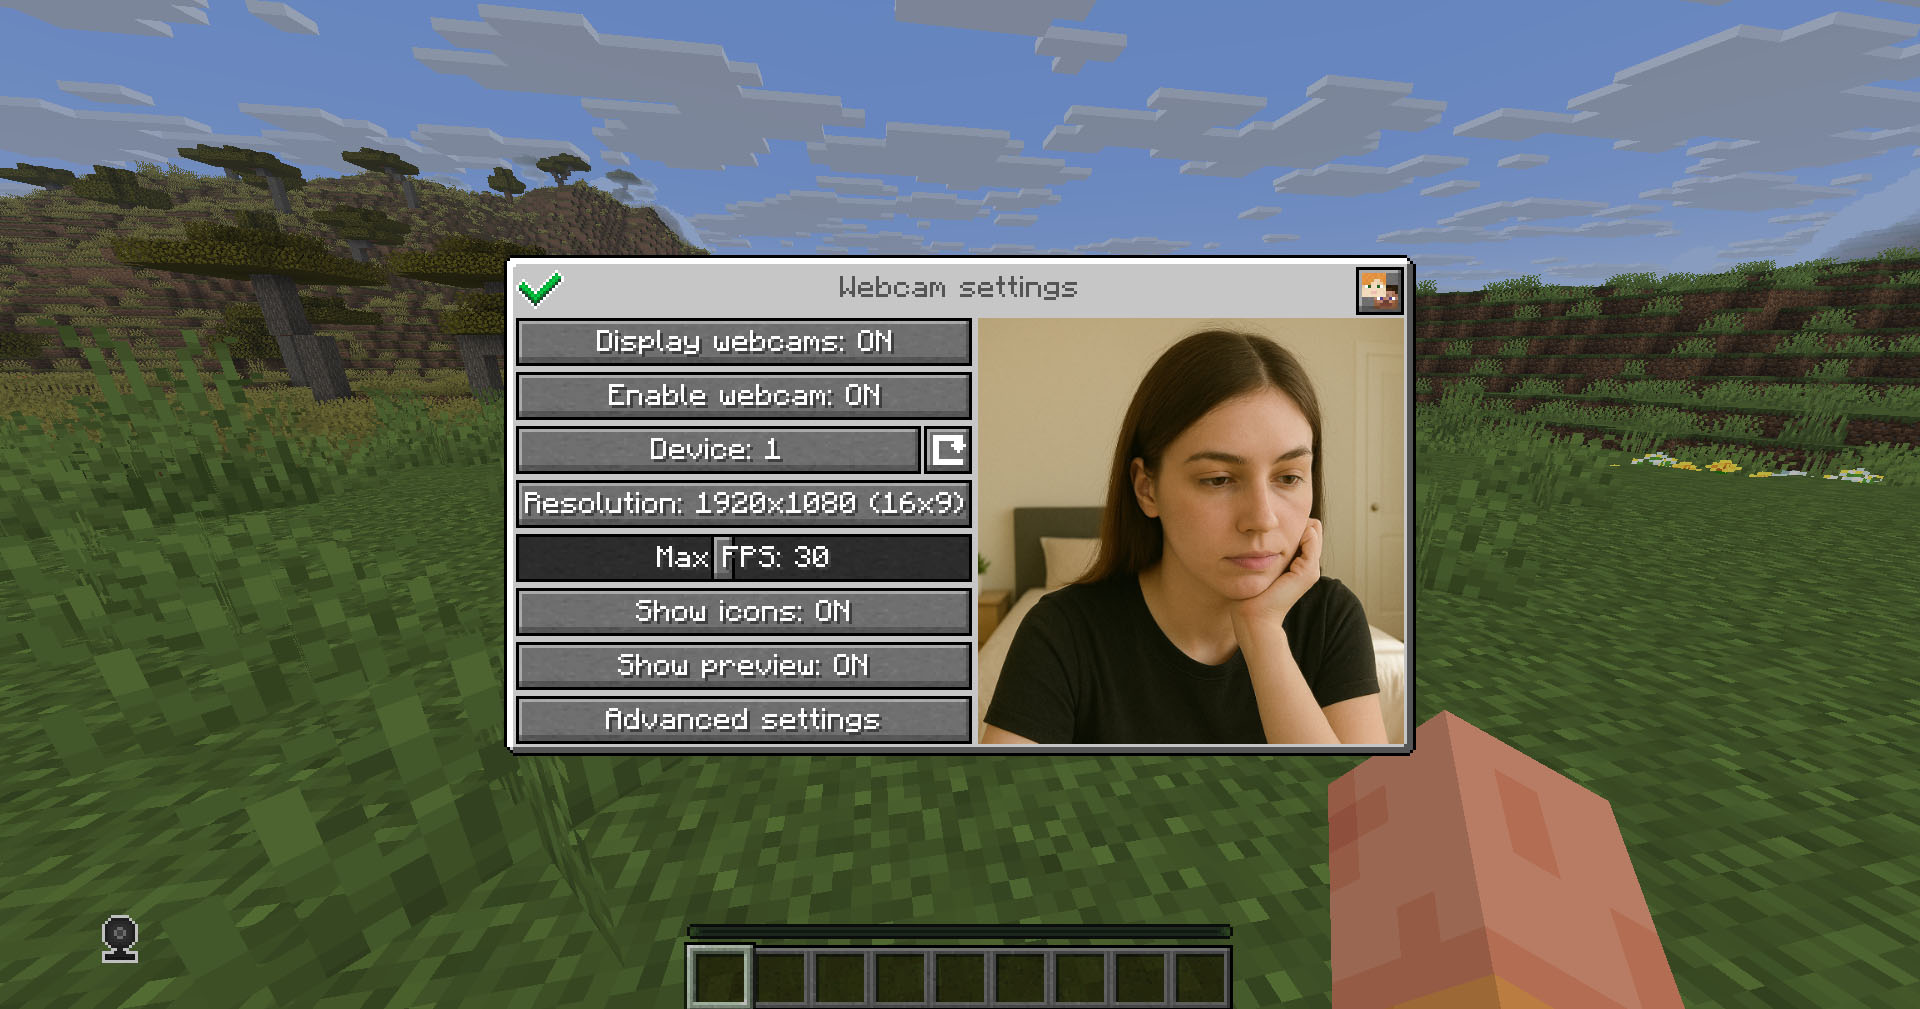
Put the mod in the `mods` directory (with the Fabric API if you are using Fabric). The settings menu can be opened by hotkey (`C` by default)
## Icons
| Icon | Description |
|:——————————————————–:|——————————–|
|  | Your webcam is enabled |
|  | Your webcam is disabled |
|  | Connecting to Webcam server |
|  | Not connected to Webcam server |
## Encryption
Webcam connection is encrypted, but we don’t guarantee the security of it. Use at your own risk!
## Setup on server
Webcam plugin uses UDP socket to transfer video packets.
So you need to open a UDP port in your server’s firewall and panel (if present) to make Webcam server work. This is port `25454/udp` by default. You can change the port in server config
If you are using Velocity, see `Setup on proxy`
### Server config
Location:
– Fabric / Quilt / NeoForge: `config/webcam/server.json`
– Bukkit / Spigot / Paper: `plugins/webcam/server.json`
Here are the default values with their descriptions:
“`
{
“port”: 25454, // Webcam UDP server port. This must not clash with any other used UDP port (like Simple Voice Chat port)
“bind_address”: “”, // Address to bind the Webcam server to. Leave blank to use the wildcard (0.0.0.0) address. F.e. use “127.0.0.1” to accept only local connections
“host”: “”, // The hostname that clients should use to connect to the Webcam server. Leave blank to use the address, that player is connected to Minecraft with. Can be a simple address or an address with port. This will be ignored, if the server is proxied
“keep_alive_period”: 1000, // Period of sending keep alive packets is milliseconds
“permission_check_period”: 60, // Period of checking webcam.broadcast and webcam.view permissions in ticks
“max_display_distance”: 100.0, // The distance in blocks from player, in which other players can see his webcam
“display_on_face”: false, // Whether to display webcam on player model face or above his head
“display_shape”: “round”, // Shape of webcams displayed above players’ head. Possible values: “round”, “square”
“display_offset_y”: 1.3, // Y offset of webcams displayed above players’ head
“display_size”: 1.2, // Size of webcams displayed above players’ head
“hide_nicknames”: true, // Whether to hide player’s nickname if his webcam is enabled
“display_self_webcam”: true, // Whether to show the player’s webcam to himself
“synced”: { // These settings are synchronized with clients
“image_dimension”: 360, // Side dimension of square webcam images
“mtu”: 1100, // Maximum Transmission Unit of packets. You can lower this, if image on webcam starts look glitchy or not arrives at all
“bitrate”: 500 // Target video bitrate (kbps)
},
“messages”: { // Custom transtalions for messages, that are sent to players in different situations. May contain placeholders – %s
“incompatible_mod_version”: “Incompatible Webcam version. Your – %s, server’s – %s” // The message that will be sent to player if he has incompatible Webcam mod version. You can set this to empty to disable sending this message
}
}
“`
### Commands
– `/webcamconfig [new_value]` – command to read/update config values. Requires `webcam.command.config` permission or OP.
### Permissions
– `webcam.command.config` – permission to modify Webcam server config (default: OP Level)
– `webcam.broadcast` – permission to broadcast webcam (default: true)
– `webcam.view` – permission to view webcams (default: true)
## Setup on proxy
Webcam has Velocity plugin that proxies Webcam servers on the backend MC servers and allows to connect to different Webcam servers through the single port.
So it acts like a UDP proxy.
If you running proxy and backend servers on the same machine, you need to configure different ports for them. See `Setup on server/Server config` and `Setup on proxy/Proxy config`
### Proxy config
Server config is located in `plugins/webcam/config.properties`
Here are the default values with their descriptions:
“`
#Webcam proxy config
# Webcam UDP server port. This must not clash with any other used UDP port (like Simple Voice Chat port)
port=25454
# Address to bind the Webcam server to. Leave blank to use the wildcard (0.0.0.0) address. F.e. use “127.0.0.1” to accept only local connections
bind_address=
# The hostname that clients should use to connect to the Webcam server. Leave blank to use the address, that player is connected to Minecraft with. Can be a simple address or an address with port. This will override configured values on backend server’s
host=
“`
## License
This mod is licensed under **No Unauthorized Distribution License**, which full text can be found at https://github.com/DimasKama/Webcam/blob/master/LICENSE.md
### Summary
– **Modpacks:** You can use this mod in modpacks, but you must not include its files directly. Instead, list it as a dependency (mod reference) that points to an official download source.
– **For Devs:** You’re allowed to create addons or integrate support for the mod, but you must not copy any of its code. Instead, make it an external dependency that gets downloaded from an official source.
– **Redistribution Limits:** You cannot re-upload or share the mod’s code or compiled files publicly without the author’s explicit permission. Forking for personal use is okay, but distributing a compiled fork is not allowed.
– **Personal Use:** You may use and modify the mod for personal use, but any changes must remain private and not be shared publicly.
– **Official Download Requirement:** Any dependency or modpack reference must point to the official download sources provided by the author.
Watchlist

# Watchlist
A [Velocity](https://github.com/PaperMC/Velocity) plugin for Minecraft servers.
Allows moderators to add players to a watchlist, and get notified of when they join. This is useful for when they are offline and their attention is still required.
## Commands
### `add `
Adds a player to the watch list.
### `ping`
Prints a list of watch list-ed players that are currently online.
### `reload`
Reloads the configuration back into the plugin.
### `remove `
Removes a player from the watch list.
### `view`
Prints the current watch list.
VyHub
VyHub, the comprehensive solution to build, manage and monetize Minecraft stores and communities. Easy integration of your Minecraft server and store. It’s the all-in-one management platform designed for your gaming community. VyHub offers a webshop, website, a donation store and bans and warnings.
Design and manage your Minecraft community through VyHub. We acknowledge that community management is hard work and takes a lot of time. With VyHub we automate your donation webstore fully. Furthermore, you can also save time on banning and warning players.
Create a professional community website and webstore in 5 minutes!
And there is more: VyHub provides you with an all-in-one solution to manage your community and gain valuable insights. Communicate, warn and ban players while maintaining good oversight of your community and its rules. With this resource you can make the best out of your community and server monetization.
The all-in-one system includes many features:
Ban and Warnings system (quick community management)
Sync groups/ranks (assign ranks through LuckPerms)
Ticketing system
Forums system
Shop system (unlimited categories, servers and packets)
Buy for a friend
Over 20 payment options (through: PayPal, Paysafecard, Stripe)
Multi language support
Discord roles and notifications
Quick support
Full API
And much more…
For more information and direct contact to the developers and the VyHub community visit our Discord (https://discord.gg/QZxQHtZnSB)
Pricing: VyHub can be used for free.
We take a small commission of 3 to 5% on purchases made through your VyHub store.
So you only pay when you make money.
Not yet convinced?
Check out the free VyHub Demo here: https://demo.vyhub.net/
Try out the different views, dashboards and customization options with VyHubs unique look and fell.
Lets go!
Create your account for FREE on https://vyhub.net, create your VyHub instance and add a Minecraft server.
Download addon for FREE and drag and drop the latest VyHub Plugin folder into your Gmod serveraddonsdirectory.
Restart your server and set your api-key through a simple command displayed in the setup process.
Congratulations your server is now connected! You can start selling products on your server!
For guides and further information visit: https://docs.vyhub.net
Velocity to Discord
**このプラグインの開発は終了しました。
別のプラグインにて、これらの機能を実装するかもしれません。**
**Development of this plugin has been completed.
Another plugin may implement these features.**
—
**より詳細なBotセットアップ方法については、[Discordの公式サイト](https://discord.com/developers/docs/getting-started)を参照してください。**
**For more detailed information on how to set up a bot, see the [official Discord website.](https://discord.com/developers/docs/getting-started)**
—
# 🤖 Bot設定ガイド
このガイドでは、ボットの基本的な設定方法を説明します。以下の2つの主要なステップに従って設定を行ってください。
## 1️⃣ ボットトークンの設定
ボットを操作するためには、正しいトークンが必要です。このトークンはボットの識別子として機能し、APIアクセスの際に使用されます。
**手順**:
1. [Discord Developer Portal](https://discord.com/developers/applications) にアクセスします。
2. 作成したボットを選択し、`TOKEN` セクションに移動します。
3. `Copy` ボタンをクリックしてトークンをコピーし、適切な場所にペーストします。
## 2️⃣ チャンネルIDの設定
チャンネルIDは、特定のDiscordチャンネルを識別するためのものです。
**手順**:
1. Discordクライアントを開きます。
2. `設定 > トピックの詳細` を選択して、特定のチャンネルのIDを表示します。
3. 表示されたIDをコピーし、必要な場所にペーストします。
—
# 🤖 Bot Configuration Guide
This guide will walk you through the basic steps of setting up your bot. Please follow the two main steps outlined below.
## 1️⃣ Setting Up Your Bot Token
The bot token acts as an identifier for your bot and is used for API access.
**Steps**:
1. Go to the [Discord Developer Portal](https://discord.com/developers/applications).
2. Select your created bot and navigate to the `TOKEN` section.
3. Click the `Copy` button to copy the token and paste it in the appropriate place.
## 2️⃣ Configuring Channel ID
The Channel ID serves as an identifier for a specific Discord channel.
**Steps**:
1. Open your Discord client.
2. Select `Settings > Advanced` to view the ID of a specific channel.
3. Copy the displayed ID and paste it wherever necessary.
—
# 📄config.yml-設定項目
“`yml
# Velocity to Discordを導入してくれてありがとう!
# わたしはあなたに感謝します!
# Bugやフィードバックの報告については下記URLから。
# Thanks for introducing “Velocity to Discord”!
# Thanks for you!
# Please use the following URL to report bugs and provide feedback.
# Discord:https://discord.gg/5sqbsmqd6K
# Github:https://github.com/Elysium-7/Velocity-to-Discord
# ここは絶対に書き換えないでください。
# Never rewrite this section.
configuration-version: 1.2
# BotTokenを入力。
# Please insert a BotToken.
token: “”
# BOTのスタータスを設定できます。「ONLINE,IDLE,DO_NOT_DISTURB」
# You can set the bot online status “ONLINE,IDLE,DO_NOT_DISTURB”
online_status: ONLINE
# ログを送信するチャンネルのIDを入力してね。
# Enter the ID of the channel you want to send the log to.
channel_id: 0
# サーバースタート・ストップ時のメッセージを編集できます。
# You can edit messages at server start/stop.
start_message_text: “Server has started.”
stop_message_text: “Server has stopped.”
“`
vSudo
# vSudo
Make players send chat messages and run proxy commands from the velocity proxy.
# Requirements
* Velocity Proxy
* Chat signing disabled on backed server.
* You must have chat signing disabled on the backend server for the chat function to work.
* To easily do this, add a plugin such as [AntiPopup](https://www.spigotmc.org/resources/%E2%9C%A8-antipopup-no-chat-reports-and-popup-%E2%9C%A8.103782/) or [NoEncryption](https://www.spigotmc.org/resources/noencryption.102902/) to your backed server and the plugin should work as intended.
* You must also set `enforce-secure-profiles` in `server.properties` to `false`
# Commands
* `/vsudo reload`
* Reloads the vSudo config
* `/vsudo [message:/command]`
* Sudo a player to send a chat message or run a proxy command.
* This command can be run by console or another player in game
* `/vsudo * `
* Sudo all players on a specific server to send a message or run a proxy command
* This command can be run by console or another player in game
* This command can be disabled in the config under `sudo-all.enabled`
# Permissions
* `vsudo.sudo`
* Access to the `/vsudo` command
* `vsudo.sudo.all`
* Access to the `/vsudo *` command
# Support & Contact
To report bugs, suggest a feature, or anything else, contact me via discord
– Direct Contact
* -> [ajmac](http://discord.com/users/643604666634076179)
# bStats