YATPAS
YATPAS is a simple but robust Player-to-Player Teleport (TPA) system for Bukkit/Spigot/Paper servers. It features clickable requests, configurable cooldowns, timeouts, and automatic cancellation upon movement or damage, ensuring a balanced gameplay experience.
***
## 🇮🇹 IMPORTANT NOTE ON LANGUAGE
The default language for the messages inside the plugin’s `config.yml` is **Italian**. You can easily translate all messages to English or any other language by editing the `messages:` section of the configuration file.
***
## ✨ Key Features
* **Clickable Requests:** Players can accept or deny TPA requests with a single click.
* **Correct TPA/TPAHERE Logic:** Supports both teleporting to another player (`/tpa`) and calling a player to your location (`/tpahere`).
* **Warmup:** Configurable time before the actual teleport, which is cancelled if the player moves or takes damage.
* **Cooldown & Timeout:** Limits request spam and ensures requests expire automatically.
* **Customizable Messages:** All messages are fully configurable via `config.yml`.
## 📦 Commands
| Command | Alias | Description | Permission |
| :— | :— | :— | :— |
| `/tpa ` | | Requests to teleport to the specified player. | `yatpas.use.tpa` |
| `/tpahere ` | | Requests the specified player to teleport to you. | `yatpas.use.tpahere` |
| `/tpaccept` | | Accepts the pending TPA request. | `yatpas.use.tpaccept` |
| `/tpdeny` | | Denies the pending TPA request. | `yatpas.use.tpdeny` |
| `/tpacancel` | | Cancels your outgoing TPA request. | `yatpas.use.tpacancel` |
## ⚙️ Configuration
The `config.yml` file allows you to customize every aspect of the TPA system.
| Config Key | Description | Default Value |
| :— | :— | :— |
| `teleport-warmup-seconds` | Time in seconds before the teleport occurs. | `5` |
| `tpa-cooldown-seconds` | Cooldown between sending two TPA requests. | `2` |
| `request-timeout-seconds` | Time before a TPA request expires. | `60` |
| `cancel-on-move` | `true` to cancel warmup if the player moves. | `true` |
| `cancel-on-damage` | `true` to cancel warmup if the player takes damage. | `true` |
| `messages.prefix` | Prefix displayed in all messages. | `&3YATPAS&8» &f` |
—
YardWatch
# YardWatch (for server owners)
Implementation of [YardWatchAPI](https://github.com/YouHaveTrouble/YardWatchAPI) for common protection plugins. If any of supported plugins implements the API itself, then this plugin will stop providing its implementation to allow the
plugin to take over.
If you’re a developer looking for information how to implement YardWatchAPI in your plugin, see
[YardWatchAPI](https://github.com/YouHaveTrouble/YardWatchAPI)
## Requirements
– Java 17
– Minecraft 1.16+
## Implementations for:
– GriefPrevention (v16+)
– WorldGuard (7.0.0+)
– LWCX
– FactionsUUID
– SuperiorSkyBlock
– Towny
– PlotSquared (6.0.0+)
## Plugin you’re using is not implementing YardWatchAPI?
Contact the plugin developer and send them [here](https://github.com/YouHaveTrouble/YardWatchAPI/blob/master/readme.md)!
You can also request a temporary implementation within this plugin [here](https://github.com/YouHaveTrouble/YardWatch/issues/new?assignees=&labels=enhancement&projects=&template=implementation-request.yml&title=%5BNEW+IMPLEMENTATION%5D%3A+).
# YardWatchAPI (for developers)
API to unify protection plugins for minecraft bukkit servers to allow easy protection queries without having to import
10 different plugin apis with separate implementations.
Current version: [](https://jitpack.io/#YouHaveTrouble/YardWatchAPI)
If you’re looking for a plugin implementing YardWatchAPI for common protection plugins, see [YardWatch plugin](https://github.com/YouHaveTrouble/YardWatch).
# Usage
### Import the api using dependency manager
In any case of usage you will need to import the API. Replace `VERSION` with current version tag. You should also adjust your `` to `provided` if you’re not implementing the api and just querying it.
#### Maven
“`xml
jitpack.io
https://jitpack.io
com.github.YouHaveTrouble
YardWatchAPI
VERSION
compile
“`
#### Gradle
“`gradle
dependencyResolutionManagement {
repositoriesMode.set(RepositoriesMode.FAIL_ON_PROJECT_REPOS)
repositories {
mavenCentral()
maven { url ‘https://jitpack.io’ }
}
}
dependencies {
compileOnly ‘com.github.YouHaveTrouble:YardWatchAPI:VERSION’
}
“`
## For plugins wanting to see if something is protected
### Check if player can break a block
Example handling of block breaking check. There’s no need to depend on any plugins for this.
“`java
public boolean canBreakBlock(Player player, Block block) {
ServicesManager servicesManager = getServer().getServicesManager();
Collection> protections = servicesManager.getRegistrations(Protection.class);
for (RegisteredServiceProvider protection : protections) {
if (protection.getProvider().canBreakBlock(player, block.getState(true))) continue;
return false; // if any protection plugin disallowed breaking the block, return false
}
// If all protection plugins allowed breaking the block, return true
return true;
}
“`
## For protection plugins
### Depend on YardWatch plugin
You can optionally softdepend and check if YardWatch is present to add an optional integration.
“`yml
depend:
– “YardWatch”
“`
### Implement Protection interface
Implement all the methods required by the interface
“`java
public class YourPluginProtection implements Protection {}
“`
### Register your implementation as a service
“`java
@Override
public void onEnable() {
getServer().getServicesManager().register(
Protection.class,
new YourPluginProtection(),
this,
ServicePriority.Normal
);
}
“`
YAML API

# YAML API
YAML API is a specialized library that simplifies working with YAML configuration files in Bukkit/Spigot/Paper plugins. It provides a robust and consistent interface for loading, saving, updating, and managing YAML-based configurations, along with advanced mapping capabilities for configuration sections and configurable units.
—
## Overview
The **YAML API** package offers a set of tools designed to handle YAML configuration files efficiently. It abstracts the complexity of file I/O and reflection-based configuration parsing, allowing you to focus on using configuration data in your plugin.
Key components include:
– **YAMLFile**: A class to load, save, and update YAML configuration files.
– **ResourceUtils**: Utility methods for handling resources and file operations.
– **Configurable & ConfigurableFile**: Interfaces and classes that provide easy access to the underlying `FileConfiguration`.
– **ConfigurableUnit**: An interface representing a configuration unit, useful for handling permissions or groups in the configuration.
– **Mappable, SectionMappable, UnitMappable & HashMappable**: A set of interfaces and classes for mapping configuration sections and units into Java collections.
– **YAMLUpdater**: A class that updates YAML files by merging default values and preserving comments.
—
## Key Features
– **Unified Configuration Management**:
Provides a consistent API for reading, writing, and updating YAML configuration files.
– **Dynamic Mapping and Conversion**:
Supports mapping configuration sections to custom units and collections, making it easier to work with complex configuration structures.
– **Resource and File Utilities**:
Includes helper classes to simplify file loading, resource saving, and directory management.
– **Comment Preservation and Updates**:
YAMLUpdater handles merging of default configuration values while preserving existing comments.
– **Reflection-Based Parsing**:
Uses reflection to dynamically access configuration sections and values, ensuring compatibility across server versions.
—
## Usage Example
Below is an example demonstrating how to use the YAML API to load, update, and work with configuration files.
### Example: Using ConfigurableFile and YAMLFile
“`java
package com.example.myplugin;
import me.croabeast.file.ConfigurableFile;
import me.croabeast.file.YAMLFile;
import org.bukkit.configuration.file.FileConfiguration;
import org.bukkit.plugin.java.JavaPlugin;
import java.io.IOException;
public class MyPlugin extends JavaPlugin {
private ConfigurableFile config;
@Override
public void onEnable() {
try {
// Create a new configuration file located in the “config” folder
config = new ConfigurableFile(this, “config”, “settings”)
// Optionally, override methods to control updatability or other behaviors
{
@Override
public boolean isUpdatable() {
// Retrieve the “update” key from the configuration to decide if updates are allowed
return get(“update”, false);
}
};
// Save the default configuration if not present
config.saveDefaults();
// Update the configuration file (merges defaults and preserves comments)
config.update();
} catch (IOException e) {
e.printStackTrace();
}
// Access configuration values
String prefix = config.get(“lang-prefix”, “&e MyPlugin »&7”);
getLogger().info(“Language prefix: ” + prefix);
}
}
“`
### Example: Working with Mappable and SectionMappable
“`java
package com.example.myplugin;
import me.croabeast.file.SectionMappable;
import me.croabeast.file.ConfigurableFile;
import org.bukkit.configuration.ConfigurationSection;
import org.bukkit.plugin.java.JavaPlugin;
public class MyPlugin extends JavaPlugin {
private ConfigurableFile config;
@Override
public void onEnable() {
try {
config = new ConfigurableFile(this, “config”, “settings”);
config.saveDefaults();
config.update();
} catch (Exception e) {
e.printStackTrace();
}
// Assume we have a configuration section “advancements”
ConfigurationSection section = config.getConfiguration().getConfigurationSection(“advancements”);
if (section != null) {
// Create a SectionMappable from the configuration section
SectionMappable.Set sectionMap = SectionMappable.asSet(section.getValues(false));
// Process the mapped configuration as needed
getLogger().info(“Loaded advancements: ” + sectionMap);
}
}
}
“`
—
## Maven / Gradle Installation
To include YAML API to the project, add the following repository and dependency to your build configuration. Replace `${version}` with the desired version tag.
### Maven
Add the repository and dependency to your `pom.xml`:
“`xml
croabeast-repo
https://croabeast.github.io/repo/
me.croabeast
YAML-API
${version}
compile
“`
### Gradle
Add the repository and dependency to your `build.gradle`:
“`groovy
repositories {
maven {
url “https://croabeast.github.io/repo/”
}
}
dependencies {
implementation “me.croabeast:YAML-API:${version}”
}
“`
Replace `${version}` with the appropriate module version.
—
## Conclusion
**YAML API** is a powerful library for managing YAML configurations in your Bukkit/Spigot/Paper plugins. It streamlines file operations, mapping, and updates while preserving comments and ensuring compatibility across server versions. Whether you are building simple configuration systems or working with complex, nested settings, YAML API provides the tools you need to efficiently manage your plugin’s configuration.
Happy coding!
— *CroaBeast*
XzeelCore


[](https://github.com/Xzeel/XzeelCore/releases)
[](https://github.com/Xzeel/XzeelCore/releases)
[](https://modrinth.com/plugin/xzeelcore)
XzeelCore is an essential library plugin designed to streamline and enhance the development process for my plugins.
[ ⏳ ] The XzeelCore plugin is still under development. Stay tuned!
## License
“`
© 2026 XzeelArcadia.
© 2025-2026 XzeelCore. All Rights Reserved.
© 2025-2026 Lumistra. All Rights Reserved.
“`
xWorldBlocker

# 🛡️ xWorldBlocker | Total Control Over Your World Access!
> **The ultimate lightweight solution to secure your server’s exclusive areas.**
Have you ever needed to restrict access to a specific world? Whether it’s for a **VIP zone**, a **temporary event**, or a **staff-only area**, **xWorldBlocker** is your solution.
This powerful plugin allows you to block entry to any world on your server, granting access only to players with the specific permissions you define. No complicated setups—just total control.
—
> ## 🚀 Key Features
* **🛡️ Secure World Blocking:** Easily define a list of worlds that remain locked to the public.
* **🔑 Granular Permission System:** * Access a specific world: `xworldblocker.bypass.`
* Access ALL worlds: `xworldblocker.bypass.*`
* **🎨 Full RGB Support:** Custom messages with **HEX colors** (`&#RRGGBB`) and standard Minecraft codes (`&a`, `&l`).
* **⚡ Ultra Lightweight:** Designed for performance. Zero impact on your server’s TPS.
* **⚙️ Instant Reload:** Apply changes instantly with `/xwb reload`—no restart required.
—
> ## 🎮 Commands & Permissions
| Command | Description | Permission Node |
| :— | :— | :— |
| **/xwb help** | Displays the help menu. | None (Public) |
| **/xwb reload** | Reloads the configuration file. | `xworldblocker.admin` |
### Access Permissions
| Permission | Description |
| :— | :— |
| `xworldblocker.bypass.` | Allows entry to a specific locked world. |
| `xworldblocker.bypass.*` | Grants access to **all** blocked worlds. |
—
> ## 🔧 Configuration (`config.yml`)
“`yaml
# __ __ _ _ ___ _ _
# __ __/ / / ___ _ __| | __| | / __ | ___ ___| | _____ _ __
# / / / / / _ | ‘__| |/ _` |/__// |/ _ / __| |/ / _ ‘__|
# > < / / (_) | | | | (_| / / | (_) | (__| < __/ |
# /_/_ / / ___/|_| |_|__,______/_|___/ ___|_|____|_|
# xPlugins - WillfryDev - 777 Studios
# List of worlds to block.
# Permission required: xworldblocker.bypass.
blocked-worlds:
– “events”
– “staff_zone”
– “world_vip”
# Messages support HEX (&#RRGGBB) and & codes.
messages:
reload: “&#A2E4B8 ✔ Done! &#C1FFD7The xWorldBlocker configuration has been reloaded.”
no-permission-entry: “&#FFB6C1 ✘ Error! &#FFDDC1You do not have permission to enter this world.”
no-permission-command: “&#FFB6C1 ✘ Error! &#FFDDC1You do not have permission to use this command.”
help:
– “”
– “&#A2E4B8/xwb reload WCEEB- Reload the plugin settings.”
– “&#A2E4B8/xwb help WCEEB- Display this help message.”
– “”
“`
> ### 📥 Installation
1. Download the “.jar“ file.
2. Drop it into your “/plugins/“ folder.
3. Restart your server.
Configure your worlds in “config.yml“ and run “/xwb reload.“
Developed with ❤️ by xPlugins
If you like this plugin, consider leaving a 5-star review!
Xwarps
## Xwarp – A Complete Teleportation Solution for Minecraft
Xwarp is a feature-rich teleportation plugin for Minecraft that allows players to easily set and teleport to custom warp points within their world. Whether you’re managing a large server with multiple locations or just want to teleport between your favorite spots, Xwarp offers a seamless and immersive experience.
## Key Features:
Custom Warp Points: Set warp points anywhere in the world with ease using the /setwarp [warpname] command. These warp points can be accessed by any player with the appropriate permissions.
Teleport Countdown: When a player selects a warp, a 5-second countdown begins, with a clear message displayed in the center of the screen: “Teleporting in 5 seconds, don’t move!” (colored in yellow). If the player walks or moves during this time, the teleportation is canceled, adding an element of realism and control to the teleportation process.
Movement Cancellation: Prevent players from teleporting if they move while waiting. This encourages players to remain stationary for teleportation to complete successfully, preventing accidental teleports during gameplay.
GUI-Based Warp Selection:
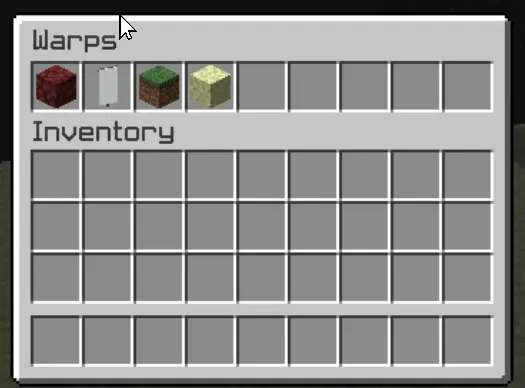
One of Xwarp’s standout features is its Graphical User Interface (GUI) for selecting warps. Instead of relying solely on commands, players can access a sleek warp selection screen where they can visually choose their desired warp point. Here’s what makes the GUI special:
Icon Customization: Each warp point can be represented by a different icon (block/item) in the GUI. Administrators can change the warp icon using the /seticonwarp [warpname] [itemname] command, allowing full customization of the look and feel of the warp menu.
Visual Warp Selection: Players simply open the warp menu and click on the desired warp icon to begin teleporting. The GUI provides an intuitive and engaging way to access teleport points, especially for large servers with multiple destinations.
## Admin-Friendly:
Warp Management: Server administrators can easily add, delete, and manage warp points, and even assign custom icons to each warp point for better organization and clarity.
Permissions Integration: Fine-grained permissions allow you to control which players can set, access, or delete warps. This ensures that only authorized users can manage or use certain warp points.
## How it Works:
1. Setting a Warp: Use /setwarp [warpname] to create a new warp at your current location. The warp is saved along with a default icon.
2. Selecting a Warp: Players can open the warp GUI and click on the icon for their desired destination. A 5-second countdown will start, and if they don’t move, they are teleported to the selected warp.
3. Customizing Warps: Use /seticonwarp [warpname] [itemname] to change the icon representing a warp in the GUI, making it easy for players to distinguish between different warp points.
## Why Xwarp?
Xwarp is designed for flexibility, ease of use, and visual appeal. It’s perfect for large servers that need efficient teleportation management or for small groups of players who want a fast and intuitive way to travel across their world. With its GUI-based approach, teleportation becomes not just a command-line task, but a visually engaging experience that fits right into Minecraft’s world.
Take your server to the next level with Xwarp—your all-in-one teleportation solution!
## LuckPerms
/warp – xwarp.warp
/setwarp – xwarp.setwarp
/delwarp – xwarp.delwarp
/seticonwarp – xwarp.seticonwarp
xVoidSpawn
# ⭐ xVoidSpawn – Advanced Anti-Void & Spawn Management
xVoidSpawn is a lightweight, optimized, and fully configurable Anti-Void plugin designed for modern Minecraft servers. It automatically rescues players when they fall into the void and safely teleports them to a configured spawn location — preventing unnecessary deaths and keeping your lobby or minigame experience smooth and professional.
Perfect for hubs, SkyBlock, void maps, minigames, and large server networks.
—
## 🚀 Key Features
### 🛡 Intelligent Anti-Void System
Automatically teleports players to a safe spawn when they fall below a configurable Y-level.
### ✈ Spawn on Join
Optionally teleport players to the main spawn every time they join the server. Ideal for lobbies and network environments.
### 💥 Fall Damage Protection
Resets the player’s fall distance after teleportation to ensure they never die from fall damage after being saved.
### 🎨 100% Configurable
Fully editable:
– Prefix
– Console messages
– Help menu
– All player messages
– Join behavior
– Void level trigger
Everything is managed inside `config.yml`.
### 🌈 Modern Color Support
Supports:
– Legacy color codes (`&a`, `&l`, etc.)
– HEX color codes (`&#RRGGBB`) for Minecraft 1.16.5+
### ⚡ Lightweight & Performance Friendly
Built to have minimal impact on server performance. No unnecessary tasks or heavy processes.
—
## 🛠 Commands & Permissions
Main Permission: `xvoidspawn.admin`
| Command | Description |
|———-|————-|
| `/xvs setspawn` | Sets the exact teleport spawn location |
| `/xvs reload` | Reloads the configuration without restarting |
| `/xvs help` | Displays the help menu |
All messages and help lines are fully customizable.
—
> ## ⚙ Configuration Overview (config.yml)
“`yaml
# ___ __ _
# / _____ _ __ / _(_) __ _ ⋆✴︎˚。⋆
# / / / _ | ‘_ | |_| |/ _` | Plugin by ˖⁺‧₊˚♡˚₊‧⁺˖
# / /__| (_) | | | | _| | (_| | xPlugins
# ____/___/|_| |_|_| |_|__, |
# |___/ .yml
# Language setting. Options: ‘en’, ‘es’.
# If you change this to ‘es’ and reload, the config messages will update to Spanish.
locale: en
teleport-on-join: true
void-level: 0
console-messages:
plugin-enabled: “7FF55[xVoidSpawn] &#AAAAAAPlugin enabled successfully.”
plugin-disabled: “&#FF5555[xVoidSpawn] &#AAAAAAPlugin disabled successfully.”
prefix: “ᆒDBxVoidSpawn &8» ”
messages:
no-permission: “&#FF0000 ✘ ¡Error! &fYou do not have permission.”
player-only: “&#FF0000 ✘ ¡Error! &fOnly players can use this.”
spawn-set: “�FF49 ✔ ¡Success! &fVoid spawn set.”
spawn-not-set: “&#FAEDCB ℹ ¡Attention! &fSpawn not set.”
void-teleport: “&#FCD05C ☀ ¡Careful! &fSaved from the void.”
reload: “7FF55 ✔ ¡Success! &fConfiguration reloaded.”
help-message:
– “”
– “&#FF5555&l xVoidSpawn – Help”
– “”
– “&8 • ᆒDB/xvs setspawn &8▸ &fSet spawn.”
– “&8 • ᆒDB/xvs reload &8▸ &fReload config.”
– “&8 • ᆒDB/xvs help &8▸ &fShow help.”
– “”
“`
—
> ## 📥 Installation
1. Download the latest .jar file.
2. Place it inside your server’s plugins folder.
3. Restart your server.
– In-game, run “/xvs setspawn“ at a safe location.
-# Your server is now protected from void deaths.
> ## 🎯 Ideal For
1. Lobby Servers
2. SkyBlock Hubs
3. Minigame Worlds
4. Void Maps
5. Network Setups
## 🔧 Compatibility
1. ✔ Spigot
2. ✔ Paper
3. ✔ 1.16.5+
Credits
Developed with ❤️ by xPlugins
xTranslate
# xTranslate
—————————————————————————————————-
### What is xTranslate ?
_xTranslate is a Minecraft Translation Plugin that translates In-game Chat messages in real time_
### How do i change my language ?
_You can change your language simply by typing /lauguage _
### How many languages are supported ?
_I dont even know the exact count but over 100+ languages are supported_
###
Spoiler
private static final Map SUPPORTED_LANGUAGES = Map.ofEntries(
Map.entry(“af”, “Afrikaans”), Map.entry(“sq”, “Albanian”), Map.entry(“am”, “Amharic”),
Map.entry(“ar”, “Arabic”), Map.entry(“hy”, “Armenian”), Map.entry(“az”, “Azerbaijani”),
Map.entry(“eu”, “Basque”), Map.entry(“be”, “Belarusian”), Map.entry(“bn”, “Bengali”),
Map.entry(“bs”, “Bosnian”), Map.entry(“bg”, “Bulgarian”), Map.entry(“ca”, “Catalan”),
Map.entry(“ceb”, “Cebuano”), Map.entry(“zh”, “Chinese”), Map.entry(“co”, “Corsican”),
Map.entry(“hr”, “Croatian”), Map.entry(“cs”, “Czech”), Map.entry(“da”, “Danish”),
Map.entry(“nl”, “Dutch”), Map.entry(“en”, “English”), Map.entry(“eo”, “Esperanto”),
Map.entry(“et”, “Estonian”), Map.entry(“fi”, “Finnish”), Map.entry(“fr”, “French”),
Map.entry(“fy”, “Frisian”), Map.entry(“gl”, “Galician”), Map.entry(“ka”, “Georgian”),
Map.entry(“de”, “German”), Map.entry(“el”, “Greek”), Map.entry(“gu”, “Gujarati”),
Map.entry(“ht”, “Haitian Creole”), Map.entry(“ha”, “Hausa”), Map.entry(“haw”, “Hawaiian”),
Map.entry(“he”, “Hebrew”), Map.entry(“hi”, “Hindi”), Map.entry(“hmn”, “Hmong”),
Map.entry(“hu”, “Hungarian”), Map.entry(“is”, “Icelandic”), Map.entry(“ig”, “Igbo”),
Map.entry(“id”, “Indonesian”), Map.entry(“ga”, “Irish”), Map.entry(“it”, “Italian”),
Map.entry(“ja”, “Japanese”), Map.entry(“jv”, “Javanese”), Map.entry(“kn”, “Kannada”),
Map.entry(“kk”, “Kazakh”), Map.entry(“km”, “Khmer”), Map.entry(“rw”, “Kinyarwanda”),
Map.entry(“ko”, “Korean”), Map.entry(“ku”, “Kurdish”), Map.entry(“ky”, “Kyrgyz”),
Map.entry(“lo”, “Lao”), Map.entry(“la”, “Latin”), Map.entry(“lv”, “Latvian”),
Map.entry(“lt”, “Lithuanian”), Map.entry(“lb”, “Luxembourgish”), Map.entry(“mk”, “Macedonian”),
Map.entry(“mg”, “Malagasy”), Map.entry(“ms”, “Malay”), Map.entry(“ml”, “Malayalam”),
Map.entry(“mt”, “Maltese”), Map.entry(“mi”, “Maori”), Map.entry(“mr”, “Marathi”),
Map.entry(“mn”, “Mongolian”), Map.entry(“my”, “Myanmar”), Map.entry(“ne”, “Nepali”),
Map.entry(“no”, “Norwegian”), Map.entry(“ny”, “Nyanja”), Map.entry(“or”, “Odia”),
Map.entry(“ps”, “Pashto”), Map.entry(“fa”, “Persian”), Map.entry(“pl”, “Polish”),
Map.entry(“pt”, “Portuguese”), Map.entry(“pa”, “Punjabi”), Map.entry(“ro”, “Romanian”),
Map.entry(“ru”, “Russian”), Map.entry(“sm”, “Samoan”), Map.entry(“gd”, “Scots Gaelic”),
Map.entry(“sr”, “Serbian”), Map.entry(“st”, “Sesotho”), Map.entry(“sn”, “Shona”),
Map.entry(“sd”, “Sindhi”), Map.entry(“si”, “Sinhala”), Map.entry(“sk”, “Slovak”),
Map.entry(“sl”, “Slovenian”), Map.entry(“so”, “Somali”), Map.entry(“es”, “Spanish”),
Map.entry(“su”, “Sundanese”), Map.entry(“sw”, “Swahili”), Map.entry(“sv”, “Swedish”),
Map.entry(“tl”, “Tagalog”), Map.entry(“tg”, “Tajik”), Map.entry(“ta”, “Tamil”),
Map.entry(“tt”, “Tatar”), Map.entry(“te”, “Telugu”), Map.entry(“th”, “Thai”),
Map.entry(“tr”, “Turkish”), Map.entry(“tk”, “Turkmen”), Map.entry(“uk”, “Ukrainian”),
Map.entry(“ur”, “Urdu”), Map.entry(“ug”, “Uyghur”), Map.entry(“uz”, “Uzbek”),
Map.entry(“vi”, “Vietnamese”), Map.entry(“cy”, “Welsh”), Map.entry(“xh”, “Xhosa”),
Map.entry(“yi”, “Yiddish”), Map.entry(“yo”, “Yoruba”), Map.entry(“zu”, “Zulu”)
);
### How does it work and is it free ?
_xTranslate is 100% and uses the offical `GOOGLE TRANSLATOR API`_
Xtpa
Xtpa is an innovative teleportation plugin for Minecraft designed to enhance player interaction and navigation. With Xtpa, players can easily send and accept teleport requests, creating a more connected gameplay experience.
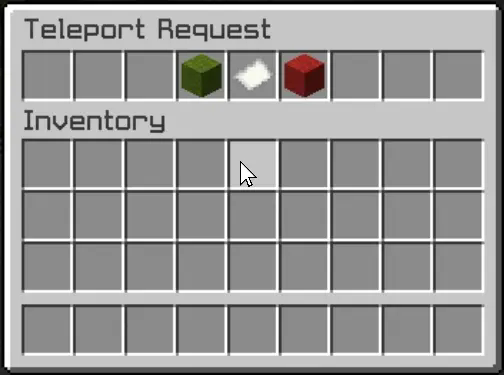
One of the standout features of Xtpa is the TPA GUI. When a player receives a teleport request, they can click on a simple button to open the GUI, which provides a clear and intuitive interface. This GUI includes:
– Accept Button:
A green wool block that allows players to accept the teleport request effortlessly.
– Warning Message:
A paper item labeled “!!warning maybe a tp trap!!”, alerting players to the risks associated with teleportation.
– Cancel Button:
A red wool block that enables players to cancel the teleport request if they choose not to accept it.
This user-friendly design not only makes the process of accepting or rejecting requests straightforward but also adds an engaging visual element to the experience. Players can quickly make decisions without cluttering their chat with commands, making teleportation seamless and efficient.
Xtpa integrates seamlessly with LuckPerms, allowing server owners to manage permissions easily. The following commands and permissions are included:
– Commands and Permissions
/tpa [playername]
Permission: xtpa.tpa
Description: Send a teleport request to another player.
/tpahere [playername]
Permission: xtpa.tpahere
Description: Request another player to teleport to your location.
/tpaccept [playername]
Permission: xtpa.tpaccept
Description: Accept a teleport request from another player.
/tpcancel [playername]
Permission: xtpa.tpcancel
Description: Cancel a teleport request.
/tpatoggle [on/off]
Permission: xtpa.tpatoggle
Description: Toggle TPA requests on or off for yourself.
/tpagui [requester]
Permission: xtpa.tpagui
Description: Open the TPA request GUI for accepting or canceling requests.
– Conclusion
Overall, Xtpa aims to enrich the Minecraft community by providing a smooth and enjoyable teleportation system that players will love to use. With its intuitive GUI and robust permission management through LuckPerms, Xtpa is the ideal solution for any Minecraft server looking to enhance player connectivity.
xTokenSMP
—
# 🌟 xTokenSMP – Power of the Mobs in Your Hands
**Unleash 20 Custom Mob Tokens with Unique Abilities and Visual Flair!**
—
## 📖 Overview
**xTokenSMP** is a premium Spigot plugin that introduces a new dimension to survival gameplay through **20 unique mob-themed tokens**.
Each token grants a **special ability**, activated with **Shift + Right Click**, and comes with **immersive visual effects**, **custom models**, and a sleek in-game GUI.
—
## 🧩 Features
* 🧬 **20 Unique Mob Tokens** – Each with its own gameplay-enhancing ability
* 🎨 **Custom Model Data Support** – Seamlessly integrate with your resource pack
* 🎁 **First-Join Bonus** – Random token granted to new players
* 🖼️ **Built-in GUI** – Browse and interact with tokens easily
* ✨ **Animated Particle Effects** – Triggered when holding specific tokens
* 🛠️ **Admin Controls** – Manage tokens, players, and features with ease
—
## 🛠️ Installation
1. Drop `xTokenSMP.jar` into your server’s `/plugins` folder
2. Restart your server
3. *(Optional)* Configure via `/plugins/xTokenSMP/config.yml`
4. Use a resource pack that assigns **Custom Model Data 1001–1020** to PAPER items
[Texchure Pack](https://drive.google.com/file/d/1BZ6vAKc7avnfbICXwTCwLKXDtwvZbQCn/view?usp=sharing)
—
## 💬 Commands
| Command | Description | Access |
| —————————— | ——————————– | —— |
| `/tokens` | Opens the token GUI | Player |
| `/token give ` | Gives a specific token | Admin |
| `/token give all ` | Gives all 20 tokens | Admin |
| `/token trust ` | Adds player to trusted list | Admin |
| `/token untrust ` | Removes player from trusted list | Admin |
| `/token clearjoin ` | Clears first-join reward status | Admin |
| `/cooldown ` | Toggles cooldown for a player | Admin |
—
## 🔐 Permissions
| Permission | Description |
| —————— | ——————————– |
| `xtokensmp.player` | Grants access to player features |
| `xtokensmp.admin` | Grants access to admin commands |
—
## 🧪 Token Abilities (Top 5 Examples)
| # | Token | Ability | Effect | CMD |
| – | ———– | ————— | ————————————- | —— |
| 1 | 🧟 Zombie | Undead Vitality | Heals 6 hearts + poisons enemies | `1001` |
| 2 | ☠️ Skeleton | Arrow Shooter | Fires 300+ arrows in all directions | `1002` |
| 3 | 🕸️ Spider | Web Trapper | Climb walls + place cobwebs | `1003` |
| 4 | 🐖 Pig | Hog Heal | Heal + Saturation II + dig 5×5×5 area | `1004` |
| 5 | 💣 Creeper | Mega Detonator | Huge explosion with block break | `1005` |
—
## 🎨 Resource Pack Integration
This plugin requires **Custom Model Data (CMD)** from **`1001` to `1020`** using **PAPER** as the base item.
Make sure your resource pack includes textures for each CMD to visually represent the tokens.
—
## 👤 Author
**GodXPro**
📬 **Discord**: `godxpro.exe`
—